Take down. That is by far the most unique set-up I have ever seen and I hereby nominate it for an award for being such. Would be great for handicapped person too. Roettger, Arrrrrghhhhhhssshhhhaaaa! Look at all those tools in one place! Must......order......more...... Tooools. Excuse me. Got carried away for a second. Nice use of space also,
silverchip, we need to form a support group. You have the latest engraving gizmo also. You're sick and need help. I love machine tools too and have a few.
Well, like I said the rest of the shop is machine tools,Screw press fly wheel presses ,torches,buffing room 3-D pantograph ,you Know, the usual baggage that comes with the disease!!!!!
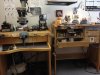
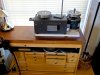
I recently put a new top on my engraving bench, and before it gets messed up, I took some photos of my setup.
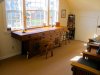
I have a full workshop nearby, for my flute making, so have my engraving bench set up in a family friendly upper attic, that has elbow room, my wife and I can then at least be shoulder to shoulder, as we usually have to stay busy into the late evenings working on our separate tasks. I wanted my engraving and drawing benches to fit into the 'mission style' of our room. We look out over the Pacific, and face into its cold winds and storms, yet if there is an occasional good sky, we are there to see it. I try to keep everything relatively tidy, but not normally as tidy as this shows, when the chips are flying.
Notice I have too many air assist hand pieces, as well as hammer/chisel and push. They all work fine. I have confessed before that, as a tool maker, I have a weakness for collecting interesting tools, and enjoy their differences. Lest you think I am a man of means, I have worked seven days a week most of my life, until late at night, and cannot afford to retire.
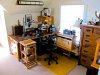
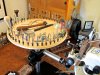
Don't laugh at my revolving high rise restaurant on top of my scope stand, at least not until you try it, for easy selection of individual gravers right in front of your eyes, and yes, it is a 'lazy susan' from Ikea, priced $8.
Another Ikea idea is that small fluorescent lamp. Price about $28. Throw away the stand and keep the lamp. I mount mine with some hobby shop brass and round bar. You now can use it with pleasure without banging into all that anglepoise framework. It will easily move to the best lighting effect upon your workpiece. Never have only one source of light! If you are forced to have only one light, it must be a flat light source, rather than a point source. A ring light for the scope is good and useful, but that Ikea long light gives an excellent alternative from time to time, as it can be angled.
Note also my wee invention of a tiny red laser dot that points always at the revolving axis of your turntable. If you are working on, say, a big bright cut buckle, you can set any element directly on the axis in seconds, you can sweep the scope right out of reach and do hand work, then pull the scope into line in seconds, the red dot can be focused, calibrated, or simply switched off. Make your own for about $7.
Notice the standard tool chest supporting the sharpening hone setup. Cut out the front of the top section to get a felt lined shelf to hold your laps ready to change.
Arms engravers can yawn here, as it is obviously not a set up for long rifle barrels, but for those who do small canvases and wide rings, as I do, it works well.
My big drawing "alter" by the west window allows me to have computers, printer, scanner, and lots of drawings all nicely stashed, or pulled out and into action in moments.
I liked your workbench, and of course your hobo nickel web!
Thank you, Steve,
I have not engraved anything on this recently replaced bench top, it is just awaiting the finish drying, so worth a clean photo for memory lane. There are three levels of mess in my system, the relatively clean bench you see looking its best today only, downstairs in my outbuilding I have a small noisier situation containing that MicroMark bandsaw that JJ liked the look of, plus a sanding belt/disc, tool grinder, and small hand lathe with a chuck for misc. tools. I also do my glass bead shot blasting in the back yard without a containing box, remembering not to pee into the wind, and that works fine. Then at my flute workshop, everything imaginable for a one person flute making shop where I can really make a mess! Coming home looking like a coal miner, if I have been working with ebony, hair filled with wood and metal chips, it is kind of a relief to face a clean bench for at least part of the day, or should I say evening.
Wow. I'm floored. I love the style of woodwork. You have made a great space for yourself. That is quite a collection of handpieces also. I will officially go on record admitting jealousy. It show reals thought and a great deal of personalization. I think I see a rack for smoking pipes used for a rotating graver caddy? There is a lot of great ideas in there. The microscope stand lazy susan is a great way to keep the table top clear. Love all the drawers to squirrel everything away. I'm sure it doesn't always look like this like you said, but I'll bet everything has a place. Thanks for sharing.
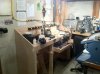
Not as impressive as Rod, but here's my new bench. I built it this weekend. I had outgrown the usage of the commerically made small bench I was using. I used Oak plywood, oak boards to trim out certain areas and regular 2x4 to build out the supporting framework. It's pretty sturdy and plenty of room for now!
The other is my cnc area where I cut wax models for my jewelry manufacturing. Not in the picture is a bunch of other stuff like a small lathe, drill press, band saw, ect....
That is a sturdy bench and will work well. I see by your equipment you are obviously well experienced in your trade!
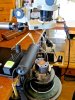
Dale sent me a PM asking about my graver sharpening bench seen in a photo, and I told him I would answer here:
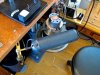
The first obvious thing is, what is that second motor doing alongside the GRS power hone? It is used to do rapid hogging of a new graver blank. If I were starting from scratch, Tom White's power hone comes with different speeds. I have tried it in Dave London's shop, and it works very well, so think about supporting Tom, unless you are cash strapped, or maybe like me you enjoy throwing a few things together for the fun of it. The second motor is a low horse power 112 volt induction motor with a half inch shaft of a type you can find in many tool bone yards, and probably get a surplus used one for a buck or two from your heating engineer, as they are used to drive the air blower in forced air duct home heating. Sit it upright, and add a disk support (GRS) to the shaft that will accept a 280 grit rough diamond lap ...the thin ones will work fine and are less expensive. A chunk of wood will get the hone surface up level with the GRS power hone, fine tune the height by adding sheets of paper, and glue it all up. Throw away the capacitor that is on the motor, and use your finger to give a spin to the motor in the direction you want it to revolve. With your finger released, start the motor switch. It will go in the direction you have spun it, so you have a reversing choice. Do not do this finger spin start on big HP motors, they might throw you through the window, but smaller motors are fine. With both hone surfaces level, you can go back and forth from high speed hogger to slow speed precision finishing, using the GRS universal fixture. I also have the Lindsay template system, and it can be used with this arrangement, all that is necessary is to take the block of aluminum that is parked on the side of the power hone, and place it on the top surface. It has some magnets on its lower surface and holds firm. The top of the aluminum block is now half and inch below the hone surfaces, just where the Lindsay System needs it, so I am set up to use both systems.
It is a good idea to attach a few small super magnets to the inner surface of the hones, even on the graver being sharpened, they will catch a good amount of iron filings coming off the sharpening process.
Notice the demagnetizer attached to the end of the power hone. It is the stator of a $10 bathroom fan motor, with a push button switch, and placed right where you want it. Press the push switch, dip the graver into the now empty core of the stator, and withdraw it to demagnetize.
Look at my picasa site for details on the laser centering guide, and other things:
Great info. I enjoyed your picasaweb link also. Anyone who hasn't seen it, I highly recommend it. Beautiful work you do there. Seven lathes? You can never have too many of those, especially if you make cylinder shaped objects. I only have three. Thanks for sharing. I like your style Rod.
Rod
great looking bench and great made desk. The drawing desk I love it,great wood and style. How does work for you as a drwaing work place when you cant get your legs under it.
Thanks for the answer on the extra hone.