Leonard, did Jesus use those mills? They might have used them to make jewelry in Bethlehem. Good tools to still be in service after all these years. Thanks for all of the great advice everyone!!!!! I will get my order in and let you know how this goes. Seth
Sometimes I wish I were like some people on this forum that just engrave. As you know Seth, this is an endless tool purchase game. Then I read a post about the guy looking for brass blanks for bracelets. I would not want to be in that position. There is alot of satisfaction when you shape the metal into a design. Oh umm Seth, Jesus said hi.
What are we looking at there. Looks green, nice, and plumb full of Santa's wearing race stickers. A Santa marathon? You sneek off down south when no one was looking?
Leonard, you better get to teaching that kid the trade because he is going to have the coolest tools to start with. Heck, that kick press will probably be good for another 100 years, unless someone mistakenly hauls it in for scrap.
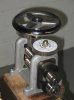
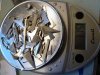
Seth, I agree. If you didn't have to buy the tools it would be a little more profitable. Here are some pictures of some simple dies that I use in the kick press.
Really nice!:thumbs up: Are you making your own RT cutting dies or do you have Shell Tech( Dar Shelton) make them for you? If you are doing your own RTs do you harden and temper them your self? Was the press made buckle blank, the one still with the sheetmetal flange blanked out on the kick press or a hydrallic press?
Hope you don't mind nosy:I've got a peck of it!
thanks for the photos too!
mike
The cutters are 01 oil hard stock. I cut them with a hacksaw and I do not heat treat them. They last forever just cutting sterling. The buckle was domed in the kick press.
That's some pretty cool equipment... I've thought about making some pancake dies like the one shown above....
Another note about making your own sheet.... if there is ANY dust or debris on the rollers or the stock, it will be pressed into the sheet. It might not be apparent until you go to put a finish on the piece... it will really show up with a mirror finish, and will still be apparent with a brushed finish too.
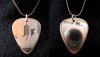
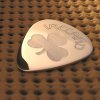
...then again you can use this to your advantage... here are some different roll prints that I've done with my rolling mill and some cutouts in paper...
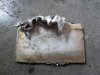
Anyway, I made poured 5 ingots today. The first one was a disaster because I didn't have the mold hot enough. The second and third ones turned out alright, but I overshot my pour and didn't get a good sprue thingy, but they worked fine and I rolled them out into some 10 guage sheet. The last two pours were textbook and worked great. I rolled one into 16 guage sheet and only had to anneal once during, and once when done. I am going to make the sprues into wire or something.
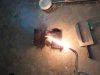
The second picture was melting the boric acid to coat the ceramic crucible. It was weird stuff. The third pic was coating the mold and c-clamp with acetylene soot.
Lessons learned:
1. Practice pouring ahead of time with water until you get good.
2. Keep ingot mold sooted as possible with acetylene or the silver will stick.
3. Keep ingot mold hot as heck with second torch ( this was a huge help).
4. Make sure you have an adequate oxy/acetylene torch.
5. Don't quench too soon with argentium or you will crack your ingot.
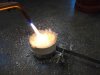
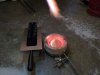
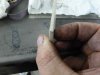
Here are some more. The first was more coating with boric acid to get a glass finish on the crucible. The second pic was right before I poured. I stirred a lot with my quartz stirring rod with a pinch of boric acid. The third pic was my 3rd pour, and you can see how I had the second torch laying on it's side and it was used strictly to keep the mold hot. This worked very well. The first two ingots weren't that pretty as I had a difficult time hitting the hole for some reason.
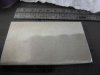
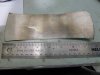
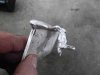
And more.... The first pic is with the sprue thing cut off, pickled, and ready to roll. The second is the width (around 3.5 mm), and the 4th is 16 guage sheet rolled out. Please, if you have advice in this matter please share. THANKS FOR THE HAND EVERYONE!!!!!!!! HAPPY NEW YEAR!
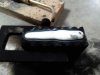
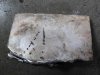
Here are some more pics. The first pic was my second cast, and as you can see I quenched it too fast and had a crack in the middle. I cleaned it up some and rolled it out a couple of times to see where the crack was and then cut it out. That left me with 4 workable small pieces to work with on that one. The second pic is where I got too crazy pouring in and ran it over the side of the mold. It ended up being a very good ingot. The last pic is another where I ran over the side again because I had too much silver in the crucible. Rookie move.
Hey Seth, Looks like your on your way to becoming a true silversmith!!! One piece of advice is to make sure your metal is quite liquid when you pour it into the mold.Keep the heat on it while pouring.
I made a bracelet yesterday with scrap silver,Rolled it out to about .100 before annealing,then finished at .052 to keep some spring in it.
I know you like to shoot so I was surprised to see you missed like that!!!