Question: Making silver sheet.

eastslope

~ Elite 1000 Member ~
Joined
Jan 16, 2008
Messages
1,008
Location
Conrad, MT
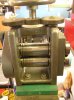
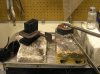
Anyway, silver hit 30 dollars today and I am motivated to make my own sheet using my stockpile of small scraps. I just bought a nice rolling mill and I need to purchase an ingot mold and a ceramic cup thing to melt the silver in. I have an oxygen acetylene torch and will be using Argentium silver..

????Are the steps as follows????:

1. Melt the silver in the cup with the torch set with a reducing flame.

2. Soot up the inside and preheat the ingot mold.

3. Pour silver into ingot mold and let cool.

4. Let sit in pickle for awhile to clean up.

5. Roll into sheet periodically annealing.

Any advice is welcome and I thank you for reading this. Also, any advice as to what brand ingot and ceramic cup items are better? Thanks again, Seth
 

qndrgnsdd

Elite Cafe Member
Joined
Sep 30, 2007
Messages
163
Location
Bellingham WA
be sure to get a closed ingot (open on one end only) rather than an open mold you will be much happier with the results. Watch the edges of the ingot as you roll carefully for tiny cracks, then anneal.
 

silverchip

~ Elite 1000 Member ~
Joined
Jun 1, 2007
Messages
1,877
Location
Fishermans Paradise,Idaho
Seth, I'm with you on this Idea. Make sure you buy the best you can, there are a lot of cheap rolling mills out there and it won't take long for you to make it worth your while.I think that the major benefit to having a mill is that you can have what you want today and you get more mileage out of the silver or gold that you already have .I make a lot of wire and sheet for myself for those reasons.
 

diandwill

Elite Cafe Member
Joined
Aug 10, 2008
Messages
864
Location
Eastern, Washington State
Seth, I'm with you on this Idea. Make sure you buy the best you can, there are a lot of cheap rolling mills out there and it won't take long for you to make it worth your while.I think that the major benefit to having a mill is that you can have what you want today and you get more mileage out of the silver or gold that you already have .I make a lot of wire and sheet for myself for those reasons.

AMEN to this. I bought a "cheap" mill off of e-bay, made in India. The rollers were cast and showed cracks, and did in fact crack. The seller took it back even though his suppliers wouldn't cover it. They were sure it was me.
Then I bought a Dunston. British made. It's a dream. Wide enough flat to roll buckle sheet, square grooves to facilitate pulling wire and a 5x reduction gear. It cost over twice as much, but it will last for my life time and beyond.

Will
:beerchug:
 

eastslope

~ Elite 1000 Member ~
Joined
Jan 16, 2008
Messages
1,008
Location
Conrad, MT
Already bought the Durston and have it bolted down. Just have to get the other stuff and make it happen. Thanks for the advice!:)
 

AndrosCreations

Elite Cafe Member
Joined
Jul 14, 2010
Messages
464
Also, don't forget about measuring the maximum thickness your mill can handle. I have a Durston but it can only handle something like 4 to 6 mm thickness (can't remember)... so don't pour your ingot thicker than the mill will be able to accept.

I still can't believe silver... It was like $10/$11 bucks at the beginning of 2009.... Now $30. Many thanks to the printing presses that must run non-stop thanks to the fed. I hear that Bernanke is going to pump another $600,000,000,000.00 (yes, that many zero's) into the economy.

Hyper-inflation... the only thing I'm looking forward to is being able to pay off my mortgage with devalued dollars. :beat up:
 

diandwill

Elite Cafe Member
Joined
Aug 10, 2008
Messages
864
Location
Eastern, Washington State
[
I still can't believe silver... It was like $10/$11 bucks at the beginning of 2009.... Now $30. Many thanks to the printing presses that must run non-stop thanks to the fed. I hear that Bernanke is going to pump another $600,000,000,000.00 (yes, that many zero's) into the economy.

Hyper-inflation... the only thing I'm looking forward to is being able to pay off my mortgage with devalued dollars. :beat up:[/QUOTE]

But how many people can afford $2000.00 for inside ring engraving? LOL
:beerchug:
 

AndrosCreations

Elite Cafe Member
Joined
Jul 14, 2010
Messages
464
"But how many people can afford $2000.00 for inside ring engraving? LOL"

Hah, that's one of the many downsides... "my house is paid for but my electric = $3,500.00, property tax = $5,000, Winter gas bill = $7,000... etc..." :beat up:
 

John B.

Lifetime Pledge Member
::::Pledge Member::::
Joined
Nov 9, 2006
Messages
3,955
Location
Los Angeles area, California.
Thank you for the excellent melting, wire making tutorial, Mike.
The tutorial itself is pure gold and has some very important details.
Great photographs too.
Best regards.
 
Joined
Apr 7, 2007
Messages
24
Location
Arcata , CA
Hi Seth
You’ve got the basic sequence correct but the devil is in the details so I thought I’d send some tips along to make things easier.
1)Do pre glaze your crucible as the Cirrelli demo shows with borax and or boric acid. I like to bake a new crucible in an oven or kiln for a couple of hours to drive out any moisture that this new ceramic object may have picked up in storage ; who knows how long it may have been in storage. 500 f is usually sufficient, and then glaze. The initial flux coating need only be thin but it should cover the interior crucible surfaces that will be in contact with the metal. Reserve a separate crucible for each alloy you use.
2) Flux your melting metal a tiny bit with a Dry flux preparation( you haven’t seen trouble till you seen someone try and flux molten metal with a wet ground flux intended to be applied to cold metal for brazing) .You could use borax, boric acid or a premade commercial flux like Matt’s Casting flux (Rio Grande). I keep a little bit in an old peppershaker in my casting area. I put a small piece of non reactive stainless steel in the shaker too .This allows me to just shake the container to break up any lumps with one hand if I’ve hot metal in need of flux.
3) Pre heat all tools and mold to be in contact with the molten metal to drive off atmospheric humidity.
Preheat: A) The crucible till it glows before adding metal. A cold crucible will extend the time needed to melt and superheat the metal to pouring temperature.
B) The ingot mold to about 400 f or until oil on the mold smokes a bit (if that’s your mold release). I use acetylene soot on the surface of my mold as a mold release. Candle soot works too if you’re using Qxy /Propane. I heat my ingot mold in a large toaster oven purchased at a thrift store for about $12. Saves fuel and heats the mold evenly without condensing any water out burned fuel from a torch flame.
C) Any stir rods or other tools to drive off moisture. My favorite stir rod for most nonferrous metals is a 3/8†to ½†graphite rod which is 12†in length (If it hasn’t been dropped). I drag this preheated rod through my melt just before pouring to insure the metal is fully melted. It also will draw off but not entirely eliminate any dissolved oxygen in your metal. The solubility curve of Oxygen in Silver radically skyrockets at the melting temperature of silver. Dissolved gasses are your enemy.
4) Cut your scrap into small pieces no larger than ½“by 1/2â€. Start melting a little bit of metal at a time and add more small pieces to the growing pool in the in the bottom of your hot preheated crucible. Use flux, but sparingly a little goes a long way. Melt with a large bushy reducing flame. The surfaces of the molten metal should look clean like quicksilver with an orange glow and begin to swim a bit at pouring temperature. If it looks dirty or seems to have a skin your torch is too close, too far away, or you may need a tiny bit more flux. Pour metal into the preheated ingot mold through the flame aimed at the crucible lip. Pour continuously without a break in the flow of metal until the mold is filled including the widened entry mouth at the top of the mold. This button will be thicker in cross section and cooling last will provide as steady supply of hot metal reducing shrink age in the thinner ingot below. The thicker button also provides an area for dissolved gasses to migrate to as the ingot solidifies below. Since it cools last it will also have hopefully all of the shrinkage in your casting. I cut the button off before rolling and remelt it in another casting or ingot pour but I’ve also successfully milled it into wire. Wire production seems more tolerant of a little dissolved gas.
5) Quench your metal in water after it cools to a black heat (no longer glowing in a darkened area). I’ve been told Argentium sterling alloys are prone to hot shorting at soldering temperatures but I have not used them yet. Pickle after quenching. You want to avoid quenching in pickle because the crystal lattice of the alloy is open a bit more at elevated temperatures and while we want to use the acid for pickling we don’t want to have it penetrate the metal along grain boundaries. Rinse and dry your metal after pickling and gently warm it a bit till it’s warm to the touch. File off any flashing or sharp edges. Cut the thick button off the top of the ingot and reserve it for another use. Resist the temptation to forge it flat to make the ingot bigger. If you do forge the button on top of the ingot this area will be work hardened by the time the cross section matches the rest of the ingot and will require annealing before you move to the rolling mill for further reduction. The problem is that the unworked areas of the ingot will be subjected to grain growth at annealing temperature and be more prone to cracking during the initial phase of reduction on the rolling mill.
6) Introduce your clean dry slightly warm ingot to your rolling mill. I oil my ingot a bit, 3and 1 sewing machine oil. This also protects my rolling mill. Everything metal likes lubrication! I mark the leading edge of the ingot with sharpie felt tip pen. The ingot always enters a reduction pass through rollers from this edge. If the ingot starts to banana or curve I May flip it over side to side to correct the curve, but it still enters the mill with the marked leading edge first. I continue to mill until I reach a 30 or 40% reduction in thickness at a minimum. Then anneal. Thereafter you may take cross sectional reduction up 50% between annealing. You want o anneal before you see cracking but after significant cold working. This will keep the crystalline grain structure of your metal small. Also anneal any time you change rolling direction which presents a different leading edge of the metal to the mill rollers. Below is a link to the Durston rolling mill guide if you haven’t already found it.

http://www.durston.co.uk/lan-en/online-guide-p1-en.htm

I’m still working with the Graver mach I bought from you. Someday I’ll post when Iv’e something I’m proud of but you folks promote a high standard. IN the meantime here is my latest fabricated pendant no engraving but did alloy and mill out the 800 silver I used to create the reticulated element. I
 

Attachments

  • reticulated pendant #2.jpg
    reticulated pendant #2.jpg
    34.7 KB · Views: 94

eastslope

~ Elite 1000 Member ~
Joined
Jan 16, 2008
Messages
1,008
Location
Conrad, MT
Wow, thanks for the awesome answer and thanks Mike for the terrific tutorial!!!! Beautiful pendant also! I should be able to accomplish something with all of this, and I will be sure to post my results. Thanks again, Seth
 

qndrgnsdd

Elite Cafe Member
Joined
Sep 30, 2007
Messages
163
Location
Bellingham WA
Lots of good info there flyingmedwards! HOWEVER check with Rio or other info before using carbon rod and flux for Argentium, some fluxes contain carbon and If I remember right (i'm getting old) you are not supposed to use carbon fluxes or rods with Argentium you can get quartz rod they are a bit more$ but last forever if you don't cool them too fast, I had one that lasted at least 8 years, casting several times a week in the trade shop. I think you will find boric acid is the recommended flux. You can get boric acid at the hardware store under the name "Roach Away" It is about 1/10 the price!
 

James Roettger

Elite Cafe Member
Joined
Apr 21, 2008
Messages
242
Location
Minneapolis, MN
To preserve your mill do not quench the still warm metal in the pickle. It will suck pickle right into the surface and damage the roller face when the acid bites it later. Argentium needs to be fairly cool before quenching to prevent cracking. Be very careful not to overheat the argentium or it will be ruined. Do any quenching in clear water then pickle. Keep the mill rollers coated with a medium layer of motor oil at all times. It's messy but a marred roller will leave a mark on the silver and be a real bummer to look at. Inspect your mill after each use to be sure there are no shadow marks left from the rolling. Recoat with oil and sand any stains immediately with 600 grit sandpaper. Following these steps will keep your mill pristine for life.
 
Joined
Apr 7, 2007
Messages
24
Location
Arcata , CA
Re: making ingots with argentium

I checked the rio tech sheet for Argetium alloys (linked in to this thread by By Chris Malouf on page one ,Thanks Chris ). Under the casting section of that pdf It recommends a " A protective atmosphere,borax, boric acid flux or graphite powder are all effective." This led me to believe that there are no contra indications between carbon and germanium / silver alloys.As I alluded to In my post I've not worked with this family of sterling alloys (there are several mixes of sterling on the market now that contain germanium as tarnish retarder/ preventer). If you've had a bad reaction or experience using argentium with graphite stir rods and or carbon based cover fluxes I love to hear about it so I can avoid any similar experience.Sooner or later I know I'm bound to encounter this alloy on a repair or casting job .If it's a repair no doubt it will not be quality marked with argentium stamp (shudder):shock:.

I've a good friend who uses this alloy on a regular basis and likes being able to fuse it rather than soldering it.She however did remark that it did not like to be touched at high (near fusing) temperatures.

I considered trying it for a while but it means keeping a separate scrap bin etcetra ( translation; I'm Cheap). So I continue to endure the task of polishing away fire scale.
Let us know more about that carbon contra indication on this alloy.
thanks, mike
 
Joined
Apr 7, 2007
Messages
24
Location
Arcata , CA
re: ingots_ my equipment

Hi all,
I thought I 'd do a quick post of my mill and ingot mold for Eastslope. I've had my mill ,A Durston 130 combo mill with reduction and side rollers for 1/2 round for twenty years! (sometime i wish it would wear out so i could buy a big double roller durston but that will never happen, built like a tank). the second photo is a shot of my ingot mold and melt dish. Note the steel cookie sheet for catching any spilled metal. This style melt dish i believe is on close out with otto frei right now but you should also check out the whip style melt dishes some people really like these:
http://www.ottofrei.com/store/product.php?productid=1441&cat=1928&page=1
Unfortunatly, Otto Frei doesn't carry the the whip style handle for these lighter style melt dishes... you'd need to contact Whaley studios for one of those I guess.
Hope this helps,
mike
 

Attachments

  • my durston rolling mill.jpg
    my durston rolling mill.jpg
    65.1 KB · Views: 59
  • ingot mold and meltdish.jpg
    ingot mold and meltdish.jpg
    82.8 KB · Views: 64

Latest posts

Sponsors

Top