Making dies

vilts

Elite Cafe Member
Joined
Apr 8, 2007
Messages
512
Location
Estonia
Hello forum,

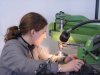
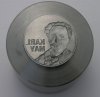
A strange thing happened. I was asked to make a die for making one medallion. Now the problem is, I've never done any dies before and I know very little about the process. Of course I told this to the customer, but he insisted that I'd give it a try at least, if it doesn't work out, then no problem, I gained experience.

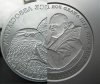
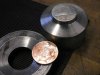
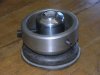
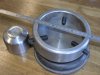
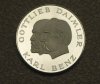
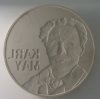
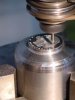
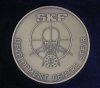
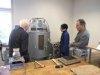
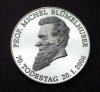
I know that it will be used on 60 ton press for silver. The die shape is 45mm (2 3/4 in) circular with probably the same height. I need to make 2 sides - obverse and reverse (I think that's what they're called).

Now the questions:
1. On what metal I have to do it? Probably something that is hardens... But use regular carbon steel, special diemaking steel or something else? Die steel that I have, D2, I think is very-very hard to engrave.
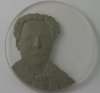
2. As I understand the images on dies have to be reversed and cut into the metal? Not like relief engraving which removes the background, but I have to "remove" the image from metal.
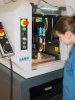
3. Which tools to use? I have engraver, of course. But as this will be quite big, probably I'd need something to help with faster metal removal? The rotary tool? Which tips?
4. How long do you think it could take time? 10 hours, 100 hours? More? Less?
5. Finishing... How smooth the surface has to be? Mirror? 2000 grit? 400?
6. Anything, ANY information you can point me to and that would help me on finishing this.

Just in case I say it again. The customer knows and I've told him that I probably can't produce good enough result, so no worries there. I just do my best and have fun with it.

Thanks!
Viljo
 

silverchip

~ Elite 1000 Member ~
Joined
Jun 1, 2007
Messages
1,877
Location
Fishermans Paradise,Idaho
Recently I decided to make dies for my own work.As long as 25 years ago I did build dies for an employer,but they were simple blanking dies,not coining dies.At that time we used O1 or graphmo oil hardening steel-very easy to work but messy haet treating and tempering processes.I started to do recearch on die steels that would engrave well and were easy to heat treat.
Well, to say the least,there are a lot of different types of tool steels-each with it's own little metallurgical Quirk.
I finally settled on A10 for the ease of being able to heat treat and temper it in my own shop with nice and clean results as well as it machines well in an anealled state.You can find the heat treating and tempering instructions on the internet as well as comanies that carry it in stock.
I had an old hub of a five pointed star 3/4" in dia. that I set up in my 50 ton screw press,with just 2-3 hits, the A10 took the impression perfectly,I then cleaned up the face of the die in the lathe and sharpened up the detail with engraving tools and heat treated it.It came out in beautiful shape as well.
I have used O1 for small coining dies as well, but for the heat treating process requires you to use an oil bath for hardening and tempering,(heat,smoke,stink,fire and acid etching the scale off and polishing out the detail)Too much work.
You could use W1 or w2 if you can find it to make a hub,( a positive image ) heat treat it and push it in to an anealled piece of tool steel to create a die and master force.Be sure that you give the master a slight taper on all outlying edges(10 degrees) in order to extract it from the die as well as lining up.
the water hardening steels are a little fickle when hardening,but they will engrave and sculpture fairly easily.
If you are doing a shrt run die and don't wish to go to all that trouble,you can engrave in reverse( in the deep) on the A10 tool steel but you will not have a master and if something went bad, you would just have to start all over .
Since you said that this might be a one off job, why don't you look into casting ??!!??
 

Martin Strolz

Elite Cafe Member
Joined
Dec 12, 2006
Messages
339
Location
Steyr, Austria
Making dies 1

Hi Vilts,

Several ways to do the job.
The classic technique is to cut the die by hand, meaning engrave it mirrored and negative using hand tools. The best tools are wide flats, slightly rounded for large areas. You can use punches and small round gravers too, onglette for details. During engraving you can melt a small amount of tin, pour it on an old newspaper and immediately push the die onto it. The tin will get solid quickly and you can collect these pieces for comparing and evaluating your progress, the depth and expression of you work. If your design is suitable for this technique, you will be surprised by the results you get. The only machine you need is lathe for making the ring and the dies.

If you have engraving machinery, you can do a model in clay (1), about 4 or 5 times larger than the final size. Then make a negative by casting in epoxy resin and mill the die using it as a model (4,5). This model can also be used on a reducing machine.

Pictures show my students and their work.
 

Attachments

  • 01 Clay model.jpg
    01 Clay model.jpg
    36.9 KB · Views: 194
  • 02 Plaster model.jpg
    02 Plaster model.jpg
    47.8 KB · Views: 195
  • 03 Scanner.jpg
    03 Scanner.jpg
    39.1 KB · Views: 197
  • 04 3D pantograph.jpg
    04 3D pantograph.jpg
    27.3 KB · Views: 220
  • 05 milling a die.jpg
    05 milling a die.jpg
    24 KB · Views: 248
Last edited:

Martin Strolz

Elite Cafe Member
Joined
Dec 12, 2006
Messages
339
Location
Steyr, Austria
Making dies 2

A more modern way is to 3D- scan (3) the plaster model (2), load the point cloud in a CAD/CAM system and recreate the surface. Then the die can be milled using a 3D CNC-engraving machine (6, 7).

Sadly nowadays there is a tendency to skip it all, designing the relief surface in a 3D-software program.
Flat 2D designs can be done completely in CorelDraw, executed with CNC technology. (8, 9)

After engraving I often create a matte finish by slightly sandblasting or etching the surface. The background is polished to high gloss finish- 2500 grit.
For dies I use cold work steel (DIN) type 1.2721, in other words 50 NrCr 13. This type contains C 0,53 %, Si 0,25%, Mn 0,45%, Cr 1&, Mo 0,2% and Ni 3,1%. It is a nice material to work in and should be vacuum hardened to HRC 58 or 59. In any case get heat treatment done by a professional! A vacuum process avoids building up oxides on the delicate surface! The surface of the background must be polished again after heat treatment.

After hardening, the die will have changed its dimensions slightly. You must rework the fit of the ring on the dies, even more so after first use because of the pressure. Clearance must only be a few hundreds of a millimeter. Otherwise metal fills the gap creating a heavy bur during minting and making it hard to get the dies apart.

I use a hydraulic press. For a copper or silver medal of 40 mm diameter you can expect needing 250 to 350 tons of pressure. (10, 11)

Best luck with your first one!
Martin
 

Attachments

  • 06 CNC milling.jpg
    06 CNC milling.jpg
    120.1 KB · Views: 174
  • 07 Steel die for medal.jpg
    07 Steel die for medal.jpg
    50.9 KB · Views: 147
  • 08 Design in CorelDraw12.jpg
    08 Design in CorelDraw12.jpg
    40.4 KB · Views: 151
  • 09 SKF medal.jpg
    09 SKF medal.jpg
    38 KB · Views: 152
  • 10 press.jpg
    10 press.jpg
    38.9 KB · Views: 191
  • 11 Medal minted in silver.jpg
    11 Medal minted in silver.jpg
    75 KB · Views: 180
Last edited:

threefingerdave

Elite Cafe Member
Joined
Feb 23, 2007
Messages
284
Location
North Idaho
Martin
Very informative
in picture # 4 where is that ladies safety glasses
the machine looks like it really throws the little chips
thanks for showing the process
i really liked it
Dave
 

Dmitriy Pavlov

Elite Cafe Member
Joined
Nov 23, 2006
Messages
108
Location
DeForest, WI
Hi, Viljo.
Call me, or Skype me.
My phone is +1 608 277 0001
My Skype name is dmitriypavlov1
My Google Talk name is dpavlov1
I have friends in the SPb Russia. I think they can sale to you special die steel 7h3
I'll try give to you answers on your questions.
 
Last edited:

vilts

Elite Cafe Member
Joined
Apr 8, 2007
Messages
512
Location
Estonia
Thank you guys for such a thorough answers and info! I've got a lot to digest now. Dmitry it was really nice to talk to you over Skype (especially over Skype, because I happen to work there ;)).

I wish I could see the die making process in real life. It looks like a very fascinating thing. Austria isn't that far from me, but still :).

You can expect more newbie questions from me soon :)

Viljo
 

Leonardo

Elite Cafe Member
Joined
Jan 9, 2008
Messages
640
Location
Cordoba - Argentina
Hi Viljo!

May be it is late now, but I see your thread today. Anyway I would like to suggest you other way to do the dies.
It is, I think, the more simplest way to do these kind of jobs and also, and more important, is totally risk free.

First you have to have a blank piece of electrolytic copper (99,9%) that is prepared to match the external shape of the die you have to do, but larger enough to be fixed by it's rear end in a EDM (Electrical Discharge Machine).

Then, you have to do the work as usually you engrave anything on the front side of the copper. The inversion will occur at the EDM machine eroding the steel.

Then you or your client, have to have the steel die blank prepared and finished (I mean machined and tempered).

After that you are ready to visit a metallurgical shop that has an EDM machine and ask for eroding the steel die with your engraved copper electrode, and that is all.

No worries about what hard the steel is tempered, and also it is possible to eroding many dies with the same electrode. I have attached some pictures of electrodes made by me. These are text/logo electrodes but it is the same, no matter what is the electrode shape, it would be reproduced on the steel surface.
Also you have here a link to know more about EDM:

http://www.engineersedge.com/edm.shtml

Hope this help!
Leonardo
 

Attachments

  • Electrodo-Ford.jpg
    Electrodo-Ford.jpg
    89.2 KB · Views: 171
  • Electrodo-ingesco.jpg
    Electrodo-ingesco.jpg
    36.9 KB · Views: 153
  • Electrodo-MB.jpg
    Electrodo-MB.jpg
    17.7 KB · Views: 149
  • Electrodo-tisa.jpg
    Electrodo-tisa.jpg
    28.7 KB · Views: 157

Steve Adams

Elite Cafe Member
Joined
Jan 2, 2007
Messages
320
Viljo,
Sorry I didn't see this sooner, I just got back into town. I engrave two and three dimensional dies plus sculpt for die reductions. This is what I do do for a living in the medallic and minting industry. I stopped counting dies about eight years ago after I got to 3,000, so I guess you could say I know a bit about the process. Please consider all advise, but if I could suggest anything it would be to keep it simple. If you are a hand man, then that is where to start. I started without the use of any machinery and did quite well using a hammer, chisels and punches. Although I use additional methods now, the hammer and chisel is the main reason why I have been successful. It doesn't hurt to walk before you run.
Are these dies collar dies or splash dies. Collar dies are used to strike a coin and the metal is confined by a collar that surrounds the two dies during the strike. Splash dies have a cavity and the excess metal flows out of the cavity during the strike, the excess is then trimmed with a trim tool.
Good die steel --- Yes, D2 is hard , Try S7, A2 or O1. If hand engraving or touching up another kind of engraving, make sure there are no undercuts or straight walls. A 15 to 25 degree draft is good for lettering or logos. A sculpted section is generally free of undercuts or straight walls, but you should still be careful.
Think of die engraving as backwards or reverse plus in the negative. You can check your work as you go with a hard clay block or silly putty. Whatever is forward in the design is worked on last. Gauge the depth you do by size of the coin, material thickness, type of material and tonage of the press. Collar dies are generally shallow like coin relief .003 to .010 and sometimes more. Collar dies are one shot, but many splash dies take multiple hits. I suggest more than a 60 ton press.
You sound like you want to keep it simple, so hand tools are okay. Although I have machinery at my disposal, I can quite easily cut a die with chisels and other hand tools. If you use a rotary, a professional flex shaft is a good choice with a variety of carbide and HSS burs. Someone will need to prepare the die steel for the press before you begin to engrave though.
Time depends on your design. If the design is complex with a lot of lettering and modeling, it could take as much as three to four days while simple designs are done in a day or less. Since you are a beginner, you may take twice the time as a full time die engraver.
Surface smoothness of the die is up to you and the effect you want to show. How will the coins be finished? You may let the coin finish be your judge. Most common finish on a die is a stoned finish where you start with 320 grit stones and work to 400 or 600 grit. After using straight motions, start using circular motions and avoid contamination from previous stones. A glass beaded finish is nice as well, some call it satin or frosted. This method follows stoning, but don't over do it. Two other finishes are proof like and full proof. This is where you stone the die as fine as you can, exceeding 600 grit with 800 and 1200 then follow that with a series of fine diamond componds to create a mirror finish on the bachground. The engraved areas remain frosted. Some follow stoned dies with a brushed compound to help eliminate stone marks.
I'll post some die photos tonight or tomorrow. If you need anything, let me know. I do not do 2d or 3D CNC, but fix their work on occasion when it needs an engravers touch. I have made electrodes for dies and know there is clean up involved afterwards. I have made hobs for die sinking, and am familar with die sinking. Making sculpts for Jan-Vier die reduction is part of my job. These dies come out pretty nice, but require some clean up as well. Manual 3D machines using models are okay if you like them, again some clean up is needed. My favorite method for dies is making a template for a Gorton P1-2 pantograph, cutting the 2D sections on the machine and assit with the modeling if I can by removing material in levels. Many die engravers in the minting industry have become pretty good at this method, producing dies faster than any other method. Since I started out with hand tools, I know dies can be done this way. You'd be amazed at what a few hand tools can do. I don't know if it is still on the forum, but the cafe interview with me shows a temple I did that came from a hand engraved die. Actual size is at least seven inches high I think. Just chisels. Steve
 

Steve Adams

Elite Cafe Member
Joined
Jan 2, 2007
Messages
320
Die photos

Viljo,
Enclosed is a split-image photograph to show samples of two dies. On the left is a collar die with shallow relief and a plain stoned background. The lettering was cut with a pantograph, the modeling was aided by the pantograph and finished on the bench. The die on the right is a splash die. You can see there is a cavity that the metal blank sits in before striking. The cavity is machined and domed slightly, the lettering is cut with the pantograph, and the figure is hand engraved. I use a pattern to scribe lines on the die to indicate where the figure is and the detail within it. I then use a hammer and chisel to start engraving the figure. As I remove more metal from the die, I can then re-indicate detail as I get closer to the image I want to create. It's just a gradual process of indicating detail with scribe lines, sculpting with my hammer and chisel, indicating again, chiseling again, etc, etc. until the figure is done. The idea is to make the figure look sculpted and for there to be no difference between a sculpt reduced die and a handcut die. The back ground on the splash die (on the right) is the glass bead finish. The same finish is on the figure. Relief for this splash die is approximately .055.
 

Attachments

  • die example.jpg
    die example.jpg
    115 KB · Views: 173
Last edited:

Rick Eaton

Elite Cafe Member
Joined
Nov 9, 2006
Messages
114
Location
Broadview, MT
Steve,
Great work, you said you liked the Gorton
[QUOTEMy favorite method for dies is making a template for a Gorton P1-2 pantograph, cutting the 2D sections on the machine and assit with the modeling if I can by removing material in levels.][/QUOTE]

I would be very interested in the type of cutters you use for this machine and what you use for your template material.
I have a Gorton P2-3 which is capable of 3d work but I've only used it for 2d. Any help would be great.
Thanks
Rick
 

Steve Adams

Elite Cafe Member
Joined
Jan 2, 2007
Messages
320
Rick,
I use micro grain carbide in 1/8, 3/16 and 1/4 on the P1-2 Gortons, all split and sharpened on my Gorton models 265 or 500 as single flute cutters. I have some HSS cutters, but I only use them for roughing occasionally. Template material is clear rigid vinyl around .033 thick for lettering, logos and modeled areas. Photopolymer patterns are good for lettering and logos and will save some time vs a hand cut pattern.
 

John B.

Lifetime Pledge Member
::::Pledge Member::::
Joined
Nov 9, 2006
Messages
3,956
Location
Los Angeles area, California.
Hello Martin.
Thank you for your knowledgable input on this subject.
Your link to the Antares site is very interesting.
I have enjoyed reading the great input by all the diemakers in this thread.
Thank you all for sharing your expertise.
Best, John B.
 

Rick Eaton

Elite Cafe Member
Joined
Nov 9, 2006
Messages
114
Location
Broadview, MT
Steve and Martin,
Thanks for the info, I've never used my gorton to the capasity it is capable. I'll have to experiment a little.
Thanks
Rick
 
Joined
Aug 1, 2007
Messages
22
Location
Fairmont, mn
Wow, I piddle around making medieval coins. But it's all a hammer and punch sort tof thing. No pantographs or 3D software.

None of my coins are struck in large numbers. 2,000 being the biggest run so far. So I just cut the dies from 1" cold rolled 1018. I do polish the dies down to 1,500 grit before I start marring the surface. And instead of a hydraulic press it's my trusty 6 pound sledge with a handle cut down to about 18" long.

But they are incrediably crude compared to the stuff you folks are doing.

http://www.bsaxton.com/summer07.jpg
 
Last edited:

vilts

Elite Cafe Member
Joined
Apr 8, 2007
Messages
512
Location
Estonia
As I don't have access to any of this fancy equipment you guys are talking here about, then it seems that for me, if at all, it will be totally handmade.

After looking at the examples you people have posted here I thought I'd like to try diemaking anyway, even if it doesn't work out with this guy. Coins with my own name would be a good start...

Which leads me to another question. How do you calculate the pressure that is needed for diemaking? Martin said that for die that has 34mm diameter I should need about 250 ton press. But lets say I have 20mm die? Is there a specific equation for calculating that? And it probably does matter which material is used, copper, silver, gold...

It is totally amazing which knowledge is available in this forum. Thank you guys so much!

Viljo
 

Martin Strolz

Elite Cafe Member
Joined
Dec 12, 2006
Messages
339
Location
Steyr, Austria
Minting process

Steve,
thank you. Very interesting to read!

Viljo,
Yesterday we made a series of medals in copper using the hydraulic press. I took the chance and recorded a video of the process.
First the collar is put onto one die and then a round piece of copper is put into the collar. Together with the upper die it went into the press checking orientation of the dies. The power was limited to 150 tons, just enough for making this 40 mm diameter medal. The copper was annealed in order to keep the force down low. Disassembling takes light use of a plastic hammer. To push the medal out of the ring requires a padded stamp and several hits of a heavy hammer or the use of a spindle press. Here is the link http://www.youtube.com/watch?v=X0Zy6zhaA0s
The pictures show the finished medal and one of our special “die engraving ballsâ€￾. The diameter is about six inches.
 

Attachments

  • 01 Collar, die and medal b.jpg
    01 Collar, die and medal b.jpg
    53.8 KB · Views: 67
  • 02 Finshed medal.JPG
    02 Finshed medal.JPG
    176.4 KB · Views: 58
  • 03 Special die engraving ball 1.JPG
    03 Special die engraving ball 1.JPG
    72.3 KB · Views: 65
  • 04 Special die engraving ball 2.JPG
    04 Special die engraving ball 2.JPG
    97.9 KB · Views: 62
  • 05 Daimler Benz.jpg
    05 Daimler Benz.jpg
    82.8 KB · Views: 63

vilts

Elite Cafe Member
Joined
Apr 8, 2007
Messages
512
Location
Estonia
Wow. Thank you so much Martin for going through the trouble of filming, photographing and posting!

Now all I have to to is find a 200 ton press lying somewhere around...

A question about the press. Does it have to be a slow press like you use on the video, or could I use one that is.. umm, faster. I don't how it's called, but basically it has a huge wheel spinning fast and then the wheel's inertia is used to cut, press or do whatever needed with enormous power. I could possibly use one of those, but I suspect it's no good for this purpose?
 

Latest posts

Sponsors

Top