Graver Geometry - Color Lines?

vondershred

Member
Joined
Feb 21, 2024
Messages
32
Hey y’all, it’s me again!

Quick question about graver geometry. After some digging on Youtube and this forum I’m led to believe that graver geometry plays a huge part in the colour of the lines you engrave. Can someone confirm?

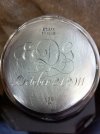
I learned how smaller the angle for instance a 60 degree angle makes the lines bright and shiny, whereas a 120 degree angle results in dark lines. Makes a lot of sense since I did my fourth practice plate yesterday with a flat 0.4mm graver (no angle) and all the lines are bright (see picture). All my previous practice plates are like this too, since I only have flat gravers at my disposal for now.

Up until now I thought there was no connection and all lines with all graver angles are bright and you have to ink them to make ‘em black, but I saw lots of Sam Alfano’s vids where the lines are black-ish when fresh cut and he sometimes mentions he likes the 120 degree gravers best. This is more the look I’m after. This would also eliminate the need to make a mess with black enamel paint. Tried that yesterday and boy did it suck. I know now this technique is rather used for filling removed background rather than fill lines, the lines being black already when fresh cut.

Also, does the type of metal make a difference too? Engraving on aluminum now…

Thanks guys,

Tristan.

IMG_6815.jpeg
 
Last edited:

alwayslearning2012

:::Pledge Member:::
::::Pledge Member::::
Joined
Aug 24, 2012
Messages
44
Location
Louisville, KY, USA
I like the design. You say you've been cutting for HOW long?

When I look at this piece, .... well.... I wish I could be as consistent in depth and width as you are.

And with a flat graver, you say, because "that was all they had".

The plot thickens.

I have spoken.

AL12
 

vondershred

Member
Joined
Feb 21, 2024
Messages
32
Hello,

Just read your private message so gonna answer that here too. You don’t need my permission for the image: I got it from Google myself. Just searched for “esoteric sun” and there it was. I really hope to draw stuff like this from my mind’s eye one day.

I really like medieval, occult, esoteric, witchcrafty art you see on tarot cards etc. Skeletons with scythes and dancing frogs and cauldrons and demons and what have you. Artists like Albrecht Dürer and Gustave Doré really sparked my fascination with engraving years ago.


When I look at this piece, .... well.... I wish I could be as consistent in depth and width as you are.
Thanks for the compliment, but I really don’t think it’s that good. This one goes right into the practice plate bin. If there’s any level of consistency it might be thanks to years of drawing in Illustrator and Procreate, I guess. I think that helped…

Tristan.
 

AllenClapp

Elite Cafe Member
Joined
Aug 7, 2019
Messages
381
Location
Raleigh, NC
Perhaps I am misunderstanding you. The higher grit used on the graver heel, or higher polish if polished, will make the cut surface be more smooth and, thus, more reflective. If I am correctly viewing this photo, you are holding your flat graver with the heel surface more horizontal than the side of the flat graver. This produces a steep side of the cut on the side of the flat graver [which does not reflect light to the eye easily] and a relatively horizontal cut on the heel side of the flat graver [which produces a wide surface that will reflect more light to the viewer]. As to vee angle, the flat graver is essentially a 90 degree graver with a heel on only one side. I think your conclusion as to which vee angle produces a shinier cut is backwards. Narrow vee gravers held erect produce a narrow, deep channel that both receives less light on the sides of the cuts and reflects less light back to the veiwer. Wide vee gravers held erect allow more light into the shallower cut and better reflect light back to the viewer. No matter what the vee angle of the graver, if the heels are highly polished they will produce a shinier cut than another vee graver of the same angle whose heels are less highly polished. Any vee graver, if tilted to one side, will produce a less reflective side of the cut on the steep side and a more reflective side of the cut on the shallow side. The greater the tilt from vertical, the greater is this effect. The amount of light reflected back to a viewer is a function of graver polish, the angle of the sides of the cut, and the width of the sides of the cut. Deeper cuts have wider reflective sides than shallow cuts. Steep sides both get less light above and reflect less light back to the viewer [because the light gets reflected to the side].
 

vondershred

Member
Joined
Feb 21, 2024
Messages
32
Perhaps I am misunderstanding you. The higher grit used on the graver heel, or higher polish if polished, will make the cut surface be more smooth and, thus, more reflective. If I am correctly viewing this photo, you are holding your flat graver with the heel surface more horizontal than the side of the flat graver. This produces a steep side of the cut on the side of the flat graver [which does not reflect light to the eye easily] and a relatively horizontal cut on the heel side of the flat graver [which produces a wide surface that will reflect more light to the viewer]. As to vee angle, the flat graver is essentially a 90 degree graver with a heel on only one side. I think your conclusion as to which vee angle produces a shinier cut is backwards. Narrow vee gravers held erect produce a narrow, deep channel that both receives less light on the sides of the cuts and reflects less light back to the veiwer. Wide vee gravers held erect allow more light into the shallower cut and better reflect light back to the viewer. No matter what the vee angle of the graver, if the heels are highly polished they will produce a shinier cut than another vee graver of the same angle whose heels are less highly polished. Any vee graver, if tilted to one side, will produce a less reflective side of the cut on the steep side and a more reflective side of the cut on the shallow side. The greater the tilt from vertical, the greater is this effect. The amount of light reflected back to a viewer is a function of graver polish, the angle of the sides of the cut, and the width of the sides of the cut. Deeper cuts have wider reflective sides than shallow cuts. Steep sides both get less light above and reflect less light back to the viewer [because the light gets reflected to the side].
Hey Allen,

Thank you for taking your time to post this lenghty reply. It will take me a couple of re-reads to fully understand as I started engraving only two weeks ago.

In the meanwhile, here’s a Youtube video I found that kind of explains of what I’m trying to ask. The way I understand this, is that how wider the angle of graver the darker the cut:


Thanks again,

Tristan.
 

dhall

:::Pledge Member:::
::::Pledge Member::::
Joined
Jan 1, 2008
Messages
144
Location
San Diego, California
I'm pretty sure Allen encapsulated the idea very well.

With all due respect for Chris DeCamillis, whose video you're referencing, I'm going to have to come down on the side of science regarding the physics of light. The overarching concept here is that the angle of incidence equals the angle of reflection. If a light source hits a reflective surface at a 45 degree angle, it will reflect back at its reciprocal 45 degree angle, or 135 degrees. If a light source is pointing straight down at any reflective V-cut wherein either wall of the V is not perpendicular to the light, it will not reflect the maximum amount of light straight back. I call this phenomenon the "roach motel for light - the light goes in but it doesn't come out". Generally, less light is returned from a narrow-angle V cut than a wide-angle V cut.

The 3 keys for all of this are 1) - the location/angle of the light source, 2) the location/angle of the reflective surface, 3) the location/angle at which your eye is viewing the reflective surface.

As you look at a reflective V-shaped cut, the greatest possibility is that one edge of the V is probably a bit more reflective than the other, based on the above conditions. By taking into account the angle at which light is directed into V-cuts of different angles, it is most certainly possible for a steeper angle to reflect more brightly than a shallower angle, and vice-versa, which is usually the case. An exception to this could be if a narrow V-cut is illuminated by light coming at a shallow angle, the surface of the cut most perpendicular to the light might reflect light on to the other surface of the cut, and both surfaces of the V might appear fairly bright, depending upon from where this is being viewed. Certainly a contrived condition, but it doesn't not occur!

Since we generally don't live in a world where light rays are polarized to be in one general direction, or certainly where where light ray are coherent in one very specific direction (laser beam), the light we live with bounces around in all directions, so viewing reflective V-shaped graver cuts is not a zero-sum game - you generally don't see all or nothing of the light reflecting off the surface, but gradients of light, and that is nowhere more evident than in Chris's masterful bulino engraving. This gradation of light is generally referred to as tone, as in light-toned or dark-toned, and this is certainly the case in monochrome illustrations such as bulino. The word color doesn't really apply in this discussion. The variable not addressed, nor viewed, or changed in the video, was the direction of the light source illuminating the sample lines, and given the rule regarding light that the angle of incidence equals the angle of reflectance, it's clear that the location and direction of the light source is critical to your perception of an object.

Best regards,
Doug
 

vondershred

Member
Joined
Feb 21, 2024
Messages
32
I'm pretty sure Allen encapsulated the idea very well.

With all due respect for Chris DeCamillis, whose video you're referencing, I'm going to have to come down on the side of science regarding the physics of light. The overarching concept here is that the angle of incidence equals the angle of reflection. If a light source hits a reflective surface at a 45 degree angle, it will reflect back at its reciprocal 45 degree angle, or 135 degrees. If a light source is pointing straight down at any reflective V-cut wherein either wall of the V is not perpendicular to the light, it will not reflect the maximum amount of light straight back. I call this phenomenon the "roach motel for light - the light goes in but it doesn't come out". Generally, less light is returned from a narrow-angle V cut than a wide-angle V cut.

The 3 keys for all of this are 1) - the location/angle of the light source, 2) the location/angle of the reflective surface, 3) the location/angle at which your eye is viewing the reflective surface.

As you look at a reflective V-shaped cut, the greatest possibility is that one edge of the V is probably a bit more reflective than the other, based on the above conditions. By taking into account the angle at which light is directed into V-cuts of different angles, it is most certainly possible for a steeper angle to reflect more brightly than a shallower angle, and vice-versa, which is usually the case. An exception to this could be if a narrow V-cut is illuminated by light coming at a shallow angle, the surface of the cut most perpendicular to the light might reflect light on to the other surface of the cut, and both surfaces of the V might appear fairly bright, depending upon from where this is being viewed. Certainly a contrived condition, but it doesn't not occur!

Since we generally don't live in a world where light rays are polarized to be in one general direction, or certainly where where light ray are coherent in one very specific direction (laser beam), the light we live with bounces around in all directions, so viewing reflective V-shaped graver cuts is not a zero-sum game - you generally don't see all or nothing of the light reflecting off the surface, but gradients of light, and that is nowhere more evident than in Chris's masterful bulino engraving. This gradation of light is generally referred to as tone, as in light-toned or dark-toned, and this is certainly the case in monochrome illustrations such as bulino. The word color doesn't really apply in this discussion. The variable not addressed, nor viewed, or changed in the video, was the direction of the light source illuminating the sample lines, and given the rule regarding light that the angle of incidence equals the angle of reflectance, it's clear that the location and direction of the light source is critical to your perception of an object.

Best regards,
Doug
Hey Doug,

I really appreciate your in-depth scientific analysis of the subject. I am aware that in order to make metal shine it needs to reflect light.

I learned this when polishing many aluminum motorcycle parts, when I started sanding from 120 up until 2000 grit, then polish it against a motorized cotton wheel containing paste that holds a grit equivalent to 5000. It’s the same principle.

I never suggested the Youtube video is the absolute right way. I admit I think it’s rather peculiar that a wider graver should reflect less, since there’s a wider line cut by a polished graver and thus reflecting more light. However, I see what I see: there’s obvious darker lines when Chris engraves with a wider angle.

That’s why I started this thread, to know what’s going on? I’m fairly new to engraving (started two weeks ago) so any material I haven’t covered yet like this for instance, is a complete mystery to me. “Could it really be wider gravers cut lines that reflect less thus making it appear black?” I remained skeptical but it wouldn’t be the first time this new world of engraving -for me at least- would make me “re-learn” things I thought I new from the past, for instance from polishing metal.

I do agree “color” isn’t the right choice of word, what I really meant is “tone” or “appearance”. English isn’t my main language so sometimes I mess up translating myself! ;)

Cheers,

Tristan.
 
Last edited:

allan621

:::Pledge Member:::
::::Pledge Member::::
Joined
Jan 10, 2007
Messages
365
Tristan

I think its a little too soon to be concerned with the color of the reflection. Chris deCamillis is a great engraver but he wasn't talking to you. He was talking to more experienced engravers who do not work with flat tools. He was talking about grinding square tools to do bulino work.

Square tools are a misnomer in that they are named after the square shaft of metals they are ground from. Square tools end up having a v shaped bottom cutting surface. Flat tools are flat on the bottom and I use them for inside ring engraving.

Allen and dghall are right in that the colors are the quality of the reflected light. When you cut with a flat tool its like creating a mirror. A mirror is a flat plane of glass with a reflective back. The light goes in and then comes back out in close to the same angle. This is why reflections from common mirrors look so accurate. Now if the mirror is smudged with a grease the image comes back looking not so precise or clear. That's because the light gets kind of bounced around in sort of the same angle but enough of a difference that it looks like it needs cleaning.

Your flat cut is like a mirror. IF the cut is completely flat and your tool well polished then it comes back bright and precise and brighter than the surface color of the metal. . Hold the polished cut at different angles and the image should change a little because the light is being reflected in a different direction.

Now the cuts in the sun plate are a different color than the surface of the plate. That's probably because even though the tool is not polished well, it reflects light in a more universal direction the diffuse surface of the plate. But when the cuts are made with a square tool the reflection may go in different directions because some of the cuts are cut facing in and some are cut facing the other direction.Like the monogram in the picture.


Allan
 

Attachments

  • IMG_1145.JPG
    IMG_1145.JPG
    155.2 KB · Views: 34

alwayslearning2012

:::Pledge Member:::
::::Pledge Member::::
Joined
Aug 24, 2012
Messages
44
Location
Louisville, KY, USA
"But it still leaves the following unanswered:"

Personally, I think they did answer your question.

I've found that direct sunlight shows any engraving work perfectly. It reveals the good and the bad of the work that I do. and when presented at different angles to the observer, it does funny things. That's why I love this craft.

A flat graver, I feel, has it's place. But for basic cutting....which at your level, appears to be better than mine, a v-graver is the way to go.

It took me roughly 8 minutes to shape a 1.8 mm c-max blank from scratch. It was a wonderful, old-school method. I shaped it to 80. I haven't faced it yet. (still debating over a 50 or a 55 degree face.) I like what I have for decent sharpening and mediocre polishing, and I don't think I need anything else.

Just throwin that out there

AL12
 

Attachments

  • All I need for sharpening..jpg
    All I need for sharpening..jpg
    117 KB · Views: 20
Last edited:

vondershred

Member
Joined
Feb 21, 2024
Messages
32
Hey Allen!


I think its a little too soon to be concerned with the color of the reflection.
I don’t know what to think of that, except that I want to know what I should do to make stuff look the way I want? I don’t see why this should be advanced knowledge? All I’m looking for are simple suggestions if there are any, for instance “try this graver instead”. Even if I just want to waste a practice plate with straight lines to work on my technique, wouldn’t it be useful for me to know how those lines would look “color”-wise?

EDIT: I deleted an entire epistle after this, because in retrospect I realize I was being a lil’ rude and stubborn. I apologize @allen621, I truly appreciate your wisdom on the subject.

On more close inspection: the picture you posted of that watch does indeed look like your engraving is reflecting light from different angles, whereas my engravings look shiny in more angles because I used flat gravers thus creating more surface from which light can reflect of.
 
Last edited:

Andrew Biggs

Moderator
Joined
Nov 10, 2006
Messages
5,034
Location
Christchurch, New Zealand
You are way overthinking the whole deal with cuts.

Here’s the basics.

Wider gravers…………Cut wider lines

Narrow gravers ………cut narrow lines.

You can alter the above by cutting deeper or shallower or by leaning the graver onto its side (often called rolling the graver)

When shading…….lines very close together and cross hatched look darker than lines spread further apart.

The more polished (shiny) the heel…the more reflection the cut gives.

Light will reflect on all cuts depending on the light source. That is why engravings are blacked with paint, ink, etc etc etc. That means the engraving can be seen in any light and blackening brings out the details at all angles.

Some cuts you never blacken……E.G. Bright cuts on Jewellery, western bright cut, flare cutting etc. So it all depends on the metal canvas you are engraving and the result you want/need to achieve.

If you don’t like paint then use dirty oil or whatever you like.

And that’s about it.

As you have only been at this for 2 weeks there is a whole lot more you need to learn. The reflection/light value of your cuts at this stage of your learning is totally irrelevant

And I have to say you are doing well with only flat gravers to work with :)

Cheers
Andrew
 
Last edited:

vondershred

Member
Joined
Feb 21, 2024
Messages
32
Hey Andrew, nice of you to reply!


You are way overthinking the whole deal with cuts.
I’m slowly starting to realize that, haha. It’s just all so much information, some right some wrong some inbetween, and often contradicting and hard to solve without the help of this forum.

But this thread has given me plenty insight and corrections on my way of thinking about this, for which I’m happy.

Thanks Andrew,

Tristan.
 
Last edited:

dhall

:::Pledge Member:::
::::Pledge Member::::
Joined
Jan 1, 2008
Messages
144
Location
San Diego, California
Well, the other option, used by most folks who use a flat graver, at some time or another, is to tilt the graver a bit and only use one corner to make a V-shaped cut. Gradually "rolling" your wrist as you cut will make the line get narrower or wider. This is the basis for much script lettering, with the beautiful calligraphic effect. The cut can become a bit more challenging to control the closer the flat graver gets to cutting its full width. Regardless, rotating the graver about 45 degrees will be a good place to start, and you can get a hairline with careful control, and wider, all the way up to the full width of the flat. You don't necessarily need to get a different graver in order to make a V-shaped cut.

Best regards,
Doug
 

AllenClapp

Elite Cafe Member
Joined
Aug 7, 2019
Messages
381
Location
Raleigh, NC
You might benefit by attending one of the beginner week-long engraver courses at the GRS Training Center www.grs.com or the Texas Engraving Schoo http://www.crashcourseengraving.com/l. Ray Cover is another well-recognized source. https://learningtoengrave.com/. These incredibly intense and fun courses can save you years of frustration in learning to engrave. If that is not practical for you, I suggest getting some Sam Alfano's excellent scroll engraving videos [either DVD or download] https://engraving-videos.com/. They are excellent. Lee Griffiths has engraving books, DVD's, and online engraving courses. https://leegriffithsengraving.com/.
 

vondershred

Member
Joined
Feb 21, 2024
Messages
32
You might benefit by attending one of the beginner week-long engraver courses at the GRS Training Center www.grs.com or the Texas Engraving Schoo http://www.crashcourseengraving.com/l. Ray Cover is another well-recognized source. https://learningtoengrave.com/. These incredibly intense and fun courses can save you years of frustration in learning to engrave. If that is not practical for you, I suggest getting some Sam Alfano's excellent scroll engraving videos [either DVD or download] https://engraving-videos.com/. They are excellent. Lee Griffiths has engraving books, DVD's, and online engraving courses. https://leegriffithsengraving.com/.
Hello,

I wish I could but I’m in Belgium! ;)
But I did look into the DVD lessons and I think I will buy some of those!

Thanks and have a great day,

Tristan.
 

DaveatWeirs

Member
Joined
Jan 16, 2023
Messages
65
Location
Ireland
Keep in mind that all of the videos you see of stuff being engraved are done under a ring light. These are highly directional so they tend not to reflect light back at the camera, plus because of the loss of light through magnification, they tend to be much brighter in comparison to the surrounding workshop light. The combo of these two gives the impression on video that the lines are much darker than they would actually appear in your hand under any other light. Blackening is added afterwards because of this.

EDIT: I don't know for sure but I'd bet that the graver used in the screenshot is a steve lindsay 116 universal V cut.
 

vondershred

Member
Joined
Feb 21, 2024
Messages
32
Keep in mind that all of the videos you see of stuff being engraved are done under a ring light. These are highly directional so they tend not to reflect light back at the camera, plus because of the loss of light through magnification, they tend to be much brighter in comparison to the surrounding workshop light. The combo of these two gives the impression on video that the lines are much darker than they would actually appear in your hand under any other light. Blackening is added afterwards because of this.

EDIT: I don't know for sure but I'd bet that the graver used in the screenshot is a steve lindsay 116 universal V cut.
Hey thanks!

I’m accepting that there’s no such thing as a specific graver that makes the lines appear black when freshly cut. Can’t blame a man for asking though!

This answer, together with previous replies from Doug, Andrew, Allen and Allan I can finally give it a rest haha. Thank you all for all the advice and support!

Tristan.
 

alwayslearning2012

:::Pledge Member:::
::::Pledge Member::::
Joined
Aug 24, 2012
Messages
44
Location
Louisville, KY, USA
Some time ago, when I knew I wanted to learn this art form, I started buying the cheaper things I could afford at the time. A handpeice and vice were the first. Then came the graver set. (the engravers mixed graver kit #022-526) Then the sharpening fixture. When I picked the gravers, I was immediately attracted to the shiny brushed steel gravers. I avoided the c-max blanks because foolishly I thought to myself: "those are stupid, what can I do with those? These shiny ones look way cooler. I'll be cutting like Sam in no time"

And I tried, and failed. Mostly because I didn't know what I was doing. and the work stayed idle for a few years. Then I decided I needed help, and signed up for a basic hand class with Layne in Emporia. Which was worth every penny it took to make the journey, BTW.

Much to my surprise, the c-max blank, which was eventually shaped into a 120, was all I used that week. And it's all I use now. I've added a couple 105s the the bunch.

I have watched this thread frequently over the past few days. And the explanations about lighting reflection have been outstanding. I kinda had already studied these things, and observed them first hand by cutting with different shapes and just playing around with different lines. Never really intending to create a finished piece. I just wanted to play around with it and see what happened. My lines still need some serious work.

I've seen a high degree of patience displayed by the fellow members here. My hat's off to you all.

Conversely, I don't possess that much. so I'll be taking my leave from this thread.

But I do wish to add something before I go,

Tristan,

Try to lay off the bold font in your posts. By the way you are conducting yourself here, I'm beginning to wonder, If you have ever owned a razor.

The only way your going to create work that is to your liking, is to learn to create work that is to your liking. All the tools you need are in this thread.

Finally, study the work of Sadeler. He gives fine examples of shadow and depth.

Cheers, mate.

Good luck on your journey.

AL12
 

vondershred

Member
Joined
Feb 21, 2024
Messages
32
Good luck on your journey.

Hey @alwayslearning2012 ,

I don’t mean to come across as arrogant or know-it-all or pompous or just plain unfriendly or… I have terrible OCD haha, my bold text is to keep my replies clutter-free, and is just my way of saying to everyone they don’t have to read all the tedious volumes of literature I’ve been putting out in this thread and they can skip ahead to my updated question.

I say updated because I have also learned much from all the good and indeed very patient people contributing to this thread, so the bold text is also my way of reformulating my original question(s) with what I’ve learned from previous replies.

I don’t know what you mean with “have you ever owned a razor” but… Mind you, English is not my native language. I know it’s not an excuse for coming across as harsh or being high-maintenance, but I really don’t mean any offence. My sarcasm is intended to be friendly and light-hearted. However if people have taken offence by my comments I take full responsibilty and the moderator can take this thread down because by now it’s gotten a little out of hand! :D

I really do appreciate your message, and because of your previous replies on my other threads I was glad to have found someone to share the first steps with amongst all other experienced craftsmen. It’s good to know I’m not the only one intimidated by the steep learning curve.

And again, I thank all contributors for the wisdom and apologize for being high-maintenance. I’m here to make friends and learn from the best, I see how my eagerness can be mistaken for impatience. I will buy some DVD’s now in the hope I can start my next thread with some more insight and less need to argue with experienced engravers.

Night y’all!

Tristan.
 
Last edited:

Latest posts

Sponsors

Top