Wild West Show 1873

Beathard

~ Elite 1000 Member ~
Joined
Jun 22, 2011
Messages
1,476
Location
Paige, TX
Ok... I'm starting to work on an 1873. It is supposed to have a Buffalo Bill Cody Wild West Theme. This will be my first attempt at human figures in my engraving. I have Cody, Sitting Bull and Annie Oakley in the design.

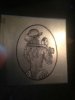
I thought I'd better start on some practice plates. I would like to get your thoughts on each as I go. The first is the easiest of the three. Annie Oakley was known for an over the shoulder shot. The smithsonian has a good image at http://www.smithsonianmag.com/multimedia/photos/?c=y&articleID=100570924&page=2.

Here is my first attempt at Annie. Any thoughts comments?


My hope is to share each piece as its designed and cut, both to get the forums comments to make it better, but as a journal of how to do step out on the bleeding edge for other beginning to intermediate gun engravers.
 

Attachments

  • ImageUploadedByTapatalk1371768377.151798.jpg
    ImageUploadedByTapatalk1371768377.151798.jpg
    47.4 KB · Views: 326
Last edited:

Andrew Biggs

Moderator
Joined
Nov 10, 2006
Messages
5,034
Location
Christchurch, New Zealand
Hi Gerry

There are three points I would look at.

The first is the face. You have rounded it so it balloons out.

The second is the gloved hand as it looks a bit like nothing.

The third is the rifle barrel. I would make it longer so it sticks out beyond her hair slightly as it gets lost in the hair. I know that is how it is in the photo but sometimes you need to alter things to "enhance" the image slightly for engraving purposes. You also need to make sure that the hair doesn't flow through the barrel. There is a highlight on the top of the barrel and the bottom shadow on the magazine wants to follow the length of the barrel. The same applies to the stock. It is the highlight and shadow that makes things three dimensional.

Cheers
Andrew
 

FANCYGUN

~ Elite 1000 Member ~
Joined
Nov 10, 2006
Messages
1,842
Location
West Grove, PA
Looking good Gere. Glad you are using what you learned in my class.
Marty
 

Attachments

  • 4a.jpg
    4a.jpg
    110 KB · Views: 309

Beathard

~ Elite 1000 Member ~
Joined
Jun 22, 2011
Messages
1,476
Location
Paige, TX
Thanks Andrew. I agree with all points. That's why I did a practice plate. Still can't figure out how to do a black glove.

Marty, my Sensei, these will be my first three attempts at humans. Annie was first because I'm scared of the eyes on the others. I'm also having trouble with the long hair and black items (e.g. Gun barrel and gloves). Any suggestions?
 

FANCYGUN

~ Elite 1000 Member ~
Joined
Nov 10, 2006
Messages
1,842
Location
West Grove, PA
Black is a relative term and value. Just make it noticeably darker than the surrounding area and don't forget the shadows and highlights in a dark grey mode. Remember you are not doing a photograph. Just make it visually exciting and look correct. Hell, I am still trying to figure it out each time i do an engraving so just have fun with it.
 

Beathard

~ Elite 1000 Member ~
Joined
Jun 22, 2011
Messages
1,476
Location
Paige, TX
I'll need to plan ahead for the black so that the areas leading into it are lighter. Right?

The original photo was so flat it was hard to determine what to do.
 

Andrew Biggs

Moderator
Joined
Nov 10, 2006
Messages
5,034
Location
Christchurch, New Zealand
Still can't figure out how to do a black glove.

The answer to that is......very carefully :)

If it's of any help, I work from light to dark. It's easier to darken something up than it is to lighten it. A burnisher can lighten selective areas. Try not to get to carried away zooming in with a microscope as you can go overboard with the cuts and start losing the contrast that you need in some areas.

Cheers
Andrew
 

GTJC460

~ Elite 1000 Member ~
Joined
Mar 24, 2010
Messages
1,327
Location
Tullahoma TN
Gerry. Not bad. It might pay dividends to get the video/kit from GRS on the Meeks squirrel. This might help you out it learning to develop the form of objects.

One thing I do is lightly scribe in lines across an area to indicate the form I'm trying to develop. For instance the back look a little flat whereas in real life a persons back is much more curved. Almost elliptical in shape. Hence, I would start by lightly scribbing in some arcs indicating the general form I wanted to achieve. Then I'd start by laying in lines at the edge at a very steep angle then with each additional layer of lines adjusting the angle to follow the scribe marks.

A note about the scribe I use. It's more of a rounded polished burnished cone than a point. A point will leave a scratch that might not get covered whereas the marks I make are easy to make disappear.

Once I develop my form, I go in and try to add detail to give texture to the objects making them look more realistic.
 

FANCYGUN

~ Elite 1000 Member ~
Joined
Nov 10, 2006
Messages
1,842
Location
West Grove, PA
Gere
Everyone is giving you very good pointers. Remember the rabbit you did in class and how you built your form lines and textures on it. How I had you build the image as you engraved. Lighten up on your lines. Do more of them and keep the graver very sharp. Show me the finess you showed in class.
The picture i posted of what I am doing now is engraved with a 90 and a 70 graver. Both puch and using a monarch handpiece. It's interesting how light you can get if you lower the air pressure a bit and just "kiss" the surface with a sharp tool
 

FANCYGUN

~ Elite 1000 Member ~
Joined
Nov 10, 2006
Messages
1,842
Location
West Grove, PA
Gere.
Heres some pictures i took along the way while engraving the locomotive and water tower. They're not great photos as i took them playing around with the new IPhone and just hand held it under the microscope light. But at least you can see the seguence i used. Now they are not finished as i need to sharpen thigs up and hadd accents when the rest of the scene is done. Thats when I can see the final balance everything will have as a whole. I'll take ore pictures along the way and use them for my drawing class in Sept. Now sure how long it will take as i am doing this between doctor appointments and PT sessions but it's helping me kep my sanity as you already know.
Keep plugging at it and you will succeed
 

Attachments

  • locomotive watertower sequence.jpg
    locomotive watertower sequence.jpg
    56.7 KB · Views: 117

Christian DeCamillis

Elite Cafe Member
Joined
Nov 9, 2006
Messages
639
Location
Traverse City, Michigan
Gere,

The first thing i would say to you is to sand your plate to a smooth finish . When you practice you should practice on the same kind of surface as a project would be.

What you have picked to do is difficult. I agree you need more lines lighter. This image to be done correctly would take someone with experience 20 plus hours depending on the size. For a person without experience you could double that. To get finer lines try a wider geometry. It sounds opposite to what we are told built it works. Look at Sam's lines in his shading all done with a 120. I would try a 105 to start.

The hat you engraved isn't the same as in the reference picture. Also everything is too dark overall. Clothing has much more folds creases etc... Yours is smooth. Again Nothing easy about this engraving.

I would recommend that before you put anything on a gun especially if it's for,a customer that you do a bucket full of practice plates. If you don't you will end up defining yourself as an engraver at the level you are now because people will remember your fist works no matter how much you advance in the future. It's the same with getting something published wait until you feel you are at a level that people will recognize your ability.

For your fist attempt it's not bad for sure. I would also recommend drawing the picture on paper but draw it with the same lines dots or whatever else you would use the same as you would engrave it. This will help a lot. It may not be the best drawing technique but it will help when it comes to engraving the image.

Chris
 

Big-Un

~ Elite 1000 Member ~
Joined
Nov 10, 2006
Messages
1,370
Location
Eden, NC
One of the best tools/technique I use is practice with pen and ink. Not only do you use the same basic dot/line technique but it is as unforgiving as engraving.

Bill
 

Beathard

~ Elite 1000 Member ~
Joined
Jun 22, 2011
Messages
1,476
Location
Paige, TX
Working on Buffalo Bill practice plate today. Attempting to use all the recommendations. I will post it as soon as I'm done.

Thanks everyone. Lets see if I can improve.
 

FANCYGUN

~ Elite 1000 Member ~
Joined
Nov 10, 2006
Messages
1,842
Location
West Grove, PA
Gere
Once again all good suggestions but remember you are working on a repro Henry I believe. The originals were not up to the standards of engraving that we use or are accustomed to today. Do the best you can but remember it should look of the period. Not many can elevate period engraving to todays standards. So have fun with it, learn and move on to the next piece. Thats the only way to improve. It does not have to photographic in style. So DRAW DRAW and DRAW some more then just do it
 

Beathard

~ Elite 1000 Member ~
Joined
Jun 22, 2011
Messages
1,476
Location
Paige, TX
Thanks Marty, will do. I'm squeezing this in between my production pieces. It's a Uberti copy of an 1873 in brass. They call it an 1860, but its exactly the same as their 1873.

Production engraving for this week includes 3 Bond Arms Derringers and a Cimmeron SAA if it arrives.
 

FANCYGUN

~ Elite 1000 Member ~
Joined
Nov 10, 2006
Messages
1,842
Location
West Grove, PA
Gere....you know I am a winchester 73 and 76 freak......but I never heard of a repro 73 in brass. The sketch you emailed me looked like a henry frame. Are you sure it's not a 1866 that you're working on?
Now also slow down and dont get this mixed up with your "production work". You're going too fast and not looking at what you are doing in my opinion
 

Beathard

~ Elite 1000 Member ~
Joined
Jun 22, 2011
Messages
1,476
Location
Paige, TX
1866. Your right.

Yep. Going to fast... Annie took less than 2 hours. Chris said 20 plus... Looks like I'm going at the speed of light.
 

Christian DeCamillis

Elite Cafe Member
Joined
Nov 9, 2006
Messages
639
Location
Traverse City, Michigan
I Must disagree with your statement Marty. Just because someone is working on a gun from another period doesn't mean they shouldn't do the best job possible. Because the work from a certain period might have been production work and the quality of that period was poor or not up to today's standard doesn't mean that it's OK to do sub standard work.

If a customer has elected to have the piece done to reproduce a period piece that would be different. But i wouldn't sign it. I have done some Winchester model 21's for a client with the same patterns and animals as in the book. I wouldn't sign it because i don't want someone to think that this was the kind of work I did.

I Also believe that if during a certain period engravers could have done photo realism they would have. I am also sure many were capable but didn't because no one was willing to pay for that.

The piece your showing seems to be a Winchester rifle and you most certainly aren't cutting it like they would have back then. I doubt very much that they would have done a railroad scene with the quality and detail you are.

I am not trying to be contrary so please don't take it that way I just think that quality has no bounds.

Chris
 

FANCYGUN

~ Elite 1000 Member ~
Joined
Nov 10, 2006
Messages
1,842
Location
West Grove, PA
Chris
I never said not to do the best you can
I agree with all that you have said about period work. Then and also now. All I am saying is do the best yu can and don't worry if it is not up to todays standards. After all, we cannot all do masters level work and this should not prevent you from engraving a good looking period stylized type of work. Hell, you and I would never be doing what we are doing with we waited to do masters work rather than the best we were capable of at the time. At least for me some of that work is now downright scarey to look at.
Thanks for you comments on my train layout.
 

Latest posts

Sponsors

Top