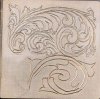
In previous thread I mentioned that I bought something called Black Noir graphite paper at Michaels art supply. This is how well it works when put behind a pattern and traced on to the plate. Anyone else ever tried it. Mack
Attachments
-
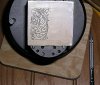 Transfer.jpg124.5 KB · Views: 284