
GTJC460
~ Elite 1000 Member ~
The following is my attempt at the Meek's squirrel. I worked on it off and on for the past two weeks. Probably put about 20-25 hours into it in total.
Learned a lot about this style of engraving doing this project.
Learned a lot about this style of engraving doing this project.
Attachments
-
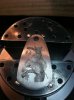 meeks squirrel.jpg96.6 KB · Views: 337


