
FANCYGUN
~ Elite 1000 Member ~
Making a smoke pull (print) of your engraving is a very useful visual tool. While doing an engraving job I will make a print at various stages along the way. I can use these prints to transfer images and also see what I have done on one saide of a gun while engraving the other side. You can print these out actual scale or really blow them up for study also. I use these while laying out and scaling a game scene so that it fits the engraved panel perfectly.
For those of us that have never made a smoke pull, here is what I do.
Take an old plane jane utility candle and light it. It should give off a sooty deposit on your metal as you pass it through the tip of the flame.
Now take a piece of transparent tape and carefully lay it over the top of the engraved surface. Press down lightly and rub the tape flat onto the metal. What you are doing here is making a relief print of the surface.
Peel the tape off and carefully stick it to a piece of white paper. You will have a nice clear image of your work with white lines and black background.
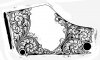
Now what I do here is scan the print on my scanner at 600dpi. This works well most of the time for capturing the fine detail as seen in my first photo.
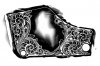
Now save this on your computer so you don't lose it and now go on to the next step. I will now play with the contrast to make the darks darker and the whites brighter. I can also use my eraser to get rid of areas I don't want or need. I am using Photoshop for my image work.
What I really want for me reference work is a black line against a white background not what I have at this point. Easy fix. All I have to do now is click the "inverse" command and like magic the image flips itself into black lines against a white background. Usually at this point I have to do a little more touch up of the image which is no big deal.
Try this out and don't forget to save what you do all along the way. It's a great visual tool. It also is a great form of record keeping and I also send these to my clients to show then the progress on the pieces.
Good luck
Marty
For those of us that have never made a smoke pull, here is what I do.
Take an old plane jane utility candle and light it. It should give off a sooty deposit on your metal as you pass it through the tip of the flame.
Now take a piece of transparent tape and carefully lay it over the top of the engraved surface. Press down lightly and rub the tape flat onto the metal. What you are doing here is making a relief print of the surface.
Peel the tape off and carefully stick it to a piece of white paper. You will have a nice clear image of your work with white lines and black background.
Now what I do here is scan the print on my scanner at 600dpi. This works well most of the time for capturing the fine detail as seen in my first photo.
Now save this on your computer so you don't lose it and now go on to the next step. I will now play with the contrast to make the darks darker and the whites brighter. I can also use my eraser to get rid of areas I don't want or need. I am using Photoshop for my image work.
What I really want for me reference work is a black line against a white background not what I have at this point. Easy fix. All I have to do now is click the "inverse" command and like magic the image flips itself into black lines against a white background. Usually at this point I have to do a little more touch up of the image which is no big deal.
Try this out and don't forget to save what you do all along the way. It's a great visual tool. It also is a great form of record keeping and I also send these to my clients to show then the progress on the pieces.
Good luck
Marty
Attachments
-
 Smoke pull 2 inverted.jpg79.8 KB · Views: 183
 -
 Smoke pull 1.jpg85.8 KB · Views: 188


