
Ron Jr.
Elite Cafe Member
Hello, my name is Ron Luebke Jr. and I'm a full time scrimshaw artist and bulino engraver. GRS recently did an article on myself and my art, it is in the Featured Photos section. If you'd like to check it out you can view it here http://www.grstools.com/featuredphotos/2010/FP12-1.html (GRS is currently reworking their site as of the writing of this and their site would not come up, if the link changes the article is titled "Beauty is in the Eye, work by Ron Luebke")
I'm not much of an entertaining writer, especially when trying to explain something so I apologize for how dry this is but if you can wade through it I believe........ well, I hope you will find at least some useful information. Oh, also I use the "/" mark constantly, oftentimes I find that I can explain something more completely/quicker by using a couple words, I think it's just my lack of writing skills so if you find it irritating (and a lot do) I will apologize to you also.
The following is how "I" do scrimshaw, I believe there is no right or wrong way to do something, the only thing that counts is how good the results are. If you do something differently and it works then how can it be the "wrong" way.
I'm assuming you have a general understanding of stipple scrimshaw and how to do it in this explanation. I'm also assuming you are using some kind of magnification to work with. I personally use a 7.5x to 22.5x variable power stereo microscope on a boom stand.
Layout; I think there are as many ways to layout/transfer artwork to a piece as there are engravers and scrimshanders so I'm not going to talk much about it. I will tell you that whether working from a photo or drawing the subject directly onto the piece I only do an outline of the subject and lines that indicate where major shading edges/areas are. After I dot in my outlines I renaissance wax the piece, no I don't ink them first, they might be too big/deep or a bit off and I want to be able to move/adjust them if needed. Besides I can see the dots under the stereo microscope just fine even without ink in them. Don't try to put too much detail into your layout as all those dots on a tiny piece of ivory can get very confusing.
Starting; ALL ivory responds differently to being "worked", sometimes even different areas of one piece react differently (which can be a REAL pain). Start on a small area where the shading is not critical. Poke some dots trying to match the shade you want and then ink it to see what your going to get. I can only speak for myself but I always end up working up to a shade, i.e. its too light and I go over it/add more dots on average 2-4 times until I get the shade I'm looking for. In scrimshaw this is good as there is no going back, if you over do it you either have to work with it or start over. Where you start when you figure out how the ivory is reacting is completely up to you. For me when doing a person I always do the face last, I find it's easier to put the facial features in correctly when I have the rest of the figure to use as a reference but that's just me.
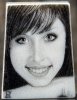
Working; Now that you've figured out how the ivory is reacting to being worked it's time for the real work to begin, settle in as it's going to take a while if done correctly, no such thing as a good "quick" scrimshaw, the example portrait of my daughter while small even for scrimshaw took me 11.5 hours to complete. Some work from light to dark others dark to light. I don't know if it's my lack of official art schooling or my goofy ocd way of doing things but I start at the bottom right hand side of a piece and work my way across and up. The reason for this is I'm left handed and want to rest my hand on the completed work as little as possible. I hold my scribe like a pencil and my middle finger rests on the piece, quite often I also use my right hand to help steady my scribe. Basically it goes like this, stipple a selected area, ink it, remove ink from surface, wax it, see how you did. Once you are close to the shade you want look for any unevenness in it and correct as needed. I find it easier to zoom way out with the microscope to fill in those pesky uneven spots.
Technique; In bulino all your dots are supposed to be the same size, more, closer together for darker areas, fewer farther apart for lighter areas.......... I disagree with this but am not going to get into it and don't want to argue with 100's (1000's?) of years of experience and tradition. In scrimshaw this is definitely not the case. If you want black go in heavy and hard with the scribe and repeat till you can't fit anymore dots in. If you want lighter go in light and spread the dots out. Keep in mind the bigger the dots the easier it is for the naked eye to pick out a single one. You don't want this in scrimshaw, you want it to look completely "filled in" painted on if you will. In the close up picture of the portrait I did of my daughter you can see the dots with the naked eye because the picture is taken close up (about 6 inches away) with a good camera using a good macro lens. If you were to see this piece in person you can barely make out those dots from up close with your naked eye (depending on how well your vision is), most pictures simply do not do high quality scrimshaw much justice, you have to see one in person to truly understand. Interestingly even with this camera this close up you cannot see all of the dots. Look at the "outsides" of the whites of both of her eyes, see any dots? Yet if you look the eyes do have a slight shadow, it is not from the lighting for the photo, there are VERY tiny dots there to get that shading, they are so small the camera could not pick them out, it simply shaded that part of the photo. That is exactly what you are trying to do only on the level of human eyesight. Now look at her teeth, yep your right got too heavy with the scribe, I was trying to do the same thing I did with the eyes but poked too hard. It is not a total loss though as only the camera see's these dots, I cannot make them out from even close up with the naked eye, Whew") Afterthought; Keep in mind also in these close up pictures your eyes are fighting to see the individual dots instead of the flat even "shading" I'm trying to create. The shading from close up is not as dark/apparent as it is if you look at it with the naked eye, is a big part of the reason photos do not do scrim justice. Always look at your progress repeatedly with your naked eye as that is how everyone is going to see it.
Afterthought; Keep in mind also in these close up pictures your eyes are fighting to see the individual dots instead of the flat even "shading" I'm trying to create. The shading from close up is not as dark/apparent as it is if you look at it with the naked eye, is a big part of the reason photos do not do scrim justice. Always look at your progress repeatedly with your naked eye as that is how everyone is going to see it.
Mistakes; We all make them, is part of the "game" only question when you make one is, can I fix/hide it or do I have to start over? Look at the chin of my daughter in the scrim portrait, left hand side as you view it, see it? Looks like a tall skinny triangle, maybe the edge of a band-aid or something. I was doing the shadow around her chin and went up one of my shading indicator lines by mistake, d%#n. The ink in scrimshaw not only sits in the crater your scribe makes it also absorbs into the ivory somewhat. Depending on how deep/hard your mistake is sometimes you can get away with "digging out". What your seeing in the picture is the ink that soaked into the ivory and the shadows from the surface marks from me digging out the little pools of ink in each dot. If you were to look at this under strong magnification you would see the surface is pretty rough from me scratching out the ink. I was lucky in that it was a small and light enough mistake that I knew you would barely be able to make it out with the naked eye after it was dug it out. Speaking of that, do any "digging out" last! If you do it and your not finished and any more ink gets in that area you will be starting over. Even if you do manage to get all the ink out some will be absorbed into the ivory and you will have to dig that much more/deeper to get it out making the blemish that much more noticeable and yes I know this from experience.
That's about all that comes to mind at the moment. I should be working right now but was asked about my technique on the forum and guess I just felt like writing/explaining this morning, it got a lot bigger than I anticipated. One thing most don't tell you is doing this full time is very lonely, sitting behind a microscope for 8-10 hours a day you get a lot of thinking time about how and what your doing. Hopefully anyone who does manage to wade through this finds at least some helpful hints somewhere.
If anyone has any questions or wants any advice or would like a further explanation about anything I wrote please feel free to ask. Is always enjoyable to talk to others who are interested.
Happy scrimming or engraving or drawing or carving or whatever it is you do to express yourself artistically to everyone
Ron
Hello again everyone and thank you all very much for all the positive feedback.
I see there are a couple questions on Renaissance wax (what it is and why use it) and I thought I would add to the post as the information could be useful to many.
Renaissance wax is a "semi-synthetic micro-crystalline fossil-origin wax that is chemically neutral". For what it's meant to be it truly is some pretty amazing stuff. I don't want to push/or endorse this site but it gives a very complete explanation of what Renaissance Wax is and what its good for. http://www.restorationproduct.com/renwaxinfo.html
Why Waxing?; This was answered correctly already, thanks John B. But if I may recap & elaborate. It helps seal the raw ivory keeping ink from absorbing into places you don't want it too, it gives the surface a shine so when you poke a dot into/through it the dot appears dull and is easier to view. If you make a mistake and catch it before you ink it just wax over the mistake and the wax will stop the ink from absorbing into the ivory saving you from having to "dig out". But probably the the 2 biggest reasons I use wax are 1. I work hard to get a "shade" just where I want it and sealing in the already completed work keeps more ink from getting into/absorbing into the already worked areas and 2. In scrimshaw I work, ink, and wipe off excess ink up too and sometimes more than a 100 times on a single piece. If I didn't seal in the already completed work after each inking a little of it would wipe off each and every time I did it and throw my hard fought for "perfect shade" off mucking it all up!
What Tool do I Use?; Again, am not trying to make an endorsement here on the forum but I use a Coulter Precision carbide scribe. (see pic) Charles can be found on eBay just search "scrimshaw hobby tool" and he should show up.
Stipple or Scratch?; Whichever you prefer or do best! There are some amazing scrimshaw artists out there that use one or the other or both.
I'm not much of an entertaining writer, especially when trying to explain something so I apologize for how dry this is but if you can wade through it I believe........ well, I hope you will find at least some useful information. Oh, also I use the "/" mark constantly, oftentimes I find that I can explain something more completely/quicker by using a couple words, I think it's just my lack of writing skills so if you find it irritating (and a lot do) I will apologize to you also.
The following is how "I" do scrimshaw, I believe there is no right or wrong way to do something, the only thing that counts is how good the results are. If you do something differently and it works then how can it be the "wrong" way.
I'm assuming you have a general understanding of stipple scrimshaw and how to do it in this explanation. I'm also assuming you are using some kind of magnification to work with. I personally use a 7.5x to 22.5x variable power stereo microscope on a boom stand.
Layout; I think there are as many ways to layout/transfer artwork to a piece as there are engravers and scrimshanders so I'm not going to talk much about it. I will tell you that whether working from a photo or drawing the subject directly onto the piece I only do an outline of the subject and lines that indicate where major shading edges/areas are. After I dot in my outlines I renaissance wax the piece, no I don't ink them first, they might be too big/deep or a bit off and I want to be able to move/adjust them if needed. Besides I can see the dots under the stereo microscope just fine even without ink in them. Don't try to put too much detail into your layout as all those dots on a tiny piece of ivory can get very confusing.
Starting; ALL ivory responds differently to being "worked", sometimes even different areas of one piece react differently (which can be a REAL pain). Start on a small area where the shading is not critical. Poke some dots trying to match the shade you want and then ink it to see what your going to get. I can only speak for myself but I always end up working up to a shade, i.e. its too light and I go over it/add more dots on average 2-4 times until I get the shade I'm looking for. In scrimshaw this is good as there is no going back, if you over do it you either have to work with it or start over. Where you start when you figure out how the ivory is reacting is completely up to you. For me when doing a person I always do the face last, I find it's easier to put the facial features in correctly when I have the rest of the figure to use as a reference but that's just me.
Working; Now that you've figured out how the ivory is reacting to being worked it's time for the real work to begin, settle in as it's going to take a while if done correctly, no such thing as a good "quick" scrimshaw, the example portrait of my daughter while small even for scrimshaw took me 11.5 hours to complete. Some work from light to dark others dark to light. I don't know if it's my lack of official art schooling or my goofy ocd way of doing things but I start at the bottom right hand side of a piece and work my way across and up. The reason for this is I'm left handed and want to rest my hand on the completed work as little as possible. I hold my scribe like a pencil and my middle finger rests on the piece, quite often I also use my right hand to help steady my scribe. Basically it goes like this, stipple a selected area, ink it, remove ink from surface, wax it, see how you did. Once you are close to the shade you want look for any unevenness in it and correct as needed. I find it easier to zoom way out with the microscope to fill in those pesky uneven spots.
Technique; In bulino all your dots are supposed to be the same size, more, closer together for darker areas, fewer farther apart for lighter areas.......... I disagree with this but am not going to get into it and don't want to argue with 100's (1000's?) of years of experience and tradition. In scrimshaw this is definitely not the case. If you want black go in heavy and hard with the scribe and repeat till you can't fit anymore dots in. If you want lighter go in light and spread the dots out. Keep in mind the bigger the dots the easier it is for the naked eye to pick out a single one. You don't want this in scrimshaw, you want it to look completely "filled in" painted on if you will. In the close up picture of the portrait I did of my daughter you can see the dots with the naked eye because the picture is taken close up (about 6 inches away) with a good camera using a good macro lens. If you were to see this piece in person you can barely make out those dots from up close with your naked eye (depending on how well your vision is), most pictures simply do not do high quality scrimshaw much justice, you have to see one in person to truly understand. Interestingly even with this camera this close up you cannot see all of the dots. Look at the "outsides" of the whites of both of her eyes, see any dots? Yet if you look the eyes do have a slight shadow, it is not from the lighting for the photo, there are VERY tiny dots there to get that shading, they are so small the camera could not pick them out, it simply shaded that part of the photo. That is exactly what you are trying to do only on the level of human eyesight. Now look at her teeth, yep your right got too heavy with the scribe, I was trying to do the same thing I did with the eyes but poked too hard. It is not a total loss though as only the camera see's these dots, I cannot make them out from even close up with the naked eye, Whew
Afterthought; Keep in mind also in these close up pictures your eyes are fighting to see the individual dots instead of the flat even "shading" I'm trying to create. The shading from close up is not as dark/apparent as it is if you look at it with the naked eye, is a big part of the reason photos do not do scrim justice. Always look at your progress repeatedly with your naked eye as that is how everyone is going to see it.Mistakes; We all make them, is part of the "game" only question when you make one is, can I fix/hide it or do I have to start over? Look at the chin of my daughter in the scrim portrait, left hand side as you view it, see it? Looks like a tall skinny triangle, maybe the edge of a band-aid or something. I was doing the shadow around her chin and went up one of my shading indicator lines by mistake, d%#n. The ink in scrimshaw not only sits in the crater your scribe makes it also absorbs into the ivory somewhat. Depending on how deep/hard your mistake is sometimes you can get away with "digging out". What your seeing in the picture is the ink that soaked into the ivory and the shadows from the surface marks from me digging out the little pools of ink in each dot. If you were to look at this under strong magnification you would see the surface is pretty rough from me scratching out the ink. I was lucky in that it was a small and light enough mistake that I knew you would barely be able to make it out with the naked eye after it was dug it out. Speaking of that, do any "digging out" last! If you do it and your not finished and any more ink gets in that area you will be starting over. Even if you do manage to get all the ink out some will be absorbed into the ivory and you will have to dig that much more/deeper to get it out making the blemish that much more noticeable and yes I know this from experience.
That's about all that comes to mind at the moment. I should be working right now but was asked about my technique on the forum and guess I just felt like writing/explaining this morning, it got a lot bigger than I anticipated. One thing most don't tell you is doing this full time is very lonely, sitting behind a microscope for 8-10 hours a day you get a lot of thinking time about how and what your doing. Hopefully anyone who does manage to wade through this finds at least some helpful hints somewhere.
If anyone has any questions or wants any advice or would like a further explanation about anything I wrote please feel free to ask. Is always enjoyable to talk to others who are interested.
Happy scrimming or engraving or drawing or carving or whatever it is you do to express yourself artistically to everyone
Ron
Hello again everyone and thank you all very much for all the positive feedback.
I see there are a couple questions on Renaissance wax (what it is and why use it) and I thought I would add to the post as the information could be useful to many.
Renaissance wax is a "semi-synthetic micro-crystalline fossil-origin wax that is chemically neutral". For what it's meant to be it truly is some pretty amazing stuff. I don't want to push/or endorse this site but it gives a very complete explanation of what Renaissance Wax is and what its good for. http://www.restorationproduct.com/renwaxinfo.html
Why Waxing?; This was answered correctly already, thanks John B.
But if I may recap & elaborate. It helps seal the raw ivory keeping ink from absorbing into places you don't want it too, it gives the surface a shine so when you poke a dot into/through it the dot appears dull and is easier to view. If you make a mistake and catch it before you ink it just wax over the mistake and the wax will stop the ink from absorbing into the ivory saving you from having to "dig out". But probably the the 2 biggest reasons I use wax are 1. I work hard to get a "shade" just where I want it and sealing in the already completed work keeps more ink from getting into/absorbing into the already worked areas and 2. In scrimshaw I work, ink, and wipe off excess ink up too and sometimes more than a 100 times on a single piece. If I didn't seal in the already completed work after each inking a little of it would wipe off each and every time I did it and throw my hard fought for "perfect shade" off mucking it all up!What Tool do I Use?; Again, am not trying to make an endorsement here on the forum but I use a Coulter Precision carbide scribe. (see pic) Charles can be found on eBay just search "scrimshaw hobby tool" and he should show up.
Stipple or Scratch?; Whichever you prefer or do best! There are some amazing scrimshaw artists out there that use one or the other or both.
Attachments
-
 kcp3lowq.jpg97.3 KB · Views: 190
 -
 kcplowq.jpg93.1 KB · Views: 190
 -
 scribe.jpg25.5 KB · Views: 115
Last edited:


