rod
~ Elite 1000 Member ~
Our colleague, Lucie B, for the Czech Republic posted me some interesting examples of the Scandinavian folk art tradition called, "Rosemailling", online videos show a rather intriguing painting equivalent of very nice scroll and leaf work usually painted on furniture and household artifacts....I wrote back:
Lucie,
Thank you for your suggestion and examples of "Rosemåling", I became very interested in this Scandinavian tradition, and indeed, watching videos of these artists painting is very intriguing.
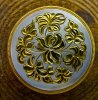
As a small practice exercise, I tried a 'beauty line' engraving of one of your posted examples, and then made an interpretation of the design in copper and gold. Again, I must be careful to engrave on perfectly flat or perfectly curved surfaces ( no shallow depressions please), otherwise the final sanding to remove gold from the surface will begin to remove engraving cuts. Should this happen, it is simply a case of re-cutting some areas, and then re-plating with gold. These little practices do show what to correct next time. On the copper practice, I outline with my modified flat graver and then scoop with a round graver.
On the Lindsay Forum, Ray Cover posted a very nice way to fast track my modified flat graver geometry to keep side edge drag off wide bright cuts in tight turns. I wrote him...
Ray, when you kindly posted your much faster approach to preparing a similar geometry for making a flat graver with "tucked back" side edge, I was delighted, and after returning from a Canada visit I immediately had a go following your approach. For me, it is still a problem of some side edge drag on the very tightest small turns, but fine on larger radius turns. I still do prefer to have just a bit of untouched side edge at each corner, otherwise I find my corner points tend to dig. Once again, let me add that this might just be my lack of skill in using the geometry? That said, the posted photos of your geometry is definitely a fast track approach, and all I now do is modify it slightly.
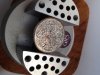
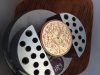
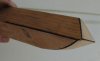
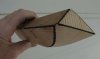
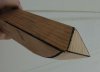
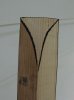
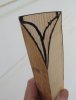
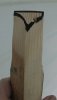
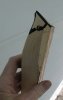
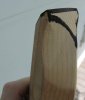
With some crude over-sized wood 'gravers', I have tried to show Ray's geometry ( with a rounded heel), followed by the small changes I make to allow tight bright turns with no side edge drag, and also leaving untouched a small portion of the graver edge to counteract the tool tending to dive.
Excuse the poor photos, I only have my iPhone camera at this moment. One photo is out of place, but the graver geometry shows Ray's faster way to grind, and here I have put my well rounded heel on his approach, following along on the seventh photo I show my slight modification of Ray's proposed shape.
Thank you, Ray!
Rod ps : how do I correct my spelling on the post title .. 'fofk' should be 'folk' ?
Lucie,
Thank you for your suggestion and examples of "Rosemåling", I became very interested in this Scandinavian tradition, and indeed, watching videos of these artists painting is very intriguing.
As a small practice exercise, I tried a 'beauty line' engraving of one of your posted examples, and then made an interpretation of the design in copper and gold. Again, I must be careful to engrave on perfectly flat or perfectly curved surfaces ( no shallow depressions please), otherwise the final sanding to remove gold from the surface will begin to remove engraving cuts. Should this happen, it is simply a case of re-cutting some areas, and then re-plating with gold. These little practices do show what to correct next time. On the copper practice, I outline with my modified flat graver and then scoop with a round graver.
On the Lindsay Forum, Ray Cover posted a very nice way to fast track my modified flat graver geometry to keep side edge drag off wide bright cuts in tight turns. I wrote him...
Ray, when you kindly posted your much faster approach to preparing a similar geometry for making a flat graver with "tucked back" side edge, I was delighted, and after returning from a Canada visit I immediately had a go following your approach. For me, it is still a problem of some side edge drag on the very tightest small turns, but fine on larger radius turns. I still do prefer to have just a bit of untouched side edge at each corner, otherwise I find my corner points tend to dig. Once again, let me add that this might just be my lack of skill in using the geometry? That said, the posted photos of your geometry is definitely a fast track approach, and all I now do is modify it slightly.
With some crude over-sized wood 'gravers', I have tried to show Ray's geometry ( with a rounded heel), followed by the small changes I make to allow tight bright turns with no side edge drag, and also leaving untouched a small portion of the graver edge to counteract the tool tending to dive.
Excuse the poor photos, I only have my iPhone camera at this moment. One photo is out of place, but the graver geometry shows Ray's faster way to grind, and here I have put my well rounded heel on his approach, following along on the seventh photo I show my slight modification of Ray's proposed shape.
Thank you, Ray!
Rod ps : how do I correct my spelling on the post title .. 'fofk' should be 'folk' ?
Attachments
-
 rose 2.jpg54.1 KB · Views: 322
 -
 rosemaling.jpg50.1 KB · Views: 323
 -
 IMG_3762.jpg21.3 KB · Views: 319
 -
 IMG_3763.jpg24.2 KB · Views: 311
 -
 IMG_3764.jpg27.2 KB · Views: 311
 -
 IMG_3765.jpg27 KB · Views: 310
 -
 IMG_3767.jpg32 KB · Views: 311
 -
 IMG_3768.jpg21.9 KB · Views: 313
 -
 IMG_3769.jpg23.7 KB · Views: 313
 -
 IMG_3770.jpg31.7 KB · Views: 313
Last edited: