
rod
~ Elite 1000 Member ~
This thread relates to the piccolo I showed on another thread, however the subject here is pen plating. When I posted gilded flare cutting on a separate thread some time ago, a few asked, 'Would it not be better to pen plate each area of the object, and save some gold, and time?"
Answer, absolutely not, as it would be impossible, and take forever to try to pen plate each tiny cut, with no spillover. A surface of a couple of square centimeters, at the most, covered with 24k gold to a depth of seven millions of an inch is not a lot of gold bullion... do the math.
Now when it comes to gilding some silver rings on flutes or piccolos, rings that are glued onto the wood and hand turned in situ, well, that is a different matter, and pen plating is a good approach.
Not a good idea to put a wood flute joint, with silver ring attached, into a bowl of gold plating solution. Too much chance of contaminating the expensive solution.
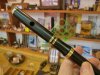
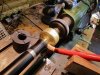
Looking at my piccolo with gilded flare cut key, I thought I would have a try at pen plating the silver rings, then burnish the gold off the high points of the ornamental turning to give a silver gold mix that inflected towards the look of the key.
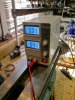
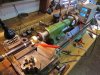
With a pen plating approach, the wood stayed out of the the main bowl of plating solution. I had to quickly rig up a way of supplying the electric polarity.... -4 volts DC to the silver ring, while it was rotating at a modest 200 rpm on the lathe. A simple slip ring was required, to touch against the ring.
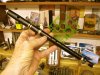
A holder was sawn out to take the commercial pen plating anode ($15). You can use a clean wick, or felt, to dip into the solution, to load it with enough liquid to keep the silver ring whetted with gold carrying acid. My little makeshift holders have three super magnets glued to the base of the wood, and can be positioned easily.
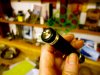
The gold plating was noticed after about two minutes. I left it running on automatic for about ten minutes to give a nice flash look. Too much time leads to a matt gold finish...not good.
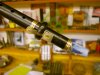
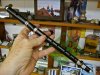
Natural daylight is best to see the results, but the sun has gone down, and shop lighting is not the best to show the results. You will have to believe me they are better in real life than shown here.
I think the pictures tell the rest of the story.
After plating all over, I fine sanded some parts back to silver to get that composite look.
P S By the way, my tailstock center is not made from pure gold, only brass. Why? When you are hand turning wood parts, from time to time the tool touches the center. A hard steel center will blunt the tool edge, but not a brass center. Sooner or later the brass center looks battle scarred, but it may be smooth turned good as new in a few moments.
Sorry, but I have not yet mastered getting the photos in correct order...?
Rod
Answer, absolutely not, as it would be impossible, and take forever to try to pen plate each tiny cut, with no spillover. A surface of a couple of square centimeters, at the most, covered with 24k gold to a depth of seven millions of an inch is not a lot of gold bullion... do the math.
Now when it comes to gilding some silver rings on flutes or piccolos, rings that are glued onto the wood and hand turned in situ, well, that is a different matter, and pen plating is a good approach.
Not a good idea to put a wood flute joint, with silver ring attached, into a bowl of gold plating solution. Too much chance of contaminating the expensive solution.
Looking at my piccolo with gilded flare cut key, I thought I would have a try at pen plating the silver rings, then burnish the gold off the high points of the ornamental turning to give a silver gold mix that inflected towards the look of the key.
With a pen plating approach, the wood stayed out of the the main bowl of plating solution. I had to quickly rig up a way of supplying the electric polarity.... -4 volts DC to the silver ring, while it was rotating at a modest 200 rpm on the lathe. A simple slip ring was required, to touch against the ring.
A holder was sawn out to take the commercial pen plating anode ($15). You can use a clean wick, or felt, to dip into the solution, to load it with enough liquid to keep the silver ring whetted with gold carrying acid. My little makeshift holders have three super magnets glued to the base of the wood, and can be positioned easily.
The gold plating was noticed after about two minutes. I left it running on automatic for about ten minutes to give a nice flash look. Too much time leads to a matt gold finish...not good.
Natural daylight is best to see the results, but the sun has gone down, and shop lighting is not the best to show the results. You will have to believe me they are better in real life than shown here.
I think the pictures tell the rest of the story.
After plating all over, I fine sanded some parts back to silver to get that composite look.
P S By the way, my tailstock center is not made from pure gold, only brass. Why? When you are hand turning wood parts, from time to time the tool touches the center. A hard steel center will blunt the tool edge, but not a brass center. Sooner or later the brass center looks battle scarred, but it may be smooth turned good as new in a few moments.
Sorry, but I have not yet mastered getting the photos in correct order...?
Rod
Attachments
-
 IMG_4877.jpg110.6 KB · Views: 187
 -
 IMG_4876.jpg54.8 KB · Views: 190
 -
 IMG_4885.jpg97.6 KB · Views: 190
 -
 IMG_4884.jpg65.4 KB · Views: 191
 -
 IMG_4883.jpg74 KB · Views: 192
 -
 IMG_4873.jpg132.2 KB · Views: 190
 -
 IMG_4874.jpg109.2 KB · Views: 192
 -
 IMG_4886.jpg67.2 KB · Views: 185
 -
 IMG_4872.jpg94.9 KB · Views: 186
Last edited:
")


