
Crossbolt
Elite Cafe Member
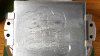
I thought I'd post this photograph of a recent practice plate and some comments so other novices can get a feel for what others are doing and see there's someone doing rougher work than them ")
After doodling around with various graver cuts I found one I felt consistently comfortable with hand pushing and decided to test it out hand pushing doing a variety of circles. What I settled on was a Dubber Speitzer round heel ground small using the Lindsay template. I put almost no heel on it and it seems to do fine. I had spent some time fiddling with assorted onglettes and haven't got the Lindsay template to work hand pushing and the other jewelers gravers feel too large ... I have it in my head they should work so I'll return to them once I practice a bit more so I can feel what they should be doing.
My approach on this was to do varying sizes to varying depths, starting with a scribed circle from a template then adding inner and outer circles by eye. Obviously the results are those of a beginner... they look like Tom Brady had something to do with most of them. If anyone sees anything they want to comment on by all means fire away.
I have a few observations to pass on that might be helpful to fellow beginners.
1. Preparation - This made an ENORMOUS difference. I don't think practice plates I had were prepared well previously and were contributing to trouble hand pushing. I reground the surface of this and successively took it all the way down to 1200. I found the cutting very much improved.
2. Scribing - Comments requested here. I scribed the original free standing circles. I find it easiest to cut on the scribe line rather than slightly to one side. I also think this saves the problem of possibly having to polish off scribe marks on a piece. Is this a good approach or not?
3. Feel. I've been working on grip focusing on trying to use my thumb and avoid top finger pressure. What I find helps and produces comfortable cutting is to feel the push not in my fingers or thumb but at the base of my palm and my elbow (if that makes sense).
4. Pushing - I find in the vise that with circles (as opposed to lines) I'm not so much pushing as maintaining graver position and turning the metal into the graver with my other hand.
5. Depth - I found it much easier to control shallow cuts than deep - the lack of material to resist popping out is much less of a problem than the amount of force in deep cutting leading to less control and serious pop outs when they do occur.
Obviously a lot more practice needed but I hope some find this a relevant reference point if nothing else. Oh, and if it isn't obvious the material is low carbon steel.
Jeremy
After doodling around with various graver cuts I found one I felt consistently comfortable with hand pushing and decided to test it out hand pushing doing a variety of circles. What I settled on was a Dubber Speitzer round heel ground small using the Lindsay template. I put almost no heel on it and it seems to do fine. I had spent some time fiddling with assorted onglettes and haven't got the Lindsay template to work hand pushing and the other jewelers gravers feel too large ... I have it in my head they should work so I'll return to them once I practice a bit more so I can feel what they should be doing.
My approach on this was to do varying sizes to varying depths, starting with a scribed circle from a template then adding inner and outer circles by eye. Obviously the results are those of a beginner... they look like Tom Brady had something to do with most of them
. If anyone sees anything they want to comment on by all means fire away.I have a few observations to pass on that might be helpful to fellow beginners.
1. Preparation - This made an ENORMOUS difference. I don't think practice plates I had were prepared well previously and were contributing to trouble hand pushing. I reground the surface of this and successively took it all the way down to 1200. I found the cutting very much improved.
2. Scribing - Comments requested here. I scribed the original free standing circles. I find it easiest to cut on the scribe line rather than slightly to one side. I also think this saves the problem of possibly having to polish off scribe marks on a piece. Is this a good approach or not?
3. Feel. I've been working on grip focusing on trying to use my thumb and avoid top finger pressure. What I find helps and produces comfortable cutting is to feel the push not in my fingers or thumb but at the base of my palm and my elbow (if that makes sense).
4. Pushing - I find in the vise that with circles (as opposed to lines) I'm not so much pushing as maintaining graver position and turning the metal into the graver with my other hand.
5. Depth - I found it much easier to control shallow cuts than deep - the lack of material to resist popping out is much less of a problem than the amount of force in deep cutting leading to less control and serious pop outs when they do occur.
Obviously a lot more practice needed but I hope some find this a relevant reference point if nothing else. Oh, and if it isn't obvious the material is low carbon steel.
Jeremy
Attachments
-
 circles-1.jpg111.3 KB · Views: 165
Last edited:


