Crossbolt
Elite Cafe Member
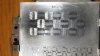
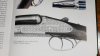
I decided to try pushing the limits a bit (no pun intended) and combine some circles and lines and extend my efforts to include basic shading. The attached photo shows my efforts and the historical example I based them on, which is a Horsely pattern (photograph from David Baker's book). I wouldn't call it their "house pattern" but I've only ever seen it on Horsley guns. It is a nice combination of basics and I find it oddly attractive. It seems useful for beginner practice anyway.
I initially tried a liner (Ngraver #7) for the shading but rapidly abandoned that, mostly because I concluded the original was done line by line individually because the liner patter was both too regular and too difficult, at least for me, to manipulate close the circles. I also find liners very difficult to hand push due, I assume to the larger surface area actually being cut.
The circles are 1/16th inch on 3/16th spacing. I've blackened the cuts temporarily with black acrylic because their orientation makes it so they don't show up evenly when photographed otherwise.
For other beginners out there I found this shading to go rather rapidly based on light slightly upward lines - like a prolonged flick or upward curving motion. It was good practice to get the feel of when to start cutting from a line. By the way, I cut away from the line, not towards. There's room for improvement but still I think it looks like more effort than is actually there (yes... you can say there should be more effort applied") ).
).
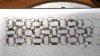
Other notes are that the layout, although simple, I found rather difficult. I didn't get it right. If you look closely the circles are not on a perfect grid. I laid them out measuring them as exactly as I could then scribing them from a template. To improve I think I'd need to scribe at grid, scribe using a compass then cut the circles and grid lines the polish off remaining scribe lines then shade.
Even with the template you can see my circles vary by about 1/32 inch in size. Not to mention the pop outs and "deflation". More practice ... more practice....
Comments, critique and general laughter welcome. Hopefully my fellow novitiates find my postings useful.
Jeremy
I initially tried a liner (Ngraver #7) for the shading but rapidly abandoned that, mostly because I concluded the original was done line by line individually because the liner patter was both too regular and too difficult, at least for me, to manipulate close the circles. I also find liners very difficult to hand push due, I assume to the larger surface area actually being cut.
The circles are 1/16th inch on 3/16th spacing. I've blackened the cuts temporarily with black acrylic because their orientation makes it so they don't show up evenly when photographed otherwise.
For other beginners out there I found this shading to go rather rapidly based on light slightly upward lines - like a prolonged flick or upward curving motion. It was good practice to get the feel of when to start cutting from a line. By the way, I cut away from the line, not towards. There's room for improvement but still I think it looks like more effort than is actually there (yes... you can say there should be more effort applied
).Other notes are that the layout, although simple, I found rather difficult. I didn't get it right. If you look closely the circles are not on a perfect grid. I laid them out measuring them as exactly as I could then scribing them from a template. To improve I think I'd need to scribe at grid, scribe using a compass then cut the circles and grid lines the polish off remaining scribe lines then shade.
Even with the template you can see my circles vary by about 1/32 inch in size. Not to mention the pop outs and "deflation". More practice ... more practice....
Comments, critique and general laughter welcome. Hopefully my fellow novitiates find my postings useful.
Jeremy
Attachments
-
 practice.jpg97.4 KB · Views: 317
 -
 horsley.jpg78 KB · Views: 312
Last edited: