
Ron Jr.
Elite Cafe Member
I'm often asked how I do my image transfer so here's one of the methods I often use. Sorry that the pics are incomplete, was a knee jerk decision to post this so I just used the stuff from the last thing I did.
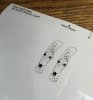
1. Make line drawing of image I want to use, outlining the important stuff. (sorry the paper is wrinkled, I dug it out of my garbage).
2. Shrink and refine original to the size I need.
3. Print to size drawing on a clear address/shipping label. (I usually print one or two extras of the image in case of any mishaps)
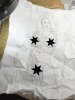
4. Place/position image printed label on piece to be engraved then poke through clear sticker label with a scribe following the lines leaving small indents in piece to be worked. (How often you poke a dot is at your discretion, too many and that may show on the finished piece, not enough and you spend a lot of time figuring them out)
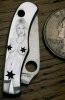
5. Remove sticker and start working playing connect the dots.
Notice I keep the small sticker I used to transfer the image (stuck to the left of the original) I've found it handy when I can't figure out the dots and use it for reference looking at it to see where I poked the hole/s through it. All those dots can get confusing if your design is complicated/intricate!
It takes a bit to get the feel for how hard to poke, it doesn't take much. Ideally your trying to just "kiss" the surface to be engraved or scrimshawed with the scribe.
Alright I think that's it, hope this helps someone. I'm happy to answer any questions about this that anyone may have.
1. Make line drawing of image I want to use, outlining the important stuff. (sorry the paper is wrinkled, I dug it out of my garbage).
2. Shrink and refine original to the size I need.
3. Print to size drawing on a clear address/shipping label. (I usually print one or two extras of the image in case of any mishaps)
4. Place/position image printed label on piece to be engraved then poke through clear sticker label with a scribe following the lines leaving small indents in piece to be worked. (How often you poke a dot is at your discretion, too many and that may show on the finished piece, not enough and you spend a lot of time figuring them out)
5. Remove sticker and start working playing connect the dots.
Notice I keep the small sticker I used to transfer the image (stuck to the left of the original) I've found it handy when I can't figure out the dots and use it for reference looking at it to see where I poked the hole/s through it. All those dots can get confusing if your design is complicated/intricate!
It takes a bit to get the feel for how hard to poke, it doesn't take much. Ideally your trying to just "kiss" the surface to be engraved or scrimshawed with the scribe.
Alright I think that's it, hope this helps someone. I'm happy to answer any questions about this that anyone may have.
Attachments
-
 sticker.jpg122.7 KB · Views: 312
 -
 drawing.jpg115.3 KB · Views: 313
 -
 RonJrPGspydy32.jpg93.4 KB · Views: 314
 just don't push to hard, they are made of soft metal, and they even leave a mark on metal clearly visible under the scope,
 ")


