
davidshe
Elite Cafe Member
Hello,
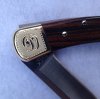
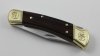
After finishing one side of this knife I was hoping to get some input from some of the wonderful engravers I have seen on this forum.
This is my first post so I will briefly introduce myself; My name is David Sheehan and I live in Santa Barbara, CA. Last year I unexpectedly lost my long time job and decided to seek a new career as an engraver. Last October I spent a week with Ray Cover to learn the basics and see if it was a fit for me. Loved it and Ray is a great teacher. I practiced every day for hours on end and then last Feb I spent a week with Sam Alfano. Wow, did that every get me motivated to push harder! Sam is a great teacher! I have most every video that Sam has made and as you can see on this knife, I also have Sam's monogram system which is very valuable in my opinion especially to a newer engraver.
Here are my questions...
1) After practicing countless hours on brass plates the brass in the Buck bolster totally threw me! Seemed really soft and cut nothing like the practice plates. Is that typical for knives?
2) The borders look ok from a distance but under the scope they are sorely lacking. I used a 120 graver for everything but since the brass was softer I think next time I will use a 90 or 105 for the border lines?
3) Once I realized it was softer brass I put a slightly larger heel on my graver. But, that did not help much. Then I tried a smaller heel with very light pressure and that seemed to be better? Ideas on that?
4) After buffing a bit I try to clean it up with detergent and a soft brush but under the scope it is not very clean. Does anyone use steam cleaner or ultrasonic cleaner after engraving? If so, what kind of equipment would you recommend?
Hope I wasn't too long winded and thanks in advance for any input.
Best regards,
David
Attachments
-
 buck-iphone2.jpg120 KB · Views: 207
 -
 2013_09_13_IMG_0301.jpg48.6 KB · Views: 208
")


