
You are using an out of date browser. It may not display this or other websites correctly.
You should upgrade or use an alternative browser.
You should upgrade or use an alternative browser.
knife craft from the garage
- Thread starter Lee
- Start date
Mario Sarto
Elite Cafe Member
I didn't read this term for a while on the Cafe - so i gonna use it now: this is eye-candy, Lee! The alignment of the elements is gorgeous. I really like it. Thank you for sharing!
 Wow amazing, Lee!! I especially love that knight scene
Marrinan
~ Elite 1000 Member ~
For a guy working in the garage you sure do some fantastic work. Wonder what you could do had you not wasted all the years farming spuds. Thanks for sharing your wonderful efforts with us. Fred
Superb Lee! Keep at it.
Cloudy
~ Elite 1000 Member ~
Magnificent! Thanks!
diandwill
Elite Cafe Member
Think I need to build a garage! LOL
Weldon47
~ Elite 1000 Member ~
Very nice indeed!!
Weldon
Weldon
jr hoot gibson
Elite Cafe Member
Lee, Beautiful...when you have the garage sale, I want to buythe garage!!
mitch
~ Elite 1000 Member ~
- Joined
- Jul 23, 2007
- Messages
- 2,636
...utilizing some uncommon techniques ....
would you mind elaborating? i'm sure many would be interested!
rod
~ Elite 1000 Member ~
Lee,
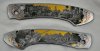
This is a superb piece of art in many ways, and flawlessly cut as ever. The scenes are so wonderful, one forgets just how small the scale is, and once it dawns on me, I am even more amazed.
Like Mitch, but with much less mastery or experience, I too would like to have you tell us a bit about the techniques, and in particular how you approach the gold sky background to eventually look so perfect? And the horse's mane, and everything quite frankly.
Separately, I would also like to know your inspiration for the piece? Camelot, King Arthur, Holy Grail, Ivanhoe, Robert the Bruce, or ?
What is the dimension of the folded knife?
Best wishes
Rod
Last edited:
Brian Hochstrat
Elite Cafe Member
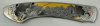
Looks real nice Lee. Do you have a larger picture?
I've been busy with the ever popular and always enjoyable taxes and other assorted bookkeeping, housekeeping activities. The basic idea here is to create a middle tone and work both directions adding darks and lights. Durer, Rembrandt, and many other in history have used a gray toned paper and applied charcoal, graphite, etc. for darker tones and then a white or lighter colored pencil to develop the light and highlight areas.
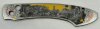
Brian, I don't know whether these will show up larger but it's a try.
Brian, I don't know whether these will show up larger but it's a try.
Attachments
-
 DSC_0035.jpg47.6 KB · Views: 78
 -
 DSC_0036.jpg49.2 KB · Views: 78
Ultra-fabulous, Lee!! Nothing not to like about this masterful work. 
mitch
~ Elite 1000 Member ~
- Joined
- Jul 23, 2007
- Messages
- 2,636
The basic idea here is to create a middle tone and work both directions adding darks and lights.
ok, so i'm gonna guess some sort etching process to establish the middle grey tone with bead blasting or acid, then engraving in the darks and burnishing in the lights. i've seen printmakers use this sort of hybrid intaglio & aquatint technique.
Mitch, I think all of the things you mentioned are likely to work to one degree or another. The principle is to find a way to create a mid-tone, which will vary some I suppose depending on the base metal, and then cut or stipple the darker areas and burnish or through some other means lighten where needed for lighter tones and highlights. In the end the key is knowing where it needs to be dark and where it needs to be light. The challenge of shading continues to rise from the ashes of our self esteem.
Andrew Biggs
Moderator
Beautiful work with the Lee Griffiths touch...................fabulous!!!!
Y'know Lee, you're getting pretty good at this")
Cheers
Andrew
Y'know Lee, you're getting pretty good at this
Cheers
Andrew
Tira
~ Elite 1000 Member ~
Very beautiful Lee. Wish I could see it in person.
Hora
Elite Cafe Member
. . . . . . . . no words . . . .
Sponsors


