Kinfe----Practice

CRW

Elite Cafe Member
Joined
Oct 10, 2008
Messages
314
Location
Daphne, AL 36526
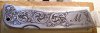
This is one of the Winchester knives that you can buy for $5.99 at Sports Academy. They are really nice for practice since they cut very well. This one goes to a friend of mine. I will start the other side today with an H on the initial part.

I probably should have put a border on this one, maybe on the next one I will do that. I still have trouble with dog legs and shading, but seems like I do better on a project than a practice plate, even tho this is a practice piece, it can be given away and hopefully make someone happy, or they may throw it at me:)

Send me some input.
Thanks
:beerchug:
 

Attachments

  • Winchester 1.jpg
    Winchester 1.jpg
    58.4 KB · Views: 235

Arnaud Van Tilburgh

~ Elite 1000 Member ~
Joined
Oct 3, 2008
Messages
4,221
Location
Belgium
Carl, sure one knife like this will make someone happy. I'm not sure a border is needed.
perhaps something extra in the oval where the M is, like a double border.

Nicely done

arnaud
 

CRW

Elite Cafe Member
Joined
Oct 10, 2008
Messages
314
Location
Daphne, AL 36526
Carl, sure one knife like this will make someone happy. I'm not sure a border is needed.
perhaps something extra in the oval where the M is, like a double border.

Nicely done

arnaud

Arnaud, Thanks for the suggestion. You are spot on, it would look a lot better with a double border, but I'm not sure I have room since I put the M so large in the oval. I also am not sure that I could cut a consistent line next to the other one:) Still learning you know.

I'm sure the next one will be a bit better.
:beerchug:
 

Arnaud Van Tilburgh

~ Elite 1000 Member ~
Joined
Oct 3, 2008
Messages
4,221
Location
Belgium
I know what you mean, as the M on top has not that much space to ad an extra border.
But........... in my opinion the border don't has to be all around.
I show you the most simple way to draw an extra border, but I think it can inspire you to draw an even more nice border than this one.
You can ad some curls at the end of my extra border, or whatever.
And notice I'm a newbie on design myself, but I like to help where I can and when I have some Idea.
But it is just my idea and if someone else can make it look better I aslo will learn from that.

So it is just my way as a novice

arnaud
 

Attachments

  • Winchester-2.jpg
    Winchester-2.jpg
    140.6 KB · Views: 78

Andrew Biggs

Moderator
Joined
Nov 10, 2006
Messages
5,034
Location
Christchurch, New Zealand
Hi Carl

Your friend should be pretty happy with that. After all it's a gift created by your own hands.

I would offer you some advice................

Elbows in the scrolls: From GRS or NGraver you can buy small plastic scroll templates with variouse size scroll backbones on them. They are cheap and a very useful thing to have around in the beginning. Set up some square practice plates of mild steel and fill these plates with various size scrolls using the plastic templates..............then cut them clockwise and counter clockwise.

keep cutting cutting them till you can iron out all those elbows in your scrolls. It may take several practice plates and some time.................also practice straight lines.

Or alternativley any stationary shop should sell circle templates or draw circles with dividers.

This is going to be utterley boring...............but don't quit doing it till you can cut them without elbows. The benefits of doing this exercise will make your work look 50 times better!!!!

Backgrounds: You need to take as much care with the background as you do the engraving. If you are going to stipple............ then do it evenly and consistantley so you get an even texture. across the whole backgroud......................that will make your work look 50 times better!!!

By the looks of it you are creating craters with your stippiling. Just remember that you are displacing metal so when you hit it with the point it's pushing the metal up and out (just like meteorites hitting the earth)......................turn your tool down to a lighter setting and stipple softly and make sure your point is sharp(or very slightly rounded) This will give you a much finer texture.

So there you are.......by doing those two simple things your work will look a 100 times better. :)

cheers
Andrew
 
Last edited:

eastslope

~ Elite 1000 Member ~
Joined
Jan 16, 2008
Messages
1,008
Location
Conrad, MT
I can't add anything to these fellows above me, but I do think your doing a good job and I am glad you keep posting your work. I enjoy it. Thanks, Seth
 

CRW

Elite Cafe Member
Joined
Oct 10, 2008
Messages
314
Location
Daphne, AL 36526
Thanks to all for the good advise, I will more than likely cut some more today and post the results later on this afternoon or tonight. I have a lot of things to try, with all the tips and such. Surly something will work for me. As someone mentioned I may be putting a death grip on my tool.

Seith, Thanks for looking at my work. I will keep posting since this is such a big help to me, with all the advice I get from people who know from looking at it what's wrong. I am not nearly as intimidated as I used to be to show my work. I know I will get better as time goes on. There are so many things to try, and without the help of the forum it would take years to find out what to try next. I would just like to say thanks to everyone that is taking part in this thread, and each comment is well worth the try.

Tira, I am going to try the traditional heel today, don't know yet if it is suitable for me or not, but will give it a try.

Andrew,
I realize the scrolls have elbows or dog legs as I call them. I will take your advice and practice on a few plates after this knife practice.
About the background, on this knife I used a rotary tool. I am thinking about using a bead punch on the next project after some practice to see if I can do it. At any rate, your advice is well taken and I promise to try to do better with every attempt.

Arnaud, Thanks for the advice on the border, I may try to put something else in it. I will do a little drawing before I do and see what looks the best. Thanks for your time and interest by showing the picture of what you had in mind, this helps a lot.
:beerchug:TO ALL
 

Tira

~ Elite 1000 Member ~
Joined
Nov 9, 2006
Messages
1,551
Location
Doylestown, PA
Carl, One thing to remember with the traditional heel, if you're not used to it is, when you go around turns - especially tight turns - the back of the tool with drag and mar the outside wall if you drop your wrist. If you start to see drag marks it is because you are dropping your wrist as you execute the turn which is very normal at first and it is not a large movement at all. You'll probably like it a great deal for the straighter line areas - hopefully it will give you more control. Keep at it! :)
 

CRW

Elite Cafe Member
Joined
Oct 10, 2008
Messages
314
Location
Daphne, AL 36526
Andrew,
One thing I forgot to ask you. On the scroll practice plates, should I do all the same size scrolls or a series of progressive scrolls? I think I know the answer, but never hurts to be sure.

Tira,
Thanks for the tip on the traditional heel. Will let you know tonight how it suits me, at my level of experience.

Jim,

Thanks for the compliment on the background and fading out. I used to do some leather work like this years ago, and liked the effect so thought I would try it in steel.

Seth,
Jump in any time. I am glad you are following this thread. I also follow yours, I really like your work.


:beerchug: To All
 

CRW

Elite Cafe Member
Joined
Oct 10, 2008
Messages
314
Location
Daphne, AL 36526
This is just an update on yesterday's findings.

I am paying more attention to everything now. I found out that I have a death grip on the graver, as someone in the thread had mentioned to hold the graver in a relaxed position. So this is one of my problems. I also found out that I am definitely moving my wrist at the end of a cut. I sharpened until I was blue in the face. :)


You guys were are right on target on the hardness of the steel, it was my lack of experience in cutting different types of metal that had me off coarse. I sharpened my graver with about a 60 degree face and it seemed to cut a little better. But the metal is harder than I had originally thought. I have the other side of the knife cut with the main lines and ready for the background and shading. Oh how I dread the shading, but it is the only way to learn, hopefully the things that Ray told me will help a lot. I will refer to the pages in his manual a lot. I also bought a couple of his castings at the grave in and have been studying them. Ray you are such a great person, with a wonderful personality.
I should have the knife ready to photograph this afternoon sometime, if the sharpening goes well.;) I will post as soon as it is ready. With all the help, I think that the cutting on this side is a little better than the first. But that again is just my opinion.
I know I will succeed, just be patient with me, as I have to be patient also. It is a slow learning experience for me.

:beerchug:
To All
 

CRW

Elite Cafe Member
Joined
Oct 10, 2008
Messages
314
Location
Daphne, AL 36526
Here is the other side of the knife, I feel like it is a little, I say a little improvement over the other side.
This time I used Thermo-Loc on a solid piece of hardwood and filled the cavity with a piece of paint paddle. The paint paddle was a perfect fit, matter of fact I thought I was going to have to sand it down to get it in the knife.
The shading is still giving me fits along with cutting perfect scrolls. I can't seem to get the dog legs out. I am going to get some practice plates and practice the scrolls as someone suggested, until I can cut a decent scroll.

Anyway here is the picture.
:beerchug:
To All
 

Attachments

  • Winchester 2.jpg
    Winchester 2.jpg
    56.6 KB · Views: 42

KCSteve

~ Elite 1000 Member ~
Joined
Jun 19, 2007
Messages
2,882
Location
Kansas City, MO
Looks pretty good Carl! :thumbs up:

Good that you matched the orientation and flow from the other side. Sure, it's not the normal one for a knife but it's better to be consistent.

The 'fading' stippling looks better on this side. I should practice this myself, assuming I get some darned bench time! I think the way to do it is draw / cut some squares and try to make a smooth gradient in them. That avoids the issues of working around a design.

I still think a part of the dog legs is from working off center. You're on just your vise, right? Did you slide the knife back and forth to keep the area you're working on near the center of the vise so it would be (pretty much) on the center of rotation? I've found it a lot harder to cut a clean curve (especially a small one) when I'm having the part I'm working on moving through a large curve. Reminds of way back when I was first driving and the problems I had changing lanes while going around a curve - just takes practice to combine the two curves into what you want.

Overall I'd say your friend should be quite pleased. Add in the learning you've done and it looks like a successful project to me. :)
 

CRW

Elite Cafe Member
Joined
Oct 10, 2008
Messages
314
Location
Daphne, AL 36526
Thanks Steve,
I do try to keep my work in the center of rotation, but sometimes I forget to move it in my vise. I am going to cut a series of scrolls next, before my next project and see if I can correct the dog leg.

Yes it has been a learning experience and I can see a difference in the first side and the second. So maybe the next project will improve a little more.

:beerchug:
To All
 

Joe Mason

Elite Cafe Member
Joined
Nov 11, 2006
Messages
430
Location
Brandon, Mississippi
Carl you are doing great. This side has less elbows and dog legs. Looks much better. Study it and do the next one a little better. Keep up the good work.

Joe
 

CRW

Elite Cafe Member
Joined
Oct 10, 2008
Messages
314
Location
Daphne, AL 36526
Joe,
It's good to see you back active again, was kinda worried about you. I don't know if you read the other thread or not so let me tell you about my bout with the old ticker. In May of 05 I had a burning in my chest and thought it was heart burn, but I wasn't sure because I have never had heart burn before. I chewed Tums and such, but it wouldn't stop. My wife, bless her heart, insisted on me going to the ER, and sure enough I was heaving a heart attach. They put in 2 stints and I have been doing great every since. Hope yours is as simple. Good luck.

Now back to the comment on the knife, thanks so much for the words of encouragement. I cut 19 scrolls today in a 2X4 practice plate. I could tell a big difference by the time I had finished. Now I have a plate full of scrolls that I might as well add leaves and shade, so that will give me some more practice.

This knife is going to a dear friend in Tennessee. I know he will treasure it so I plan to build a small knife box out of either Teak or Cherry for him to keep it in. I will send you a picture when it is finished. Heck, I might even post a picture of it some one else might want one.

:beerchug:
HERES TO YA
 

Joe Mason

Elite Cafe Member
Joined
Nov 11, 2006
Messages
430
Location
Brandon, Mississippi
Well Carl, I am going to try to get on the computer more this next week. Hope to do a little engraving this week also. Thought I would pick one of the small jobs first to work on. The Sunday after the Blade Show I did some shoveling of some sand and my arms were real sore the next day. The soreness would come and go the next couple of days. On Thursday morning I got up with my chest very tight. I checked my blood pressure and knew I had a problem. This was at 5:10am. My wife called my son, who lives next door and by 5:45 they had me in the hospital. Walked in and no one was in the emergency area. They took me back and went to work on me. The hurting arms was a signal of a heart attack, but I did not pick up on it.

I feel good now, but get tired easily. Got to have the bypasses sometime in July.

Would enjoy seeing the finished knife as everyone else. If I can help any way, give me a call. Will be laying around the house, but hope to do a little scratching soon.

Joe
 

CRW

Elite Cafe Member
Joined
Oct 10, 2008
Messages
314
Location
Daphne, AL 36526
Would enjoy seeing the finished knife as everyone else. If I can help any way, give me a call. Will be laying around the house, but hope to do a little scratching soon.

Joe

Joe,
I will post the finished knife in the box in a new thread when it is finished. Thanks for the offer for the help.
I along with everyone else, hope your surgery comes out fine, and I am sure it will with the technology they have this day and age.
To you a speedy recovery. Keep in touch.

:beerchug:
 

Latest posts

Sponsors

Top