How to engrave small circles?

Engraver10

Member
Joined
Jul 1, 2023
Messages
53
Location
Brazil
Dear engraver friends,

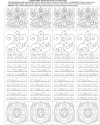
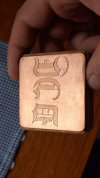
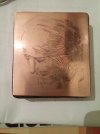
I'm new here on the Forum, and I'm still learning this art that I love. Attached in this post and images recorded by me. I use damar varnish for transfer, apply acetone on the back with a cotton swab and use a polish by rubbing until the design is transferred.

Then I wait for the varnish to dry well and take it under running water and slowly remove it with my fingertips in circular motions until I remove all the paper. I have really liked this technique. Then I can show you a transfer here.

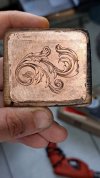
My base uses medium hard copper plate, in my country I can't get steel plate or other metal. I used a 90⁰ square burin (manual) with a 10⁰ heel, for very small circular grooves I use a singlet burin with a 45⁰ heel.

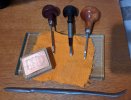
My prints are still using the technique of thickening and narrowing the lines. I don't have a spiked ball. I use a thick glass plate and a flannel for circular movements and secure my plate to a wooden support. I would really like some tips for friends here, to help a friend who learns a little more of this beautiful art every day.

I've been exercising an average of 20 hours a week. In my country there is a lot of lack of tools.

Thanks to everyone who can contribute their help.
 

Attachments

  • 20230712_165540.jpg
    20230712_165540.jpg
    138.6 KB · Views: 95
  • 20230616_151711.jpg
    20230616_151711.jpg
    81.8 KB · Views: 106
  • 20181205_040845.jpg
    20181205_040845.jpg
    119.3 KB · Views: 103
  • 20230712_145336.jpg
    20230712_145336.jpg
    107.7 KB · Views: 98
  • 20230712_145325.jpg
    20230712_145325.jpg
    115.7 KB · Views: 84
  • 20230712_145344.jpg
    20230712_145344.jpg
    109.9 KB · Views: 91

mtlctr

Elite Cafe Member
Joined
Jan 6, 2015
Messages
378
Location
NW Ohio
I like your style , especially the woman.
small circles, what you are doing now close the scrolls. Your cutting and tool control looks pretty good to me draw a bunch of small circles & go for it. I’m sure you will succeed .
 

monk

Moderator
Staff member
::::Pledge Member::::
Joined
Feb 11, 2007
Messages
10,872
Location
washington, pa
Olá, fico muito feliz com sua avaliação, como disse no texto anterior, no meu país praticamente não existe essa arte, sempre tentarei aprender mais com todos meus amigos daqui. Obrigado
please use a translator. the forum is currently english only
 

Engraver10

Member
Joined
Jul 1, 2023
Messages
53
Location
Brazil
as for engraving small circles, only practice will get you where you want to be.
I work with a fine manual burin with a 45⁰ heel, where I can get more firmness and support to make the smallest circles of the designs, there are cuts in the plate that must have an average of 2.5 mm in diameter.

But I notice that I get more quality in these cuts without digging the burin too deeply into the plate. Because when I try to make a deeper cut, the walls of the cut are all skinned, I don't know if that would be the correct term. And I use a 90⁰ square burin, with a heel for larger circumferences.

This ongelte chisel that I use would be indicated for these tiny circumferences?

Thanks
 

AllenClapp

Elite Cafe Member
Joined
Aug 7, 2019
Messages
381
Location
Raleigh, NC
Here are some practice plate designs that I made for myself to practice cutting straight lines, curved lines, and small curves. The leaf designs are not fine art, but they are good practice for both cutting small scrollwork with sharp curves and for shading practice for small leaves. If you print the pages on 8.5 x 11 inch paper, the transfers will fit onto a 2 inch by 2 inch plate. Otherwise, you can scale to fit what you have.
 

Attachments

  • Clapp Scrolls and Leaves Page 1.png
    Clapp Scrolls and Leaves Page 1.png
    547.1 KB · Views: 78
  • Clapp Practice Plate LINES LEAVES SCROLLS BORDERS Transfer Sheets.pdf
    575 KB · Views: 45

Engraver10

Member
Joined
Jul 1, 2023
Messages
53
Location
Brazil
Here are some practice plate designs that I made for myself to practice cutting straight lines, curved lines, and small curves. The leaf designs are not fine art, but they are good practice for both cutting small scrollwork with sharp curves and for shading practice for small leaves. If you print the pages on 8.5 x 11 inch paper, the transfers will fit onto a 2 inch by 2 inch plate. Otherwise, you can scale to fit what you have.
Thank you very much, I will follow your tips, I'm sure I will learn a lot here in this forum with everyone.
Regards
 

Chujybear

~ Elite 1000 Member ~
Joined
Nov 3, 2011
Messages
1,079
Location
Haida Gwaii
The most important tool to make your life easier as an engraver is not the power assisted engraver, and it is not eye enhancement. The most important tool is the engraving ball. It will increase your control. It will add weight behind the subject that you engrave, and it will make engraving circles the easiest thing, because you just set your graver and spin the vise and you will have a circle..
that said, you dont need an engraving ball to get similar advantage.. many standard vises also have rotation. You will miss the advantage of being able to tilt your work (unless you rig something up)..
What i did for years with good results was screw a small round of plywood to the end of a dowel.. the other end of the dowel corresponded to a notch that i dug in my bench.. i shellacked my work down to the dowel, and i held the dowel in my hand, providing rotation by twisting the dowel with my wrist.... i was happy with that for years.. i made a variation for the beach which was just a longer dowel.. bottom side i just pressed into the sand
 

AllenClapp

Elite Cafe Member
Joined
Aug 7, 2019
Messages
381
Location
Raleigh, NC
The most important tool to make your life easier as an engraver is not the power assisted engraver, and it is not eye enhancement. The most important tool is the engraving ball. It will increase your control. It will add weight behind the subject that you engrave, and it will make engraving circles the easiest thing, because you just set your graver and spin the vise and you will have a circle..
that said, you dont need an engraving ball to get similar advantage.. many standard vises also have rotation. You will miss the advantage of being able to tilt your work (unless you rig something up)..
What i did for years with good results was screw a small round of plywood to the end of a dowel.. the other end of the dowel corresponded to a notch that i dug in my bench.. i shellacked my work down to the dowel, and i held the dowel in my hand, providing rotation by twisting the dowel with my wrist.... i was happy with that for years.. i made a variation for the beach which was just a longer dowel.. bottom side i just pressed into the sand
Nice comment. I have known a couple of engravers who sanded a flat side on a used bowling ball, drilled and tapped some holes in it to mount pieces of wood to which they hot glued work to engrave, and sat the bowling ball in a bag of sand or shot so they could rotate the ball as needed. They waxed the bag and bottom of the all to make it easier to turn. The nice equipment is great and makes life easier, but it isn't necessary.
 

Engraver10

Member
Joined
Jul 1, 2023
Messages
53
Location
Brazil
A ferramenta mais importante para facilitar sua vida como gravador não é o gravador assistido por energia e não é o aprimoramento dos olhos. A ferramenta mais importante é a esfera de gravação. Isso aumentará seu controle. Ele adicionará peso atrás do objeto que você gravar e tornará a gravação de círculos a coisa mais fácil, porque você apenas ajusta seu gravador e gira o torno e você terá um círculo.
Dito isso, você não precisa de uma esfera de gravação para obter uma vantagem semelhante. Muitos tornos padrão também têm rotação. Você perderá a vantagem de poder inclinar seu trabalho (a menos que você monte algo).
O que fiz durante anos com bons resultados foi aparafusar um pequeno pedaço de compensado na ponta de uma cavilha.. a outra ponta da cavilha correspondia a um entalhe que cavei na minha bancada.. apliquei laca no meu trabalho até a cavilha, e segurei a cavilha na minha mão, girando a cavilha com o pulso.... fiquei feliz com isso por anos.. fiz uma variação para a praia que era apenas uma cavilha mais longa.. lado de baixo eu apenas pressionei na areia

The most important tool to make your life easier as an engraver is not the power assisted engraver, and it is not eye enhancement. The most important tool is the engraving ball. It will increase your control. It will add weight behind the subject that you engrave, and it will make engraving circles the easiest thing, because you just set your graver and spin the vise and you will have a circle..
that said, you dont need an engraving ball to get similar advantage.. many standard vises also have rotation. You will miss the advantage of being able to tilt your work (unless you rig something up)..
What i did for years with good results was screw a small round of plywood to the end of a dowel.. the other end of the dowel corresponded to a notch that i dug in my bench.. i shellacked my work down to the dowel, and i held the dowel in my hand, providing rotation by twisting the dowel with my wrist.... i was happy with that for years.. i made a variation for the beach which was just a longer dowel.. bottom side i just pressed into the sand
Your comment is very good, the fixing brackets in my country are called "nailing balls", I have never tried using them, because in my country they are very expensive. But I'm sure they make round cuts a lot easier. I currently use a very thick glass plate, and on top I place a piece of fabric. I rest my plate on top of this fabric, which makes it easier for me to rotate with one hand while fixing the burin with the other hand. I really liked your ideas. I will try to use your dowel idea, it seems excellent. thank you all for the comments and help. I am attaching my support and tools.
Regards.
 

Attachments

  • 20230723_204655.jpg
    20230723_204655.jpg
    173.2 KB · Views: 15

Latest posts

Sponsors

Top