
Weldon47
~ Elite 1000 Member ~
I was asked about the "burlap" background texture so here goes with a little info:
I'll be focused on silver (or sterling) however, these ideas can also be utilized on steel. I won't go into the actual making of a punch (shaping/texturing/annealing/hardening) as that has been covered elsewhere. For a punch used exclusively on silver you might get by for a little while without it being hardened but, if you use it on steel it will definitely need to be properly hardened!
I use several different techniques for background texture with the selection usually being dependent upon the style of scroll or pattern I'm working with on that particular project.
Round or punch dot. Useful for American/Nimschke/Helfricht style work and can be used with either standard background or, relief engraving. For this style I use a round dot punch either purchased from the Ngraver Company or, a shop-made one, whichever is handy at the time & the right size for the job (generally, larger pattern = larger dot size& smaller pattern = smaller dot size). Nice when used with the right style but not so good when you want a really dark background.
Matt texture: Usually in conjunction with relief backgrounds (moderate, deep, etc, etc...). For this on I use a shop-made punch with a heavily textured face. Once the background has been relieved (double outline with an onglette leaning into the background and then cut away with a flat) and is relatively smooth, I will use this punch to impart a matt texture to the background. This helps level or smooth the surface as you texture. For hard to reach areas like little corners, etc, I'll carefully use a single point to kill the light bouncing out of those spots. This is best when you want a dark grey/black background. Holds ink/paint well.
Single point texture: The most time consuming (IMHO) of the group mentioned here but should also result in the most light absorbing and therefore the darkest background. Holds ink/paint well.
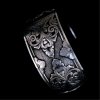
Specialty textures: The "burlap" texture was done with a shop-made punch. The punch was made by cutting the working end with a large liner at right angles resulting in a checkerboard pattern. Once you've got a punch made up, it's then a matter of stamping the pattern into the carefully prepped background. This one can be pretty challenging but if correctly done, it looks nice. Haven't used it on a gun yet but it should work there too. Not the best technique to use if you want a dark black background.
The relative darkness of a background is dependent on several things a couple of which are the texture, the antiquing agent (ink, flat black paint, etc, etc used) and the surface prep of the rest of the piece.
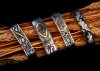
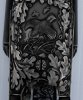
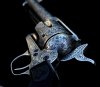
I have attached a few pics with a variety of background textures for you to take a look at.
Hope the info is helpful,
Weldon
I'll be focused on silver (or sterling) however, these ideas can also be utilized on steel. I won't go into the actual making of a punch (shaping/texturing/annealing/hardening) as that has been covered elsewhere. For a punch used exclusively on silver you might get by for a little while without it being hardened but, if you use it on steel it will definitely need to be properly hardened!
I use several different techniques for background texture with the selection usually being dependent upon the style of scroll or pattern I'm working with on that particular project.
Round or punch dot. Useful for American/Nimschke/Helfricht style work and can be used with either standard background or, relief engraving. For this style I use a round dot punch either purchased from the Ngraver Company or, a shop-made one, whichever is handy at the time & the right size for the job (generally, larger pattern = larger dot size& smaller pattern = smaller dot size). Nice when used with the right style but not so good when you want a really dark background.
Matt texture: Usually in conjunction with relief backgrounds (moderate, deep, etc, etc...). For this on I use a shop-made punch with a heavily textured face. Once the background has been relieved (double outline with an onglette leaning into the background and then cut away with a flat) and is relatively smooth, I will use this punch to impart a matt texture to the background. This helps level or smooth the surface as you texture. For hard to reach areas like little corners, etc, I'll carefully use a single point to kill the light bouncing out of those spots. This is best when you want a dark grey/black background. Holds ink/paint well.
Single point texture: The most time consuming (IMHO) of the group mentioned here but should also result in the most light absorbing and therefore the darkest background. Holds ink/paint well.
Specialty textures: The "burlap" texture was done with a shop-made punch. The punch was made by cutting the working end with a large liner at right angles resulting in a checkerboard pattern. Once you've got a punch made up, it's then a matter of stamping the pattern into the carefully prepped background. This one can be pretty challenging but if correctly done, it looks nice. Haven't used it on a gun yet but it should work there too. Not the best technique to use if you want a dark black background.
The relative darkness of a background is dependent on several things a couple of which are the texture, the antiquing agent (ink, flat black paint, etc, etc used) and the surface prep of the rest of the piece.
I have attached a few pics with a variety of background textures for you to take a look at.
Hope the info is helpful,
Weldon
Attachments
-
 Zapp 3.jpg80.5 KB · Views: 305
 -
 CB1.jpg61.4 KB · Views: 300
 -
 Bracelets2 (2).jpg103 KB · Views: 301
 -
 063.JPG385.6 KB · Views: 303
 -
 G-June.jpg74.7 KB · Views: 300
Last edited:
 :beatup:.


