Hello from a new guy

Mark Knapp

Member
Joined
Apr 25, 2016
Messages
90
Location
Fairbanks Alaska
Hello everyone, I would like to say what a great resource this site is to someone new to engraving. I've found it very helpful and informative.

I got into engraving because I have been interested in it for some time and have been a custom knife maker for about 15 years. I thought engraving would enhance my knives an broaden their appeal. I am currently an American Bladesmith Soc. Journeyman Smith.

I took the GRS beginning engraving class last spring under Jake Newell. I found him and all the people at GRS as well as the facility to be exceptional in every way. They knocked about a thousand years off of my learning curve. I highly recommend them to anyone wanting to get a jump start on this art.


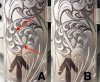
These are the first two exercises I completed in the class.

I finally got my home engraving station together and started my first practice piece, the floor plate for my old Winchester model 70.


Here's my station, the vise stand is a base from an old hydraulic barber chair. You can see the foot pedal that raises and lowers the vise. I found the desk on Alaska's List, it's a heavy, solid wood one that seemed perfect.


Here's another shot with the sharpening station drawer open, the front of the drawer even swings down.


Here's my sketch for the floor plate. I thought about starting out on a flat piece of steel for a practice piece, but then again, the floor plate IS for practice really.

Any constructive criticism or comments are welcomed.

Thanks for looking
 
Last edited:

Mike_Morgan

Elite Cafe Member
Joined
Mar 17, 2016
Messages
359
Location
Spencerport, NY
In my opinion, the leaf that you have in AREA 1 would be better served as another scroll, or a more flourished leaf, or leaves.

In AREA 2, there's something awkward about what you did there, it feels as though it's gone backwards (even though it's not), and it's creating a weird optical illusion with the perspective of the layering.
 

Attachments

  • Scroll.jpg
    Scroll.jpg
    43.1 KB · Views: 339

Sam

Chief Administrator & Benevolent Dictator
Staff member
Joined
Nov 6, 2006
Messages
10,491
Location
Covington, Louisiana
Welcome to the Cafe, Mark! You have a Graversmith AND a Gravermach?!
 

speeedy6

Elite Cafe Member
Joined
Sep 16, 2013
Messages
271
Mark, I like the design ending in a leaf like you have. I like the style of your scrollwork. The leaf at the top seems to define the area the scroll is in like, the plant has nowhere else to go but back on itself. I agree with Mike on point #2 though. And, the last two scrolls turn in the same direction. I see they're different stems but it still looks odd on first glance. Thanks for posting , Mark
 

Mark Knapp

Member
Joined
Apr 25, 2016
Messages
90
Location
Fairbanks Alaska
In my opinion, the leaf that you have in AREA 1 would be better served as another scroll, or a more flourished leaf, or leaves.

In AREA 2, there's something awkward about what you did there, it feels as though it's gone backwards (even though it's not), and it's creating a weird optical illusion with the perspective of the layering.

Hi Mike, Thank you for your input, I appreciate it. In area one, the center of that tab has a screw head in it though it is not shown on the drawing, it is actually at a lower plain than the floor plate itself. I am actually thinking of leaving it out.

In area two, I hope that shading will make that area look less awkward, this image is not etched in stone but it is already etched in steel so I can't change it, I will apply what ever I learn here to future projects. Thank you again.
 

Mark Knapp

Member
Joined
Apr 25, 2016
Messages
90
Location
Fairbanks Alaska
Welcome to the Cafe, Mark! You have a Graversmith AND a Gravermach?!


Yes, I got the Graversmith first (second hand) with two vises, a hand piece and a lot of other stuff at a very reasonable price a few years ago with the idea of starting off with that. After the GRS class I bought the Gravermax G8 because I felt like I really wanted one, with the two ports and the extra one for the rotary hand piece.

The idea was to have a port for every hand piece and the rotary. My thinking was/is that if I have a hand piece set up with a graver for whatever I might want to do I wouldn't be tempted to get by with a graver less suited for a particular application because it was already in the hand piece. I thought it might save a little time and my work might be a little better.

It could also be that I just wanted to by a shiny new machine. My knife making is subsidizing the engraving so I don't feel like I need to weigh the cost with the earning potential of the equipment like I normally do.

Thanks Sam, I appreciate this site. Excited to see more, learn more and do more.
 

Mark Knapp

Member
Joined
Apr 25, 2016
Messages
90
Location
Fairbanks Alaska
Mark, I like the design ending in a leaf like you have. I like the style of your scrollwork. The leaf at the top seems to define the area the scroll is in like, the plant has nowhere else to go but back on itself. I agree with Mike on point #2 though. And, the last two scrolls turn in the same direction. I see they're different stems but it still looks odd on first glance. Thanks for posting , Mark

Hi Speedy, I see what you mean with the two scrolls going in the same direction, I could try alternating next time. I actually wanted the stem from the first scroll to lead to the third scroll, passing through the second one, so I would need to find a way to alternate the direction and still pass through the second scroll. The overlapping theme is interesting to me and I want to experiment with it more in future work. Thanks Mark
 

monk

Moderator
Staff member
::::Pledge Member::::
Joined
Feb 11, 2007
Messages
10,874
Location
washington, pa
welcome to the forum. doing your own engraving will surely add additional value to the knives you create. your setup looks great for a newcomer. your drawing will prove more valuable than your toy collection. it's obvious you already know that. what style of knife do you make? or do you make them per client request?
 

Mark Knapp

Member
Joined
Apr 25, 2016
Messages
90
Location
Fairbanks Alaska
welcome to the forum. doing your own engraving will surely add additional value to the knives you create. your setup looks great for a newcomer. your drawing will prove more valuable than your toy collection. it's obvious you already know that. what style of knife do you make? or do you make them per client request?

Thank you for your comment.

I make customs with my own damascus and mosaic handles of exotic ancient materials like mammoth ivory mammoth teeth and fossil walrus ivory. You can check some of them out on my website if you like at markknappcustomknives.com
 

Mark Knapp

Member
Joined
Apr 25, 2016
Messages
90
Location
Fairbanks Alaska
Thanks everyone for the comments. Yes, I have a lot of stuff for a new guy. I tend to jump into things with both feet. I'm sure this is something will enjoy for a long time so there was no need to go into it timidly.

Here's another shot of my hideaway, my fly tying bench looks a lot like my engraving bench. My cabinet of fly tying materials is on an adjacent wall, it's six feet wide and six feet high, to give you an idea of how bad I got that disease.


After several engraving sessions and lots of hours, this is what I have. The photo quality could be better, I will work on that. As you can see, there are some problems with it. The scroll at the arrow being the biggest offender. That's the scroll I started with after I was done with the outlines. I had forgotten the proper graver shape for the inside leaf cut, I grabbed the wrong one. We were taught to use a round graver for scooping out the inside. On top of that I didn't immediately recognize that it was chipped or dull and I stubbornly tried to power through with what I had in the hand piece. Before I knew it the scroll looked like this.


After sleeping on it I came to the conclusion that it wasn't just my lack of graver control, It was the wrong tool and a dull, chipped one that was giving me fits. I re-grouped and for the next two scrolls it was much easier to do.

I am thinking about ways to fix the really bad scroll. I am leaning toward inlaying steel wire into the insides of each leaf and re-cutting them. I need practice doing that too, so what better place?

I'm open to suggestions on this and anything else in the project.

Thanks for looking and for any comments or suggestions.

Mark
 
Last edited:

Dave London

~ Elite 1000 Member ~
Joined
Nov 12, 2006
Messages
1,765
Location
Colorado
Only suggestion I have is mount the floor plate to a hunk of wood with hot glue. Keep from damaging the edge and a lot less vibration, MTC. YMMV looking good
 

monk

Moderator
Staff member
::::Pledge Member::::
Joined
Feb 11, 2007
Messages
10,874
Location
washington, pa
there's no known cure for your disease, so just enjoy it. i think you're living proof as to the value of taking a class of instruction.
 

Mark Knapp

Member
Joined
Apr 25, 2016
Messages
90
Location
Fairbanks Alaska
Only suggestion I have is mount the floor plate to a hunk of wood with hot glue. Keep from damaging the edge and a lot less vibration, MTC. YMMV looking good

Hi Dave, thank you. The pins I started with were actually marring the edge of the floor plate. I switched to these bigger blocks, they have grooves in them on the one side that conform to the shape of the edge of the floor plate really nicely. So far, no damage. I will keep a watch on them and switch to your idea if I need to. Thanks again.
 

Mark Knapp

Member
Joined
Apr 25, 2016
Messages
90
Location
Fairbanks Alaska
Here's the piece with the steel inlays for the repairs.

I was actually more afraid of it than I needed to be. It was really just trail and error. One of them didn't stick the first time around so I cut the furrow deeper and made the undercuts bigger.

There are 13 inlays all together, I fixed 12 in the scroll and another weird looking thing above in the circle.

Now, we will see if they all stay put while I re-cut the leaves. I'm going to take light cuts and maybe stay a little shallower than my original background cuts.
 

Mike_Morgan

Elite Cafe Member
Joined
Mar 17, 2016
Messages
359
Location
Spencerport, NY
Earlier in this thread I mentioned two areas that looked a little "wonky" to me... and you corrected the one at the top, and it looks great! The other area, in that middle scroll you've changed entirely, but there's stull a weird optical illusion that I couldn't quite put my finger on when I was looking at your drawing, only that it looked a little strange.

Now that you have it shaded out, I can see the weirdness has reared its ugly head once again, and unfortunately, it's way too late to correct it. So I'll show you what I see, for future reference.

In photo A (below) you have a stem appearing from behind the background, crossing the scroll, then hiding back behind the background again after it passes over the scroll. To me, that just looks really weird, because it implies that there is a layer BELOW the background. I manipulated your photo (B) to show where the stem would cross if it emerged IN FRONT of the background. Maybe it's just me, but that looks more natural, to my eye anyway.
 

Attachments

  • Screen Shot 2016-11-10 at 4.12.44 AM.jpg
    Screen Shot 2016-11-10 at 4.12.44 AM.jpg
    115.6 KB · Views: 70

atexascowboy2011

Elite Cafe Member
Joined
Feb 13, 2012
Messages
997
Mark,
Test the graver on your thumbnail and if it won't cut a smooth groove into your nail don't use it.
 

Mark Knapp

Member
Joined
Apr 25, 2016
Messages
90
Location
Fairbanks Alaska
Earlier in this thread I mentioned two areas that looked a little "wonky" to me... and you corrected the one at the top, and it looks great! The other area, in that middle scroll you've changed entirely, but there's stull a weird optical illusion that I couldn't quite put my finger on when I was looking at your drawing, only that it looked a little strange.

Now that you have it shaded out, I can see the weirdness has reared its ugly head once again, and unfortunately, it's way too late to correct it. So I'll show you what I see, for future reference.

In photo A (below) you have a stem appearing from behind the background, crossing the scroll, then hiding back behind the background again after it passes over the scroll. To me, that just looks really weird, because it implies that there is a layer BELOW the background. I manipulated your photo (B) to show where the stem would cross if it emerged IN FRONT of the background. Maybe it's just me, but that looks more natural, to my eye anyway.

Hi Mike, First please let me say thank you. In your first suggestion to me where you circled two areas, I left the top one out , it actually would have gone onto the hinge plate, not the actual floor plate. You suggested a scroll there instead of the leaves I sketched. As you can see there is a screw head in there so a scroll would not work. I may leave the leaves off or use them, still not sure but open to suggestions.

On the second circle of your first post, you circled the middle scroll, in your second post you circled the bottom scroll. I can see clearly what you are talking about there. You are very skilled at Photo Shop. I wish I had seen that before I inlaid some steel to fix the bottom scroll, I would have made my inlay longer to fix the bottom of that problem where you marked it NO. 1. If you look at my repair, you can see I put steel in there to fix the top of the problem where you marked it NO. 2. It actually dawned on me, while I was re-cutting that NO.2 spot, exactly what you are talking about. I am going to inlay some more steel in the NO.1 spot to fix it. Thank you very much. Please check in on me later.
 

Mark Knapp

Member
Joined
Apr 25, 2016
Messages
90
Location
Fairbanks Alaska
OK, with 15 inlays I think I have all the fixes in, for now. My original 13 and the two spots Mike pointed out. I have about twelve hours total in the fixes. It's a lot easier to do on the computer than it is to do in the steel. I am a lot happier with it now than I was. The leaves in the bottom scroll are not all anemic, the negative spaces in between leaves are a lot smaller.


Latest posts

Sponsors

Top