Hand push with the EasyGraver 105° graver

Sam

Chief Administrator & Benevolent Dictator
Staff member
Joined
Nov 6, 2006
Messages
10,491
Location
Covington, Louisiana
There are occasional posts here in the forum asking for info on hand pushing, but there doesn't seem to be much out there. I'm a handpiece guy for many reasons, but I was an old school hammer & chisel and hand push guy back in the day, so I thought I'd look into this.

I've been experimenting with the EG105 gravers for hand pushing using what's often referred to as a European style heel. I've seen this heel geometry in America 30+ years ago so I don't really know it's true origin, but it's often referred to as European.

To achieve this heel with the EasyGraver fixture, I simply sharpened the heel about 20x longer than I normally would. Obviously there will be some heel drag with this geometry, but it works well for hand pushing when my normal micro-short heel does not.

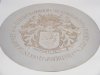
I'm the first to admit I'm really rusty with hand pushing, but here's a shot of my test with the large heel EG105 graver.

I've also made up a EG120 with large heel and I just started testing that one as well. From what I can see it performs similarly.

This is definitely an option for those wanting an inexpensive way into hand engraving.

Martin Strolz has an excellent post on a similar graver geometry in the Tips Archive which got me motivated to do some research.

easygraver_hand_push-1.jpg
 

FANCYGUN

~ Elite 1000 Member ~
Joined
Nov 10, 2006
Messages
1,842
Location
West Grove, PA
That's interesting Sam. I will have to try making one that way. I usually like a .lower heel/lift on my push gravers about 10 degrees so you are a bit more behind the tool as you push. I also have gotten into making them out or small flat gravers as I seem to like the extra height of the tool to grip with my fingers as I feel this gives me a bit more control but either way I seem to pharte around with them all and will give the EasyGraver a try for this. Thanks
 

Sam

Chief Administrator & Benevolent Dictator
Staff member
Joined
Nov 6, 2006
Messages
10,491
Location
Covington, Louisiana
Marty: I've made one from a flat graver as well and it also works. Like you, I used a much lower angle for my push gravers and also a lower face angle (30° I believe). This made a sharp V that entered the metal very quickly and I primarily used it for shading. Give this one a try and tell me what you think.
 

FANCYGUN

~ Elite 1000 Member ~
Joined
Nov 10, 2006
Messages
1,842
Location
West Grove, PA
Will do Sam once I get back to my workbench. What face angle did you use? I usually like a 45 for my push gravers but have also used a 50 for some gun work
 

Sam

Chief Administrator & Benevolent Dictator
Staff member
Joined
Nov 6, 2006
Messages
10,491
Location
Covington, Louisiana
Will do Sam once I get back to my workbench. What face angle did you use? I usually like a 45 for my push gravers but have also used a 50 for some gun work

I made it with the EasyGraver 105° fixture, so it's 50° I believe.

By the way, if you're starting with a blank C-Max round you don't need to do the reshaping grind. Just do the face and heel and you're good to go.
 

Sam

Chief Administrator & Benevolent Dictator
Staff member
Joined
Nov 6, 2006
Messages
10,491
Location
Covington, Louisiana
120° no reshaping grind

Here's the hand-push EG120 with face & heel. No reshaping grind necessary and a no-brainer to make.

The reshaping grind isn't necessary on a 105 either. I have one (reshaping grind) on my first photo only because I sharpened that graver from a 105 that I'd previously made.

easygraver_hand_push-120.jpg
 

monk

Moderator
Staff member
::::Pledge Member::::
Joined
Feb 11, 2007
Messages
10,870
Location
washington, pa
looks like one of my stone carving chisels. with the 30 degree face, have you done any steel with this ? i'd guess the harder metal would mandate more face for strength.
 

Foster

Member
Joined
Jun 21, 2010
Messages
9
Location
Iowa
Sam, in the iGraver tutorial on exhibition grade shading, you mention starting a shade line micro thin, gradually cutting wider and deeper until it converges with adjacent lines near the base of the leaf. I find it difficult to maintain control with a push graver when trying to cut shade lines clockwise. Rather than make a clockwise cut, is it acceptable practice in those situations to start at the base of the leaf and cut counter-clockwise towards the tip, gradually tapering out to a fine line? Or is it important to practice cutting clockwise to develop the necessary control?
 

Sam

Chief Administrator & Benevolent Dictator
Staff member
Joined
Nov 6, 2006
Messages
10,491
Location
Covington, Louisiana
Foster: I agree, it's a bit more difficult cutting clockwise when hand pushing. Whatever method produces the desired result is what you should do, but for me, starting deep and gradually tapering out is far more difficult, especially hand pushing.
 

phil

Elite Cafe Member
Joined
Oct 21, 2007
Messages
224
Location
England
I learnt and still use predominantly hand push engraving over power assisted as I work mainly in soft precious metals. I will say that the european style heel Sam refers to is used by every engraver that I personally know here in the UK. Sharpening angles are normally judged by eye and when measured tend to be around 35 to 45 degrees for the face and 10 to 15 for heels. Heels tend to be around 1-2 mm in length. Most engravers will grind the left heel slightly more than the right side so that the center line of the heel ( when graver is positioned for cutting)points slightly towards the left to facilitate counter clockwise cuts which is the way most cutting is done when hand pushing. I have noticed that the wider the graver geometry the harder hand cutting becomes and the smallest increase in width makes an enormous difference. Most engravers here tend to use a lozenge graver used narrow style.This means that the smallest amount of metal is removed with each pass of the graver to maintain maximum control. I believe the width of a narrow lozenge is 65 degrees, compared to a square which is 90. This small amount of width increase multiplies the amount of force required to execute the cut significantly.

You may have seen this picture before but I have posted it again because it was done with hand push techniques only.It was a practice piece I did when learning lettering. It is guilding metal with a heavy silver plating. The idea is that if you slip the plating is removed and any mistake is obvious and irrepairable as re plating would cover the existing cuts too. My teacher was a very hard task master! The plate is 6inches across and the layout was done with pencil and chinese white then scribed in. The cutting was done by resting the plate on a sandbag. A watchmakers 3x eyeglass was used for vision. If you want to give engraving a try then a lozenge and handle will cost around £10, a sandbag around £15 and a sheet of copper around £5. Chinese white is £3 a piece and a pencil and dividers around £2. The scribe was simply a needle glued into a pencil so for £35 or say 27ish dollars you can be up and running and with a little.... sorry a lot of practice you can obtain reasonable results.:thumbsup:
 

Attachments

  • New Image.jpg
    New Image.jpg
    68.6 KB · Views: 232

Sam

Chief Administrator & Benevolent Dictator
Staff member
Joined
Nov 6, 2006
Messages
10,491
Location
Covington, Louisiana
Excellent post, Phil. I've also noticed that the wider 120° graver can be pretty unpredictable, especially when cutting anti-clockwise. Right now the 105° seems to work really well, and I'm sharpening it with the EasyGraver fixture.

I'm curious to know about heel drag and the gravers you're using. With a long heel it seems impossible to completely eliminate, but it's fairly easy to remove with a bit of careful light deburring after the work is finished.

I'm making a short video demonstration for those who want to test the waters without spending a lot of money and I appreciate your input.

I remember seeing this plate before and it's fantastic! No doubt your teacher was very proud.

~Sam
 

Christian DeCamillis

Elite Cafe Member
Joined
Nov 9, 2006
Messages
639
Location
Traverse City, Michigan
Phil,

It's interesting with what you said here. The Italians also use no heel for either hand push or hammer and chisel. Instead they sharpen this elongated lift the same as with the bulino point that I show on my video and Sam is showing in this thread.
what caught my attention was what you said about using a longer heel. I have been talking about this for a long time. I also have helped many beginners resolve issues by having them lengthen their heel.

Here are some links to video blogs I made some time ago on my site. It is part of the basic lessons that are there. For any beginners that are interested there is a complete basic engraving class there which you can follow for free. It involves watching these short video blogs along with downloads that can be used to transfer to follow along with the remonstrations of the blogs.

These first ones cover the heel and what it does as well s why I think a longer heel is better.

http://www.engraversstudio.com/apps/vblog/Video/View.aspx?id=86c8304ed0

http://www.engraversstudio.com/apps/vblog/Video/View.aspx?id=eaa7deda9e

http://www.engraversstudio.com/apps/vblog/Video/View.aspx?id=449ec0f928

The last two have a demo. They are only 3 minutes each.
 
Last edited:

Lee

~ Elite 1000 Member ~
Joined
Nov 17, 2006
Messages
1,047
I have very little experience with this geometry but am intrigued by the discussion and will give it a go. There has been some discussion in the past that a highly polished graver will leave a darker line. If the polishing occurs by handstropping is there a chance that a micro heel is polished in by a slight lifting of the hand at the end or simply by the give in the leather or stropping material? Sam's EG sharpening would not have this but I welcome responses from our friends across the pond and others with more intimate knowledge of the sharpening, performance, and techniques of this geometry.
 

John P. Anderson

Elite Cafe Member
Joined
Sep 22, 2010
Messages
309
Location
Havre, Montana
I'm self taught and probably have bad habits but for what it's worth I evolved to the following to better push and avoid slips.

I exclusively hand push and hand sharpen (my skills have evolved to the point I may try power one of these days to up efficiency). Mostly I wiggle and push. A straight push is harder to control than a wiggle so initial cuts I wiggle and clean it up with a smooth push.

Primarily I use two tools. A narrow V of 60-65 degrees and a flat of about 1.5mm width. Face is generally 45 degree with a pronounced heel. Other flats of various widths I use when needed and few other shapes for special cuts. I do have a 90 degree that I use but not for initial cuts as it's far more likely to slip.

The narrow V works well on chrome Zippos if you make sure you break through the chrome on the initial push and stay under while you wiggle. The flat I use to scoop, sculpt, widen and flair my cuts from the narrow V.

Seems to me everyone should learn push on soft metal before they move on to hammer or power. It's a solid and obvious foundation to build upon.

I like push graving because it's a peaceful and quiet process. It's also an inexpensive way to develop your skills.

John
 

Haraga.com

~ Elite 1000 Member ~
Joined
Jul 27, 2007
Messages
1,264
Location
Skiff
John, you are one of the few that I know of that have a legitimate reason to have power tools for engraving soft metals. Shame on the rest of you for never learning to engrave without power assist.
 

John P. Anderson

Elite Cafe Member
Joined
Sep 22, 2010
Messages
309
Location
Havre, Montana
Push/wiggle graving doesn't seem to get much respect unless your a Bulino artist. I'm not sure anyone in the U.S.A. would still be engraving if not for the gun engravers keeping the art alive and that is hammer/power centric. Push graving has slipped off the radar. Push graving was widely practiced in the publishing world until the camera came along and then it was regulated to a art school or artist here and there. I don't remember the Meeks book giving it much coverage and that was my intro to engraving.

I started by building a crude pneumatic tool. It was a crappy tool that was more a setback than anything else but it was all I could afford. Then I discovered that you could actually just push and wiggle the tool. That was was cheap and easy. Duh.

The big advantage I see in starting new engravers with push graving is that it opens up engraving to thousands and thousands of people that can't afford the entry price of power tools. Many or most would move to power as their confidence builds. Over and over I've seen new engravers come onto the forums thinking they only way they can get started is with $3000 in new equipment. I thought that. I put off starting to engrave because I assumed that the only way I would be able to engrave with one arm is with power tools I couldn't afford. I wasted 15 years of good carving, good learning.

I think it's easy to learn to push grave. Sharpening is the hard part but that's actually affordable to buy into.

It would sure be nice if the pros on the forum put together a entry level book/DVD/Youtube/tutorial that had everything you need to bootstrap yourself into becoming a push engraver. My work is created with mostly 2 homemade gravers, a JJ post and couple sharpening stones I already had. Cost $0.00. The more engravers the better for all.

John

All push...


Latest posts

Sponsors

Top