
rod
~ Elite 1000 Member ~
Finally, I got time to write a full essay and you may read it below. Like most of you, I have my day job to attend to, so sorry it took time to finish. I have tried to write mostly for up-and-coming engravers, not yet lucky enough to have gotten close to a celebrated engraver/teacher, yet who might be interested in taking a virtual peek over the shoulder of a class participant. The essay is long, but hopefully some may get value from it.
Foreword:
It is my intention in this essay to give one person’s experience, out of a group of twelve, who took part in the Martin Strolz’ Grand Master, 5 day teaching course, recently held in Emporia, Kansas at GRS, directly following the ‘GM Weekend’ informal gathering. Martin’s was a course best suited to advanced engravers, quite frankly, engravers far above my pay grade, and it was a privilege that a conjunction of circumstances allowed me to be a part of the week. Briefly, I was signed up to attend Diane Scalese’s Western Bright Cut course (Oct12-16). On the phone with GRS, the conversation turned to Martin’s course, and to the book and other materials that he had prepared as homework, to be studied ahead of time. It transpired that an unexpected cancellation left one place vacant. My portfolio was not up to the mark, to put it mildly, yet I was fascinated with the possibility of having a close look at Martin’s European mode of working. The closing date for applications had passed. After determining that by making a late application, I would not be preventing any more deserving engraver from taking this cancellation opportunity, GRS and Martin graciously considered my application, and in a quick decision, I was accepted to join the class, and paid my tuition. Soon a package arrived containing the 56 page homework book, and other materials described later.
Disclaimer:
As I have written before, I am ‘tool neutral’, yet having once served an apprenticeship as a toolmaker in Scotland, I enjoy collecting tools and celebrate their differences, so I have more tools than I need. My day job is maker of 18th century style wood flutes for baroque music, and these have some silver or gold keys and rings, which I occasionally engrave. Through the centuries, the engraving arts is often seen at its finest when ornamenting firearms, hence to be in the presence of a firearms master is, for me, a fascination, albeit for a short time. Some are fortunate to spend long periods of deep study with any number of great masters scattered around the globe. Failing that opportunity, I was intrigued at the opportunity of joining in this class. One could say that it was akin to trying to pour an ocean into a teaspoon, the teaspoon being my brain! That acknowledged, I received the preparation materials and assignments with a mixture of trepidation and excitement…
Upon first reading of Martin’s book of homework, it was quite clear that it was a treasure chest that distilled his multi-faceted experience, including fine art, history of the engraving arts, long teaching career in Austria, portfolio of his own engraving, and mastery of a number of techniques pertinent to hand burin scroll cutting, hammer and chisel, bulino line and dot shading, deep relief sculpting of game scenes using cutting and punch shaping, and particularly in background removal on the game scene. He was happy for us to use air power for background removal, and even for general work, yet encouraged the use of hand tools. Optivisor was encouraged as the sole means of magnification, with occasional lupe.
The homework package also included:
Three data discs filled with reference material illustrations.
A rifle side plate, mounted on heavy aluminum, and ready to go on the ball vice.
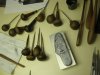
A good assortment of gravers… flats, onglettes, squares and rounds.
The homework encouraged close study of surviving engravings from the German Renaissance artist, Aldegrever, who was in his prime around 1525. Good originals survive in many museum collections, and a Google search will bring you to them. Painting and portrait commissions he readily accepted, however it was his small, yet superb, copperplate engravings/intaglio prints that Martin especially directed our attention to. His masterful use of leaf patterns in various graceful folds could be used to fill space nicely, yet present a unifying theme, if used with care. His shadings were not overdone, and very effective. We were invited to immerse ourselves in this medium, and go deep into the renaissance aesthetic. Admiration was encouraged, followed by drawing of leaves in many graceful folds, first copying, later trying personal inventions in that style. Soon one could imagine the leaf arrangements to be like a choreography of classical ballet dancers filling the stage in dance, then frozen suddenly in the moment. We were encouraged to seek out Nature and sharpen our awareness of real vegetation in its many forms. As a toolmaker, having spent too much time with precision geometry, and too little in fine arts, my brain is full of Euclid, and a bit starved of the likes of Aldegrever, so I welcomed the opportunity to make a start at redressing this shortcoming, albeit a little late in my life.
For inspiration, further examples were given of Italian Renaissance wall decoration motifs and elements. These were stylized, and somewhat too widely spaced for direct use in engraving, yet good to steep ourselves in for inspiration, perhaps sketching to reduce the negative-space background.
Martin invited each of us twelve, making up the class, to come up with our own individual designs for the plate bolsters, anticipating there would be a central game scene included in the final layout. We were not to do a carbon copy of Aldegrever’s style, just be inspired by it and the Italian influence, then come up with our own ideas. He invited an email interaction at the earliest possible stage of design thoughts, particularly important was to submit the ‘backbone’ layout, so he could “head us off at the gulch” if he saw the initial scheme moving towards trouble. This was invaluable for me, as I was packing in too much, and my backbones were breaking some fundamental rules. In truth, I was floundering at an early stage, but Martin’s prompt replies set me on a rapid course correction. He would scan my sketches, then using a color pencil, point to trouble spots, suggesting more fruitful paths forward. For me, time was of the essence, and I was trying to slip a fresh sheet of paper under my way of ‘seeing’. I found my exchanges with Martin to be invaluable, generous, and understanding. Seeing that I was in a bit of trouble, he suggested a very good style of approach, and I launched into studying this, interacting my sketches with him, gradually absorbing his emailed replies and gaining confidence. I started to add some of my own ideas, falling apart in some areas, finally coming up with some modifications to his suggested design, drew it out, and transferred my attempt to the steel side plate, ready for class. No cutting was to be done, until we were all present in Martin’s class, all with individual designs.
I now turned my attention to that part of the homework book that dealt with preparation of tools. A lifetime of nourishing the ‘engineer/scientist/toolmaker’ side of the brain meant that I have always been comfortable with the geometry of tools and visualizing why they might plough through metal with ease, or with difficulty. I made my first lathe at age 13, so lathes and the like are pretty familiar territory. Let’s face it, engraving scrolls on a ball vise can be thought of as hand-turning metal on a lathe headstock that only goes around part of a revolution at a time? That said, it is an unforgiving canvas, that is now awaiting your artistic expression …. another huge component of unlimited ideas, some of which are attractive and compelling, other ideas breaking fundamental rules of form, or else obey the rules, yet may or may not inspire or delight the eye! You and I know many an engraver who is firing on all cylinders, and equally active on both the artistic and analytical sides of the brain ( and heart!), forming the shape of their tools in a few moments by hand, jig, or whatever, very much at home with scaling, design transfer in all its many forms, computer literate, etc. Yet some who are excellent artists find the ‘tool thing’ a bit of a mystery-land, and hence a challenge. People like me are somewhat surprised by this, as we are in awe of an artistic spirit who can look at a drawing, in an instant, see what is out, add a few lines, and suddenly things begin to look better!
Martin’s book had a very good section on the European tradition of graver shapes, with a comparison to the American approach, which talks a lot about a ‘heel’ on the business end of a graver. Looking at masterful work coming from both traditions, it is clear that the hand-on-the-tool, the heart that guides it, the muscle skill that is the interface between internal imagination and external result, all come together, and are in continuous play. I hope I am paraphrasing the master engraver from Wales, Phil Coggan, with some accuracy, when he writes… “what the heck is a ‘heel’?” Then you glance at his magnificent portfolio, and that of his son, Simon, one quickly reaches the conclusion that other graver shapes work splendidly, and have done so for millennium (check out engravings done by the Romans). Likewise, look around at the many excellent portfolios of, shall we loosely say, the “North American” school of heeled graving, be they hand push, hammer and chisel, or air assist, and it is clear that both schools deliver the art. I have not even included the separate Japanese and Asian traditions of engraving excellence, but I own some fine examples!
There are many forum postings on heeled gravers. Independently, Phil C and Martin have generously posted some indication of their individually favored graver geometry. You may even obtain “Coggan” tool sharpening templates for bulino, etc., from Steve Lindsay’s website.
That said, I hope I am correct in writing that Martin and other engravers from Europe favor what Americans ( I am a Scot) would describe as a high ‘lift’ angle of about 22 degrees on the bottom of, say, the onglette and the ‘square’ graver, with perhaps about a 45 degree front face, and no heel.
For part of our home work, we were instructed to sharpen that high 22 degree lift and with about 110 degree include angle (set your universal fixture to 35 degrees each side of zero to achieve this, with the post angle at 22 degrees). We also hogged off the bulk of the graver to leave a minimum front face, the better to see where we were going, and that is a well-accepted practice in any school of engraving. We did this to the onglettes and square gravers.
So why an onglette versus a square graver, when the business end looks the same? Well, there is a heck of lot less hogging of an onglette to get it down to size, and ready to cut, because it is already thin as a knife as it comes to you in rough form. We prepared rounds and various flats by hogging the top down to leave only a minimum from face, the better to see and to re-sharpen quickly.
Okay, time to pack your bag, leave your bench, and head for a five-day teaching experience!
Question: … Am I the only one who is feeling a little uncertain?
Answer: No… as I was about to discover!
Martin Strolz, ‘Grand Master’, five-day teaching class:
Please do not get hung up in the “Grand Master” name given to these classes. You and I know of many fine engravers around the world who never post on a forum, have world reputations, do their work peacefully and privately, and like it that way. No special ‘golden crown’ is awarded that makes any one teacher any different from any other fine engraver the world over, it is just that the two GM classes given at this time of the year can almost certainly offer something special in Kansas, and there are other opportunities elsewhere around the world that might be doing something of equal high quality, so look around and see what is available!
The class started directed after a social weekend of engravers and friends, known as the ‘GM Weekend’. I have written previously an account of this yearly event:
http://www.igraver.com/forum/showthread.php?p=35933#post35933
Suffice to say the Weekend was a very enjoyable opportunity to have a barbeque, chat, play music, have a beer or wine, with lots of conversation, have some show and tell, ask questions, tell stories, etc.
Come Monday morning, Martin’s class (mostly guys, but not all, my neighbor was a fine, confident cutter, and she had a national reputation) assembled in the teaching room equipped with benches, equipment allowing all to do drawing, scribing, hand engrave, hammer and chisel, air power engrave, hand sharpen, power sharpen, punch, stipple, carve, burnish, etc. Provision was available for lupe, optivisor, or microscope viewing.
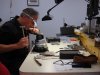
The teaching bench was centrally located, equipped with ‘drilling machine’ movable turntable, TV cameras feeding big flat screens on the wall, and a bench-mounted monitor that allowed the teacher to see what was on the big screens, the better to keep work in focus, and not drift off screen if some technique was being presented to the class. Martin placed his ball vise at table top height, perfect for optivisor viewing. You could choose to sit at your bench and watch the big screens, or gather around up close to the teacher’s bench to see hand and tool action live. One camera was attached to the microscope, another independent camera, on a tall swinging mount, could display hand techniques, hammer and chisel, and also swing over to the sharpening equipment.
Martin used exclusively a simple ‘optivisor style’ modest-magnification head rig. I can’t remember the make, but it was white colored, open sided, and light-weight. Throughout the five days, I cannot remember him using the microscope once, but I may be wrong? His eyes were very good, yet he went home to Austria with a microscope, saying that it was useful when working on specific details, such as the eyes of an animal, etc.
With that set up in mind, the first formal opening started with a gracious introduction and welcome from Kim Pember, who is GRS manager, and the person most involved with putting these special courses together. Company president, “D.J.” also welcomed us in a friendly way. Martin was introduced, and we were left to the work in hand!
On each bench was quite a large bag containing more tools to use in the course (and keep) …. three solid steel holders for hammer and chisel work, small hammer, various punches for stippling, etc.
Martin then began to lead the class. A native of Austria, he spoke excellent English, yet confessed that he struggled a bit with some expressions. I would say his command of English was better than mine, and those subtle, local expressions, that are everywhere in our various languages, appeared to give him no problem. For those who are not familiar with traveling in Continental Europe, it is quite an eye-opener to meet with, say, a young person from Scandinavia, Germany, Austria, Switzerland, or the Netherlands, and find that they may be quite comfortable communicating with you in either Dutch, German, English, French, and sometimes Spanish or Italian. This is quite embarrassing for the likes of me, a native of Scotland, with a smattering of Gaelic, French, and Spanish, and of course my own native Scots vernacular. We, of the nations within Britain, can usually get around with a ‘tourist’ level grasp of French, etc., But Continental Europeans put us to shame with their linguistic abilities. In short, Martin addressed us flawlessly and fluently in English!
First on the menu, asking our permission, he suggested we take some time to look on screen at the individual designs we had all arrived at, so up they came, one by one, on the big screens, and all, as agreed, with a framed middle space for the game scene to be developed later. I was mightily impressed to see for the first time my colleagues’ layouts. Martin quickly went over strong points in the layouts, talked about general principles, then looking at details, perhaps suggesting a few modifications to be changed on our layouts, before any cutting began. My own design, based on a good layout that Martin suggested to me by email in order that I might make more rapid progress, was put up on the screen as the best example of a cluster of things not to do! I had gotten a bit too busy with my alterations to his suggested line of approach, so in a way, my design was bristling with good teaching points, but I appeared to have taken these as if I were proffered a hedgehog! I was going a bit over the top with my own alterations, and drifting away in a wrong direction in quite a few areas. Hence my design was ‘one-stop-shopping’ in a number of awkward areas that should have been avoided. Martin graciously pointed out some areas that worked, and then went over other parts of my design showing why they needed to be re-worked. I was hungry for this critique, and found it so valuable.
We soon plunged into action. Some made small changes to their design, and I made lots. Others were ready to cut the element outlines.
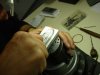
Martin continued to hand out paperwork and various tools that he had prepared himself for our use. It was like holiday season gifts every day! He had prepared twelve double-ended scribers from 1/16 inch diameter tool steel. They were fashioned to come to a rounded profile point, one crisp, and the other end with a slightly rounded point. He bought locally some collet pencil bodies that took the scribers. Almost always, it was the dull point scriber that was most useful, it gave a burnished line on the steel plate, easy to see, would not rub off, but of almost no depth, so could be polished off, if necessary. Watching Martin go round the room, making sure we were starting off on the right foot, I noticed he used the scriber in a way that made immediate sense. Previously, I was thinking of the scriber as a pencil to draw on steel, like a pencil drawing on paper. No, he used it in a hold much as he would a push graver or burin with a blunt point. Using finger against finger bracing, Martin would burnish in short arcs that gave precise and clear lines.
Each person’s onglettes and square graver were inspected, then Martin ‘stropped’ the underbelly just a little on very fine emery to soften the point geometry slightly, after which he tested its cutting qualities. With a high lift angle of about 22 degrees and no heel, by inclining the graver to one side, a smooth curved cut may be achieved on the element outline. It appears that some drag is generated on the outside of the cut, however, background relief eliminates this side of the cut. If you formerly worked only with heeled gravers, it is surprising how quickly one can become comfortable cutting with this different geometry, which works well for hand-push in steel, hammer and chisel, and air assist.
The whole side plate was first cut with an inset border of about 1.5 mm, then the element outlines boldly cut, yet with care given to intersecting elements. Next, background relief was cut between leaf elements. Some used narrow flat gravers with rounded heel, others appeared to use square gravers, finally the background was stippled randomly, or with round punches. After some smoothing of the whole plate and bur removal, Martin came round with yet another gift, he had made everyone a ‘bulino’ graver in the usual European style of about 80 degree included angle, high lift, and very tiny 45 degree front face.
Shading was now discussed, and demonstrated, with the big TV’s showing the process clearly. As Martin worked with this hand-push ‘bulino’ tool, his speed and precision were for me almost unbelievable. He cut curved shading lines with confidence. When it came to the shadings that typically parallel a leaf outline, Martin moved the bulino burin in a helical pattern, rather fast, so that the tool cut as it dipped to the bottom of its circular helical path. The cut was entered and exited in a taper shape. It is hard to convey the speed of his process without watching a video.
Now it was our turn. I was falling behind and realized I would not get my whole plate finished, so I opted to finish part of each bolster pattern, making sure I would go home with each stage well represented, and then finish the plate at my leisure.
Five days is much too short a time to get everything done, Martin knew this and opted for some design shortcuts when it came to the central game scene and landscape. A page of big horn sheep outlines was given to us with many different scale sizes. We could select and transfer one onto the steel plate, after getting an idea of the game scene. Then some sketching onto the plate, with the sheep as foreground, perhaps a tree or rocky area as middle ground, tapering off to back ground. Martin had prepared a plate with all stages partly completed. His game scene would have three sheep. Most of us opted for one. He gathered us around and took some one’s plate, laid out his four hammers, and many chisels, burins, punches, brass ring, and burnishers. There next followed my favorite moment of the week.
“Okay, let’s start”, Martin said, picking up his biggest hammer and a steel-shafted chisel. He swung like a blacksmith, and chips flew everywhere! I was quite taken aback, as my hammer and chisel work was timid in the extreme compared with what I was now watching. Very rapidly, we could watch form taking shape, first, as if a cave man was carving it out of rock, then through all the stages down through impressionistic, and finally to photo-realism. The wonderful thing to witness was, that the art was always there, at every stage of these rough-to-smooth stages. Martin had the image in his mind’s eye, and every stroke closed the gap towards the final form. First the sheep outline was cut, followed by a rough scene layout, then lots of heavy hammer swings for back-ground removal, carving relief and sculpting of the sheep. Gradually, more and more tools come to bear, a brass ring helps as a fulcrum for certain up-strokes, punches were lightly tapped, burnishers hand pushed the steel surface around, flats, rounds, and onglettes, all are snatched up every few seconds. The bench is a sea of tools, yet all in a certain order for easy access. The work was done at speed, and all by hand. It all seemed so clear that for a game scene to be carved quickly, a microscope might be considered a hindrance, and the optivisor an asset. It is necessary to look at the big picture often, and quickly focus on a detail. One must snatch up different sizes of punch, graver, burnisher, and develop a rhythm. Don’t get me wrong, I like my microscope, and it can extend our working careers. If you are using hammer and chisel under a ‘scope, the usual 0.5 objective lens, giving a working distance of 6 inches, is not necessarily a good choice, as you may start hammering the lens. Consider a 0.3 objective that will give a 10 inch working distance, with just a little reduction in magnification, yet a bigger viewing area. I was not going to develop this kind of hammer and chisel confidence in a day or two, but I knew that I would be going back home with an urge to develop in that direction, and I would start practicing more with just my optivisor. That said, even Martin’s good eyes could find a microscope useful when working on, say, carving a sheep’s eye. I don’t think he used the ‘scope at all during the week, but said he would take a ‘scope home with him, and give it a try!
We were a class of varied experience, mostly very good, and some had lifted prizes for their work. I was the odd duck out, coming in from the different trade of flute maker. However, every member of the group was very willing to visit Martin’s teaching bench, and consult regularly about various aspects of the work. Our teacher would make a habit of circulating round to each bench, offering advice, praising good work, sometimes making a number of cuts if requested. He was a masterful air power engraver, as well as hand. Whatever tool each person was using to cut, that is what Martin used to make various changes. As the work began to focus on the game scene, and in particular the sculpting of the big horn sheep, visits to Martin’s bench became more frequent. In conversation with the most accomplished engraver in our class, I was rather surprised to be told that the most valuable insight he would take away with him concerned the ‘foreground/middle ground/background’ ratio. Previously working on a linear ratio, for example: if foreground (the sheep) relief depth was unity, middle ground would be 50% less, etc. Martin laid out his game scene in a geometric progression, if that makes sense? His middle ground was much less that 50% in depth, and more like 25%. A subtle thing, but it made a big difference to whole game scene.
We were invited to allow some of the character of our cuts to remain on the finished piece, for example in craggy rocks, allowing the chisel cuts to remain. As excellence is approaching perfection, there is sometimes a tendency for the human hand to be eliminated. Martin would rather see the engraver’s fingerprint in the cuts, as well as in the design style.
I would guess that our teacher’s fingerprints were in evidence in almost every plate in the class, and very welcomed fingerprints at that! It is so valuable to take home at least a slice of the master’s style and handiwork, the better to study at leisure and hopefully learn from.
There were some evenings when we could work late, and most of us took that opportunity. The five days passed way too quickly. Martin displayed remarkable energy and focus throughout. Seeing that some of us were choosing different poses for the sheep, even on his lunch hour, he would quickly draw exquisite, fully-shaded examples for us to study. It was just as well he got a week of rock climbing in the Dolomites prior to coming to the US, as one needs to be fit and alert to teach such a class!
Friday rolled around, and we had to wind down and pack up our gear. I had a quick look at everyone’s plate, and was very impressed. There was plenty of homework awaiting me to complete my plate, yet I was feeling good about the whole experience, and looking forward to applying my new knowledge and experience.
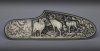
It is not my place to post any of my colleague’s plates, yet I am confident that Martin will allow me to include his demo plate in progress …. see the plate at the bottom of the essay.
Important Note:
The steel plate is 111 mm long. Castings of this plate are soon to be available through FEGA. As a donation, to help raise funds for FEGA, Martin has already sent two silicone molds to Mike Bissell, and we trust he will start producing castings soon after receiving the molds. As it is a step-by-step demo-plate, it is sure to sell well.
Just before we ended the class, there was a formal vote of thanks. Our master engraver, Martin Strolz, was thanked, together with GRS management and staff, all of them gave us huge support and encouragement. A context of friendly, good hearted assistance and co-operation is ever present at this enlightened Emporia engraving center and small manufacturing company. Manufacturing and sales are a quite distinct section from training classes, yet all may be united in forwarding the engraving arts.
Before Martin left the room, we sang him a song composed on the spur of the moment, and based loosely on that old American folk song “John Henry, the Steel Driving Man”. Rumor has it that the song may appear on YouTube, complete with a chorus of twelve hammers!
In conclusion, may I remind you, although this training was organized and took place at the GRS Center, I have no connection with GRS, nor have I any vested interest in its products. I am tool neutral, and own at least one of everything from all engraving suppliers. I left Kansas to journey on in my travels, and meet up with other good hearted engravers, enjoying their workshops, hints and tips. I do openly confess to having a warm regard for the good people of Emporia, and Glendo in particular. I thank them for allowing me the opportunity of making some new friends, and spending a great five days with Austria’s Martin Strolz. He has assisted me in stepping onto a new canvas with my work!
Thank you!
Rod Cameron
Foreword:
It is my intention in this essay to give one person’s experience, out of a group of twelve, who took part in the Martin Strolz’ Grand Master, 5 day teaching course, recently held in Emporia, Kansas at GRS, directly following the ‘GM Weekend’ informal gathering. Martin’s was a course best suited to advanced engravers, quite frankly, engravers far above my pay grade, and it was a privilege that a conjunction of circumstances allowed me to be a part of the week. Briefly, I was signed up to attend Diane Scalese’s Western Bright Cut course (Oct12-16). On the phone with GRS, the conversation turned to Martin’s course, and to the book and other materials that he had prepared as homework, to be studied ahead of time. It transpired that an unexpected cancellation left one place vacant. My portfolio was not up to the mark, to put it mildly, yet I was fascinated with the possibility of having a close look at Martin’s European mode of working. The closing date for applications had passed. After determining that by making a late application, I would not be preventing any more deserving engraver from taking this cancellation opportunity, GRS and Martin graciously considered my application, and in a quick decision, I was accepted to join the class, and paid my tuition. Soon a package arrived containing the 56 page homework book, and other materials described later.
Disclaimer:
As I have written before, I am ‘tool neutral’, yet having once served an apprenticeship as a toolmaker in Scotland, I enjoy collecting tools and celebrate their differences, so I have more tools than I need. My day job is maker of 18th century style wood flutes for baroque music, and these have some silver or gold keys and rings, which I occasionally engrave. Through the centuries, the engraving arts is often seen at its finest when ornamenting firearms, hence to be in the presence of a firearms master is, for me, a fascination, albeit for a short time. Some are fortunate to spend long periods of deep study with any number of great masters scattered around the globe. Failing that opportunity, I was intrigued at the opportunity of joining in this class. One could say that it was akin to trying to pour an ocean into a teaspoon, the teaspoon being my brain! That acknowledged, I received the preparation materials and assignments with a mixture of trepidation and excitement…
Upon first reading of Martin’s book of homework, it was quite clear that it was a treasure chest that distilled his multi-faceted experience, including fine art, history of the engraving arts, long teaching career in Austria, portfolio of his own engraving, and mastery of a number of techniques pertinent to hand burin scroll cutting, hammer and chisel, bulino line and dot shading, deep relief sculpting of game scenes using cutting and punch shaping, and particularly in background removal on the game scene. He was happy for us to use air power for background removal, and even for general work, yet encouraged the use of hand tools. Optivisor was encouraged as the sole means of magnification, with occasional lupe.
The homework package also included:
Three data discs filled with reference material illustrations.
A rifle side plate, mounted on heavy aluminum, and ready to go on the ball vice.
A good assortment of gravers… flats, onglettes, squares and rounds.
The homework encouraged close study of surviving engravings from the German Renaissance artist, Aldegrever, who was in his prime around 1525. Good originals survive in many museum collections, and a Google search will bring you to them. Painting and portrait commissions he readily accepted, however it was his small, yet superb, copperplate engravings/intaglio prints that Martin especially directed our attention to. His masterful use of leaf patterns in various graceful folds could be used to fill space nicely, yet present a unifying theme, if used with care. His shadings were not overdone, and very effective. We were invited to immerse ourselves in this medium, and go deep into the renaissance aesthetic. Admiration was encouraged, followed by drawing of leaves in many graceful folds, first copying, later trying personal inventions in that style. Soon one could imagine the leaf arrangements to be like a choreography of classical ballet dancers filling the stage in dance, then frozen suddenly in the moment. We were encouraged to seek out Nature and sharpen our awareness of real vegetation in its many forms. As a toolmaker, having spent too much time with precision geometry, and too little in fine arts, my brain is full of Euclid, and a bit starved of the likes of Aldegrever, so I welcomed the opportunity to make a start at redressing this shortcoming, albeit a little late in my life.
For inspiration, further examples were given of Italian Renaissance wall decoration motifs and elements. These were stylized, and somewhat too widely spaced for direct use in engraving, yet good to steep ourselves in for inspiration, perhaps sketching to reduce the negative-space background.
Martin invited each of us twelve, making up the class, to come up with our own individual designs for the plate bolsters, anticipating there would be a central game scene included in the final layout. We were not to do a carbon copy of Aldegrever’s style, just be inspired by it and the Italian influence, then come up with our own ideas. He invited an email interaction at the earliest possible stage of design thoughts, particularly important was to submit the ‘backbone’ layout, so he could “head us off at the gulch” if he saw the initial scheme moving towards trouble. This was invaluable for me, as I was packing in too much, and my backbones were breaking some fundamental rules. In truth, I was floundering at an early stage, but Martin’s prompt replies set me on a rapid course correction. He would scan my sketches, then using a color pencil, point to trouble spots, suggesting more fruitful paths forward. For me, time was of the essence, and I was trying to slip a fresh sheet of paper under my way of ‘seeing’. I found my exchanges with Martin to be invaluable, generous, and understanding. Seeing that I was in a bit of trouble, he suggested a very good style of approach, and I launched into studying this, interacting my sketches with him, gradually absorbing his emailed replies and gaining confidence. I started to add some of my own ideas, falling apart in some areas, finally coming up with some modifications to his suggested design, drew it out, and transferred my attempt to the steel side plate, ready for class. No cutting was to be done, until we were all present in Martin’s class, all with individual designs.
I now turned my attention to that part of the homework book that dealt with preparation of tools. A lifetime of nourishing the ‘engineer/scientist/toolmaker’ side of the brain meant that I have always been comfortable with the geometry of tools and visualizing why they might plough through metal with ease, or with difficulty. I made my first lathe at age 13, so lathes and the like are pretty familiar territory. Let’s face it, engraving scrolls on a ball vise can be thought of as hand-turning metal on a lathe headstock that only goes around part of a revolution at a time? That said, it is an unforgiving canvas, that is now awaiting your artistic expression …. another huge component of unlimited ideas, some of which are attractive and compelling, other ideas breaking fundamental rules of form, or else obey the rules, yet may or may not inspire or delight the eye! You and I know many an engraver who is firing on all cylinders, and equally active on both the artistic and analytical sides of the brain ( and heart!), forming the shape of their tools in a few moments by hand, jig, or whatever, very much at home with scaling, design transfer in all its many forms, computer literate, etc. Yet some who are excellent artists find the ‘tool thing’ a bit of a mystery-land, and hence a challenge. People like me are somewhat surprised by this, as we are in awe of an artistic spirit who can look at a drawing, in an instant, see what is out, add a few lines, and suddenly things begin to look better!
Martin’s book had a very good section on the European tradition of graver shapes, with a comparison to the American approach, which talks a lot about a ‘heel’ on the business end of a graver. Looking at masterful work coming from both traditions, it is clear that the hand-on-the-tool, the heart that guides it, the muscle skill that is the interface between internal imagination and external result, all come together, and are in continuous play. I hope I am paraphrasing the master engraver from Wales, Phil Coggan, with some accuracy, when he writes… “what the heck is a ‘heel’?” Then you glance at his magnificent portfolio, and that of his son, Simon, one quickly reaches the conclusion that other graver shapes work splendidly, and have done so for millennium (check out engravings done by the Romans). Likewise, look around at the many excellent portfolios of, shall we loosely say, the “North American” school of heeled graving, be they hand push, hammer and chisel, or air assist, and it is clear that both schools deliver the art. I have not even included the separate Japanese and Asian traditions of engraving excellence, but I own some fine examples!
There are many forum postings on heeled gravers. Independently, Phil C and Martin have generously posted some indication of their individually favored graver geometry. You may even obtain “Coggan” tool sharpening templates for bulino, etc., from Steve Lindsay’s website.
That said, I hope I am correct in writing that Martin and other engravers from Europe favor what Americans ( I am a Scot) would describe as a high ‘lift’ angle of about 22 degrees on the bottom of, say, the onglette and the ‘square’ graver, with perhaps about a 45 degree front face, and no heel.
For part of our home work, we were instructed to sharpen that high 22 degree lift and with about 110 degree include angle (set your universal fixture to 35 degrees each side of zero to achieve this, with the post angle at 22 degrees). We also hogged off the bulk of the graver to leave a minimum front face, the better to see where we were going, and that is a well-accepted practice in any school of engraving. We did this to the onglettes and square gravers.
So why an onglette versus a square graver, when the business end looks the same? Well, there is a heck of lot less hogging of an onglette to get it down to size, and ready to cut, because it is already thin as a knife as it comes to you in rough form. We prepared rounds and various flats by hogging the top down to leave only a minimum from face, the better to see and to re-sharpen quickly.
Okay, time to pack your bag, leave your bench, and head for a five-day teaching experience!
Question: … Am I the only one who is feeling a little uncertain?
Answer: No… as I was about to discover!
Martin Strolz, ‘Grand Master’, five-day teaching class:
Please do not get hung up in the “Grand Master” name given to these classes. You and I know of many fine engravers around the world who never post on a forum, have world reputations, do their work peacefully and privately, and like it that way. No special ‘golden crown’ is awarded that makes any one teacher any different from any other fine engraver the world over, it is just that the two GM classes given at this time of the year can almost certainly offer something special in Kansas, and there are other opportunities elsewhere around the world that might be doing something of equal high quality, so look around and see what is available!
The class started directed after a social weekend of engravers and friends, known as the ‘GM Weekend’. I have written previously an account of this yearly event:
http://www.igraver.com/forum/showthread.php?p=35933#post35933
Suffice to say the Weekend was a very enjoyable opportunity to have a barbeque, chat, play music, have a beer or wine, with lots of conversation, have some show and tell, ask questions, tell stories, etc.
Come Monday morning, Martin’s class (mostly guys, but not all, my neighbor was a fine, confident cutter, and she had a national reputation) assembled in the teaching room equipped with benches, equipment allowing all to do drawing, scribing, hand engrave, hammer and chisel, air power engrave, hand sharpen, power sharpen, punch, stipple, carve, burnish, etc. Provision was available for lupe, optivisor, or microscope viewing.
The teaching bench was centrally located, equipped with ‘drilling machine’ movable turntable, TV cameras feeding big flat screens on the wall, and a bench-mounted monitor that allowed the teacher to see what was on the big screens, the better to keep work in focus, and not drift off screen if some technique was being presented to the class. Martin placed his ball vise at table top height, perfect for optivisor viewing. You could choose to sit at your bench and watch the big screens, or gather around up close to the teacher’s bench to see hand and tool action live. One camera was attached to the microscope, another independent camera, on a tall swinging mount, could display hand techniques, hammer and chisel, and also swing over to the sharpening equipment.
Martin used exclusively a simple ‘optivisor style’ modest-magnification head rig. I can’t remember the make, but it was white colored, open sided, and light-weight. Throughout the five days, I cannot remember him using the microscope once, but I may be wrong? His eyes were very good, yet he went home to Austria with a microscope, saying that it was useful when working on specific details, such as the eyes of an animal, etc.
With that set up in mind, the first formal opening started with a gracious introduction and welcome from Kim Pember, who is GRS manager, and the person most involved with putting these special courses together. Company president, “D.J.” also welcomed us in a friendly way. Martin was introduced, and we were left to the work in hand!
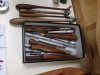
On each bench was quite a large bag containing more tools to use in the course (and keep) …. three solid steel holders for hammer and chisel work, small hammer, various punches for stippling, etc.
Martin then began to lead the class. A native of Austria, he spoke excellent English, yet confessed that he struggled a bit with some expressions. I would say his command of English was better than mine, and those subtle, local expressions, that are everywhere in our various languages, appeared to give him no problem. For those who are not familiar with traveling in Continental Europe, it is quite an eye-opener to meet with, say, a young person from Scandinavia, Germany, Austria, Switzerland, or the Netherlands, and find that they may be quite comfortable communicating with you in either Dutch, German, English, French, and sometimes Spanish or Italian. This is quite embarrassing for the likes of me, a native of Scotland, with a smattering of Gaelic, French, and Spanish, and of course my own native Scots vernacular. We, of the nations within Britain, can usually get around with a ‘tourist’ level grasp of French, etc., But Continental Europeans put us to shame with their linguistic abilities. In short, Martin addressed us flawlessly and fluently in English!
First on the menu, asking our permission, he suggested we take some time to look on screen at the individual designs we had all arrived at, so up they came, one by one, on the big screens, and all, as agreed, with a framed middle space for the game scene to be developed later. I was mightily impressed to see for the first time my colleagues’ layouts. Martin quickly went over strong points in the layouts, talked about general principles, then looking at details, perhaps suggesting a few modifications to be changed on our layouts, before any cutting began. My own design, based on a good layout that Martin suggested to me by email in order that I might make more rapid progress, was put up on the screen as the best example of a cluster of things not to do! I had gotten a bit too busy with my alterations to his suggested line of approach, so in a way, my design was bristling with good teaching points, but I appeared to have taken these as if I were proffered a hedgehog! I was going a bit over the top with my own alterations, and drifting away in a wrong direction in quite a few areas. Hence my design was ‘one-stop-shopping’ in a number of awkward areas that should have been avoided. Martin graciously pointed out some areas that worked, and then went over other parts of my design showing why they needed to be re-worked. I was hungry for this critique, and found it so valuable.
We soon plunged into action. Some made small changes to their design, and I made lots. Others were ready to cut the element outlines.
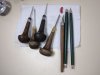
Martin continued to hand out paperwork and various tools that he had prepared himself for our use. It was like holiday season gifts every day! He had prepared twelve double-ended scribers from 1/16 inch diameter tool steel. They were fashioned to come to a rounded profile point, one crisp, and the other end with a slightly rounded point. He bought locally some collet pencil bodies that took the scribers. Almost always, it was the dull point scriber that was most useful, it gave a burnished line on the steel plate, easy to see, would not rub off, but of almost no depth, so could be polished off, if necessary. Watching Martin go round the room, making sure we were starting off on the right foot, I noticed he used the scriber in a way that made immediate sense. Previously, I was thinking of the scriber as a pencil to draw on steel, like a pencil drawing on paper. No, he used it in a hold much as he would a push graver or burin with a blunt point. Using finger against finger bracing, Martin would burnish in short arcs that gave precise and clear lines.
Each person’s onglettes and square graver were inspected, then Martin ‘stropped’ the underbelly just a little on very fine emery to soften the point geometry slightly, after which he tested its cutting qualities. With a high lift angle of about 22 degrees and no heel, by inclining the graver to one side, a smooth curved cut may be achieved on the element outline. It appears that some drag is generated on the outside of the cut, however, background relief eliminates this side of the cut. If you formerly worked only with heeled gravers, it is surprising how quickly one can become comfortable cutting with this different geometry, which works well for hand-push in steel, hammer and chisel, and air assist.
The whole side plate was first cut with an inset border of about 1.5 mm, then the element outlines boldly cut, yet with care given to intersecting elements. Next, background relief was cut between leaf elements. Some used narrow flat gravers with rounded heel, others appeared to use square gravers, finally the background was stippled randomly, or with round punches. After some smoothing of the whole plate and bur removal, Martin came round with yet another gift, he had made everyone a ‘bulino’ graver in the usual European style of about 80 degree included angle, high lift, and very tiny 45 degree front face.
Shading was now discussed, and demonstrated, with the big TV’s showing the process clearly. As Martin worked with this hand-push ‘bulino’ tool, his speed and precision were for me almost unbelievable. He cut curved shading lines with confidence. When it came to the shadings that typically parallel a leaf outline, Martin moved the bulino burin in a helical pattern, rather fast, so that the tool cut as it dipped to the bottom of its circular helical path. The cut was entered and exited in a taper shape. It is hard to convey the speed of his process without watching a video.
Now it was our turn. I was falling behind and realized I would not get my whole plate finished, so I opted to finish part of each bolster pattern, making sure I would go home with each stage well represented, and then finish the plate at my leisure.
Five days is much too short a time to get everything done, Martin knew this and opted for some design shortcuts when it came to the central game scene and landscape. A page of big horn sheep outlines was given to us with many different scale sizes. We could select and transfer one onto the steel plate, after getting an idea of the game scene. Then some sketching onto the plate, with the sheep as foreground, perhaps a tree or rocky area as middle ground, tapering off to back ground. Martin had prepared a plate with all stages partly completed. His game scene would have three sheep. Most of us opted for one. He gathered us around and took some one’s plate, laid out his four hammers, and many chisels, burins, punches, brass ring, and burnishers. There next followed my favorite moment of the week.
“Okay, let’s start”, Martin said, picking up his biggest hammer and a steel-shafted chisel. He swung like a blacksmith, and chips flew everywhere! I was quite taken aback, as my hammer and chisel work was timid in the extreme compared with what I was now watching. Very rapidly, we could watch form taking shape, first, as if a cave man was carving it out of rock, then through all the stages down through impressionistic, and finally to photo-realism. The wonderful thing to witness was, that the art was always there, at every stage of these rough-to-smooth stages. Martin had the image in his mind’s eye, and every stroke closed the gap towards the final form. First the sheep outline was cut, followed by a rough scene layout, then lots of heavy hammer swings for back-ground removal, carving relief and sculpting of the sheep. Gradually, more and more tools come to bear, a brass ring helps as a fulcrum for certain up-strokes, punches were lightly tapped, burnishers hand pushed the steel surface around, flats, rounds, and onglettes, all are snatched up every few seconds. The bench is a sea of tools, yet all in a certain order for easy access. The work was done at speed, and all by hand. It all seemed so clear that for a game scene to be carved quickly, a microscope might be considered a hindrance, and the optivisor an asset. It is necessary to look at the big picture often, and quickly focus on a detail. One must snatch up different sizes of punch, graver, burnisher, and develop a rhythm. Don’t get me wrong, I like my microscope, and it can extend our working careers. If you are using hammer and chisel under a ‘scope, the usual 0.5 objective lens, giving a working distance of 6 inches, is not necessarily a good choice, as you may start hammering the lens. Consider a 0.3 objective that will give a 10 inch working distance, with just a little reduction in magnification, yet a bigger viewing area. I was not going to develop this kind of hammer and chisel confidence in a day or two, but I knew that I would be going back home with an urge to develop in that direction, and I would start practicing more with just my optivisor. That said, even Martin’s good eyes could find a microscope useful when working on, say, carving a sheep’s eye. I don’t think he used the ‘scope at all during the week, but said he would take a ‘scope home with him, and give it a try!
We were a class of varied experience, mostly very good, and some had lifted prizes for their work. I was the odd duck out, coming in from the different trade of flute maker. However, every member of the group was very willing to visit Martin’s teaching bench, and consult regularly about various aspects of the work. Our teacher would make a habit of circulating round to each bench, offering advice, praising good work, sometimes making a number of cuts if requested. He was a masterful air power engraver, as well as hand. Whatever tool each person was using to cut, that is what Martin used to make various changes. As the work began to focus on the game scene, and in particular the sculpting of the big horn sheep, visits to Martin’s bench became more frequent. In conversation with the most accomplished engraver in our class, I was rather surprised to be told that the most valuable insight he would take away with him concerned the ‘foreground/middle ground/background’ ratio. Previously working on a linear ratio, for example: if foreground (the sheep) relief depth was unity, middle ground would be 50% less, etc. Martin laid out his game scene in a geometric progression, if that makes sense? His middle ground was much less that 50% in depth, and more like 25%. A subtle thing, but it made a big difference to whole game scene.
We were invited to allow some of the character of our cuts to remain on the finished piece, for example in craggy rocks, allowing the chisel cuts to remain. As excellence is approaching perfection, there is sometimes a tendency for the human hand to be eliminated. Martin would rather see the engraver’s fingerprint in the cuts, as well as in the design style.
I would guess that our teacher’s fingerprints were in evidence in almost every plate in the class, and very welcomed fingerprints at that! It is so valuable to take home at least a slice of the master’s style and handiwork, the better to study at leisure and hopefully learn from.
There were some evenings when we could work late, and most of us took that opportunity. The five days passed way too quickly. Martin displayed remarkable energy and focus throughout. Seeing that some of us were choosing different poses for the sheep, even on his lunch hour, he would quickly draw exquisite, fully-shaded examples for us to study. It was just as well he got a week of rock climbing in the Dolomites prior to coming to the US, as one needs to be fit and alert to teach such a class!
Friday rolled around, and we had to wind down and pack up our gear. I had a quick look at everyone’s plate, and was very impressed. There was plenty of homework awaiting me to complete my plate, yet I was feeling good about the whole experience, and looking forward to applying my new knowledge and experience.
It is not my place to post any of my colleague’s plates, yet I am confident that Martin will allow me to include his demo plate in progress …. see the plate at the bottom of the essay.
Important Note:
The steel plate is 111 mm long. Castings of this plate are soon to be available through FEGA. As a donation, to help raise funds for FEGA, Martin has already sent two silicone molds to Mike Bissell, and we trust he will start producing castings soon after receiving the molds. As it is a step-by-step demo-plate, it is sure to sell well.
Just before we ended the class, there was a formal vote of thanks. Our master engraver, Martin Strolz, was thanked, together with GRS management and staff, all of them gave us huge support and encouragement. A context of friendly, good hearted assistance and co-operation is ever present at this enlightened Emporia engraving center and small manufacturing company. Manufacturing and sales are a quite distinct section from training classes, yet all may be united in forwarding the engraving arts.
Before Martin left the room, we sang him a song composed on the spur of the moment, and based loosely on that old American folk song “John Henry, the Steel Driving Man”. Rumor has it that the song may appear on YouTube, complete with a chorus of twelve hammers!
In conclusion, may I remind you, although this training was organized and took place at the GRS Center, I have no connection with GRS, nor have I any vested interest in its products. I am tool neutral, and own at least one of everything from all engraving suppliers. I left Kansas to journey on in my travels, and meet up with other good hearted engravers, enjoying their workshops, hints and tips. I do openly confess to having a warm regard for the good people of Emporia, and Glendo in particular. I thank them for allowing me the opportunity of making some new friends, and spending a great five days with Austria’s Martin Strolz. He has assisted me in stepping onto a new canvas with my work!
Thank you!
Rod Cameron
Attachments
-
 martin plate.jpg44.9 KB · Views: 310
 -
 DSC07621.jpg34.4 KB · Views: 281
 -
 DSC07622.jpg46.3 KB · Views: 281
 -
 DSC07638.jpg43.9 KB · Views: 299
 -
 DSC07714.jpg35.9 KB · Views: 298
 -
 DSC07705.jpg43.4 KB · Views: 283
 -
 DSC07628.jpg48.9 KB · Views: 282
 -
 DSC07623.jpg30.7 KB · Views: 276
Last edited:

")


