First project after class

KCSteve

~ Elite 1000 Member ~
Joined
Jun 19, 2007
Messages
2,882
Location
Kansas City, MO
Hi guys!

Getting caught up on things after spending the week in Emporia taking the Basic Engraving class from Marty (Fancyguns).

Learned a lot in the class and had a great time. On Saturday I picked up a new bench grinder (so I could trim / finish tools) and spent a couple of hours rearranging my bench for that as well as my PowerHone and other goodies I brought home with me.

Then I got started on my brother's birthday present. It's slightly late (September 9th) but it's a 'bonus' present and we decided it was better for him to wait until after my class.

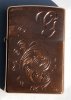
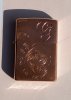
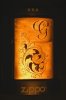
It's another Zippo - if you can get them at wholesale they're pretty good 'practice plates'. A little pricey for practice ($10 - $15 wholesale) but if they come out good you've got a great little gift. I went with the copper one for him and kept things simple. I put the Ron Smith designed scroll from the class and his intitial - both things I'd done in class.

The scroll came out pretty well - a couple of minor errors I couldn't hide with the shading but my ever-indulgent wife (who amused herself by watching me engrave it) can't find them if I don't point them out so he'll probably never find them. Should have cut a few practice G's before doing the one on the lighter - came out rough. Decided not to darken the scroll so it's a bit hard to see in the pictures I'm afraid.

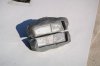
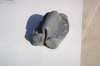
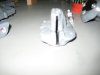
Made myself a self-clamping Zippo fixture out of ThermoLoc. That stuff is great! Probably used one stick more than I needed but a little lumpy is better than not working. As Mr. Glaser and I discussed after he demo'd making these self-clamping fixtures I carved in a second 'hinge groove' so I can do the other side of the lighter as well. I really might have overbuilt it a bit - I have to use a stick to pry the lighter out when I'm done. Easy to engrave with the lighter clamped in - the lighter surface sticks up just above the fixture's surface and I built it up with some knuckle clearance (again, as suggested).

First two pictures are the fixture, then the lighter and a closer view so you can see how badly I did on the G plus one under different lighting that shows the scroll better.

Boy do I need to practice more!
 

Attachments

  • zipfixt.jpg
    zipfixt.jpg
    64.3 KB · Views: 217
  • zipfixb.jpg
    zipfixb.jpg
    63.8 KB · Views: 156
  • gbdzip02a.jpg
    gbdzip02a.jpg
    72.9 KB · Views: 237
  • gbdzip02b.jpg
    gbdzip02b.jpg
    78 KB · Views: 141
  • garzip03.jpg
    garzip03.jpg
    68.2 KB · Views: 269

maryw

Member
Joined
Jul 11, 2007
Messages
90
Location
TAYLORS, SC (BETWEEN GREENVILLE & SPARTANBURG
Aren't those classes the greatest!!! I'm hoping that I can go back for the lettering one - one of these years. Hopefully next year. I think you're doing great with your engraving - and I know you're loving it. I'll be glad when I get to the place you are. Seems I have so far to go right now - but I'm not discouraged, just impatient.

Did you get your lighters at GRS or another wholesale source? Would like to purchase a few - they make great gifts. I'm sure your brother will treasure this one from you.
Best of luck and continued success to you.
Mary W
 

KCSteve

~ Elite 1000 Member ~
Joined
Jun 19, 2007
Messages
2,882
Location
Kansas City, MO
I have an account with Moteng. If you've got a sales tax number you should be able to get one too. Retail's a bit too much for when you're starting out but at wholesale it's not too bad.
 

FANCYGUN

~ Elite 1000 Member ~
Joined
Nov 10, 2006
Messages
1,842
Location
West Grove, PA
OK Steve.
Now try and figure out how come your practice plates in class were so much smoother than the Zippo. Slow down a bit and remember what I taught you and get your rythem and co-ordination back. Look at the way I taught you to shade your scroll and see what is different about the Zippo scroll. The Zippo is harder to cut but you can do it. You proved that to me in class. Keep cutting away and don't give up.
It was a fun week and glad you were in class and made it home safely
Marty
 

KCSteve

~ Elite 1000 Member ~
Joined
Jun 19, 2007
Messages
2,882
Location
Kansas City, MO
Part of the difference is the change in magnification - at home I just have an Optivisor. Part of it is the change in the work surface (Zippo in fixture vs. practice plate), and a large part of it is just going a little bit too fast.

More practice!
 

FANCYGUN

~ Elite 1000 Member ~
Joined
Nov 10, 2006
Messages
1,842
Location
West Grove, PA
True....true.....true and true.........You're on your way. Go for it.

Don't forget to check your tool sharpness also
 

beegee

Elite Cafe Member
Joined
Sep 7, 2007
Messages
110
Location
Grifton, NC
When I was at engraving class(not GRS)I noticed that the most important thing to me was rhythm, using the hammer and chisel. Rhythm made the flow better and with powered engravers the flow is just as important. One tip I read here said, "Don't forget to breathe." Breath control is so important to any physical skill, as it controls tension and muscle control. The most critical skill I learned was to move my whole body through the arc when cutting curved lines and not letting my wrist try to control the curve, letting the hand and wrist control depth of cut. I kept all my practice plates and could see the development from day 1 through to day 10.
 

KCSteve

~ Elite 1000 Member ~
Joined
Jun 19, 2007
Messages
2,882
Location
Kansas City, MO
beegee

I'm working with air-assisted equipment (GraverMach SC). Freshly sharpened tools since I had to show the ever-indulgent wife how the new PowerHone works. Just got going too fast trying to work for her amusement. Had to get my brother's late birthday present done so I can do a 'test' bracelet for her (it's a test because I have to order the metal I want so I'll do a test using some not-quite-right metal I already have).
 

ED DELORGE

Elite Cafe Member
Joined
Nov 17, 2006
Messages
384
Location
LOUISIANA
Hello again Steve, nice layout on your pattern. One thing for sure ZIPPPO lighters are usually pretty hard. I suppose because the metal is stamped out and becomes work hardened. One question what are the molds that you have pictured. Am I missing out on some new product?
 

Steve223

Elite Cafe Member
Joined
Apr 20, 2007
Messages
552
Location
SW NewMexico
Looks like you are improving fast Steve.....Hopefully next spring i will be in Emporia taking a class also i know i could sure use it.
 

KCSteve

~ Elite 1000 Member ~
Joined
Jun 19, 2007
Messages
2,882
Location
Kansas City, MO
Ed

The fixture is made with ThermoLoc

At the class dinner Mr. Glaser demo'd how he makes self-clamping fixtures. Basically you need a strip of heavy aluminum and a couple of wood blocks. Clamp the aluminum in your vise nice and level (I scribed a line about 3/16" down and lined that up with the top of the vise. Set the wood blocks under the strip up against your vice. You heat a little ThermoLoc and mold it around the bottom & sides of the strip and the wooden blocks. Let this cool (about 20 minutes) and you now have a system for holding the strip nice and level.

Now you heat up a bigger hunk of ThermoLoc, roll it into a 'snake' and fold it up around the strip. DO NOT LET IT TOUCH ABOVE THE STRIP! It may not stick to Aluminum but boy does it stick to itself. Open your vise up nice and wide and set the strip on the holder blocks. Close the vise part way to compress the ThermoLoc - it spreads it out and forms it to fit the vise jaws.

Fold the ends of the 'snake' out away from the strips and cut them down the center with scissors. Spread the two halves along the strip and shove your object down into it. Get it right down to the bar. This makes sure it stays nice and level and it keeps ThermoLoc from getting stuck together under it. Mold the ThermoLoc up around the object nice and neat. Leave the surface sticking just above the ThermoLoc and DO NOT FORGET TO LEAVE THE GAP OVER THE STRIP OPEN. I had to cut it free a few times. Let it cool. ThermoLoc holds mechanically, not by sticking to the object. Once it's cool get your object out (I had to pry it out with a wooden stick) and slide the strip out of the bottom. Now you've got a reusable fixture that tightening your vise will clamp securely around the object.

Let me see if I have a usuable picture from the demo...
 

Attachments

  • strip.jpg
    strip.jpg
    41.1 KB · Views: 73
  • fixture.jpg
    fixture.jpg
    33.3 KB · Views: 68

Ron Smith

~ Elite 1000 Member ~
Joined
Apr 6, 2007
Messages
1,455
Forum, You can get Zippos with different metals, but the cheapest one is chrome plated and it is hard around the edges, but if you stay toward the center it is better. They make gold filled ones I think, or they used to. I think you can even get them in brass, but not sure.

Steve, ain't that thermoloc great? Quite an improvement in your work too. Nice scroll design also, but then what did you expect me to say..........
Ron S.....
Practice, practice, practice. Nice job!!
 

KCSteve

~ Elite 1000 Member ~
Joined
Jun 19, 2007
Messages
2,882
Location
Kansas City, MO
Ron,

You're not kidding that the chrome plated Zippos can be a pain! I put a rosette on the cheap one I carry and it was... interesting to do. As near as I can tell - based partly on discussions here - a difference of a few molecules of chrome in the plating can change the 'hardness' of cutting through it. All I know is that it was like driving down a half frozen muddy road. The graver would stop, start, shoot forward, bog down, and cut well, all in the space of a quarter inch or less.

It's worth it to get the all-brass or all-copper zippos. They come in 'plain' or 'armor' versions (the armor ones are much thicker). There are also versions of at least the brass ones that have 'brass' stamped into them. Technically you could get the Zippo with the solid sterling silver case but I'd recommend against it for a practice item. I'll see if I can find the thread / post with the info I posted a while back and if so come back and edit in a link / copy.

And yes, I thought you might like the basic design of that scroll ;) Too bad the execution isn't as good as the layout. Studying it is helping me with my own work. I can draw the spine of a reasonably nice scroll but I've still got some mental blocks on the embellishments. I know, I know - time and practice.

Ok, found it! For the thread showing my first attack on a Zippo click here

Here's the key info:
If you go to the Zippo website - http://www.zippo.com you can get lots of info on the lighters, some of which is useful for our purposes. Almost all of the lighters list their Material as 'plated brass'. The one I carry is plated inside and out but the inside is thin and smooth and the outside is heavier and more of a spatter coat kind of look.

I've got a wholesale account with a place that sells Zippos along with the other things that I got the account for so I can get nice shiny new Zippos at reasonable prices - probably cheaper than what I could get one plated for if I stripped it to cut it.

Here are the Zippo model numbers I've found:
204B - Brushed Brass MSRP $21.95
254B - High Polish Brass, Plain MRSP $24.95 (the 'non-plain' has SOLID BRASS stamped into it)
161 - Brushed Copper MSRP $24.95
168 - Armor Brushed Brass MSRP $26.95 (The 'Armor' cases are much heavier and what you should choose if you want to do high-relief work, I believe).

If anyone wants them I can look up the model numbers for the Sterling Silver lighters but they MSRP around $250+
 
Last edited:

lesholmes

Elite Cafe Member
Joined
Dec 8, 2006
Messages
160
Location
Montgomery, Alabama
To add to the ThermoLoc comments. DJ suggested WalMart plastic bags be used to separate any areas that should be protected from sticking together. The ThermoLoc does not stick to WalMart bags.

Regards,

Lester
 

lesholmes

Elite Cafe Member
Joined
Dec 8, 2006
Messages
160
Location
Montgomery, Alabama
;o)

I don't know about Target bags. DJ demonstrated using WalMart bags.

Actually, I suspect any of the thin, tough plastic bags used at retail outlets would have similar properties.

Les
 

KCSteve

~ Elite 1000 Member ~
Joined
Jun 19, 2007
Messages
2,882
Location
Kansas City, MO
Good tip! He didn't mention that during our demo (or I just missed it).

When you first look at ThermoLoc you wonder why anyone would need to buy more - the stuff's so reusable it'll take years to 'wear out'.

But then you start playing with it and it's so easy to make a nice fixture that I can see myself winding up with a drawer of them for just about anything I might engrave more than once.
 

Sponsors

Top