engraving dog pictures

ken dixon

Elite Cafe Member
Joined
Nov 28, 2006
Messages
312
Location
Eastern Wyoming
Hi,
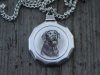
When you engrave a picture of a dog etc, and you want it to be engraved the size of a nickle, do you draw your picture like a pen and ink drawing very large then reduce it to size and transfer it to the work? Do you use a bulino style graver with the long heel as shown in Sams sharpening DVD? Finally do you cut many small lines or is it a dot matrix system? Thanks Ken
 

Tim Wells

~ Elite 1000 Member ~
Joined
Nov 9, 2006
Messages
1,331
Location
Dallas, Georgia
I'll add to this question if I may since it has been on my mind as well. Along the same lines as Ken's question; I need to know how to get started as far as putting the image you want to cut onto the plate. Transfer, scribe, draw it on there and pick/line it out?

The tools I understand, but I was going to do a transfer with the Magic solution and pick it out or cut lines as needed for the effect but I don't know if that would work. Guess I should just haul off and try it...
 

Martin Strolz

Elite Cafe Member
Joined
Dec 12, 2006
Messages
339
Location
Steyr, Austria
Ken,
let me give you an example. It is a silver pendant, engraved in a mixture of lines and dots.
If you first succeed in drawing your dog, give it a try with the graver!
Martin
 

Attachments

  • Black Labrador.jpg
    Black Labrador.jpg
    35.2 KB · Views: 879

GeorgeKhayata

Member
Joined
Nov 17, 2006
Messages
58
Hi Martin,
This is really nice work, but I can't tell if it has some kind of 3D cuts or just flat shaded.
George
 

GeorgeKhayata

Member
Joined
Nov 17, 2006
Messages
58
Martin I missed to ask you if you drew the dog or it was transfered from a picture:(
George~again
 

Jim-Iowa

Elite Cafe Member
Joined
Dec 6, 2006
Messages
101
Location
Colfax,IOwa
Ken last night I was looking at Steece's site. He has some neat tutorials on there with some great ways of transferring patterns. I reccomend you check it out for yourself.
 

Andrew Biggs

Moderator
Joined
Nov 10, 2006
Messages
5,034
Location
Christchurch, New Zealand
Hi Ken

What I do is to draw the picture with pencil and paper as big as I can. I can't draw small no matter how hard I try!!!!

Then I trace the main cut outlines only onto transparent tracing paper using a hard nibbed .5mm technical pen. You can also do the same if your taking a picture off a photograph.

Then the tracing is scanned/reduced to actual size and transferred to the metal. All that your left with is the fine outlines of the picture to cut. Then all the shading is done out of my head and off the drawings/photo.

One problem I encountered early on with scanning/transferring every bit of detail including shading/shadowing was that under the microscope you couldn't tell the difference between the transfer and your cuts. By transferring the outlines only you could build up the shading to the degree of darkness that you want.

I'll try and post a couple of pictures tonight to show you the process. The actual cutting is another story altogeather.

Hope this helps

Cheers
Andrew

P.S. Martin..............that's a beautiful dog picture that you've engraved.
 

Martin Strolz

Elite Cafe Member
Joined
Dec 12, 2006
Messages
339
Location
Steyr, Austria
George, it was a quite quick job and I had to depict the customers own dog. I received a photo which I scanned and scaled down to a few slightly different sizes.
These little prints I used for finding the proper size and position. Upon decision I flipped the picture, printed again and transferred. Of a dark picture of this kind, I only got a more or less very dark spot on my work piece, mainly the outline.
Then I slowly scribed all important detail as precise as possible. During engraving I worked from light to dark over the whole piece, seeking for proper shapes. Cuts itself vary widely and are used mixed in order to create the desired effects on the dog’s surface. Hard lines and shades I usually leave almost until the end for another chance of correction. Size was approx. ¾ of an inch, no microscope used.

Best regards, Martin
 

JTR

Member
Joined
Jan 10, 2007
Messages
68
Location
La Mesa, Ca.
That’s really a Great looking dog!
I guess never say never, but I doubt I’ll ever be able to do anything near that perfect. And yours makes my hunting dog practice plate that I did a few years ago look like a scraggly mutt!
John
 

Andrew Biggs

Moderator
Joined
Nov 10, 2006
Messages
5,034
Location
Christchurch, New Zealand
Hi Martin

You guys that don't use microscopes amaze me with what you can do on such a small area. You must have the 20/20 vision of an eagle. Even with an optivisor I simply can't see well enough to do anything. I tried it a couple of times and it was a complete and utter disaster!!!

Cheers
Andrew
 

Andy

Elite Cafe Member
Joined
Dec 31, 2006
Messages
146
Location
Ohio
Beautiful work Martin. And you say it was a quick work eh? ..I'm envious.
 

Andrew Biggs

Moderator
Joined
Nov 10, 2006
Messages
5,034
Location
Christchurch, New Zealand
Hi Ken

Below is a couple of example of what I described earlier. Keep in mind that this is the way that I do it and others may have better/quicker ways than mine.

On the left is the original pictures. As you can see the top is a pencil drawing and the bottom is a photo. On the right is the tracing outline that is scanned, then reduced in size to fit the metal. Both of the originals are full sheets of A4/Letter size paper.

The solid lines tend to be main cuts. The dotted lines are areas of significant shadow. I try to keep it simple so looking through the microscope I can tell the difference between the two. All the shading is then done "freehand".

By the way...........that photo of the very dapper young man just happens to be John Barraclough at the age of 16-17 years when he was a steeplechase jockey.

Cheers
Andrew


ken dixon

Elite Cafe Member
Joined
Nov 28, 2006
Messages
312
Location
Eastern Wyoming
Thanks Martin, Thats a great dog! Thanks Andrew those pictures help alot. Do you use transfer magic? And do you use a special graver or just a square? Thanks for the help Ken
 

Martin Strolz

Elite Cafe Member
Joined
Dec 12, 2006
Messages
339
Location
Steyr, Austria
Square graver geometry

Generally speaking you need to grind square gravers in two main shapes, the first for overall use, the second is of a narrower angle for shading purposes. The difference can be seen clearly on the figures. When I gind them using the Power Hone I use 22,5 ° post angle for the heel and 35-40° tool rotation angle for the general purpose graver. The gravers for shading are ground using 45° tool rotation angle. Just refer to the proportions of the tool in order to get a correct result.
Notice the relationship between the bottom of the graver and the angle created by the heel, on the general purpose graver the angle leans forward in comparison to the angle created by the fine line graver.
Variations of these two basic types I use too, mainly to change the tools handling characteristics.

The European style heel is quite large compared to what is recommended elsewhere. Dragging and marring of the surrounding metal with the bottom edge when cutting curves can be avoided by slightly leaning the graver towards the outside when engraving a curved line.

The face sizes depend on the depth of the cuts, but I strongly recommend to keep them small. This will give more control and excellent visibility of the tool tip, especially when executing fine detailed work.

Best regards
Martin Strolz
 

Attachments

  • General purpose graver.jpg
    General purpose graver.jpg
    26.1 KB · Views: 353
  • Fine graver for shading.jpg
    Fine graver for shading.jpg
    26.4 KB · Views: 352
  • Shotgun 2.jpg
    Shotgun 2.jpg
    56.1 KB · Views: 332
Last edited:

Sam

Chief Administrator & Benevolent Dictator
Staff member
Joined
Nov 6, 2006
Messages
10,491
Location
Covington, Louisiana
Thanks for posting the drawings, Martin. These gravers are very similar to what the Italians use. I agree that a small face is desirable. Did you ever make the Cafe sign you were talking about? / ~Sam
 

Latest posts

Sponsors

Top