
RT Bit and Spur
Elite Cafe Member
- Joined
- May 17, 2007
- Messages
- 279
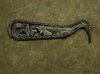
This is a practice plate I just finished. I have been helped by Bob Findley over the phone. Any advice would be appreciated.
Rod
Rod
Attachments
-
 DSC08056.JPG236.5 KB · Views: 305
")


