Curtiss Jenny

wowilson

Elite Cafe Member
Joined
Jan 9, 2013
Messages
292
Location
Mansfield, Texas
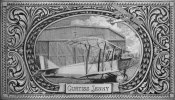
I've loved aviation my whole life. In 4th grade my parents had to have a meeting with the school principal because I drew airplanes all day, everyday. It took me many years, but I eventually ended up working at Bell Helicopter as an illustrator. Those days are over, but I still carry on in the same way. I guess, sometimes you figure out what you are at an early age. This piece is business card sized and is engraved on mild steel. I hope that you like, it has taken me my entire life to accomplish. Jenny Master.jpg
 

AllenClapp

Elite Cafe Member
Joined
Aug 7, 2019
Messages
381
Location
Raleigh, NC
Thanks for posting this. I love the look and feel of this calling card-sized engraving. I can almost hear internal termoil: do I just cut the plate so I can show it off, or do I cut it in reverse so I can use it to print calling cards?
Forgive me please, but I am a border junkie and I get out of hand sometimes, so please take the following with at least two grains of salt. If you ever decide to do it again in reversed type so that it can be used as a printing plate for your calling cards, I suggest revisiting the shape of the ovaloid inside border. There are some flat spots that almost make it look like a squashed pentagon. I see the issues with the tail and wheel that caused it. I see a few ways to avoid that.
ONE, decrease the size of the starting kernel areas of the corner scrolls so that you can extend the oval sideways a little more. This may be tricky, in order to keep the balance of the overlapping plane parts
TWO, pull the inside border up a little sooner behind the banner. This would require letting the wheel drop down over the border a little, but that is in keeping with other areas where overlap with the inside of the inside border occurs (I like the way you have done that elsewhere).
THREE, decrease the width of the inside border as it goes from vertical down toward the banner, to allow the bottom area of the inside border to better match the curvature of the top.
I like the look of your outside border. It is nicely done. Would you mind posting some closeups of the outside border? It may be the lens or lighting, but there are slight differences in the looks of the border as it goes around the piece that make it difficult to tell how you did that one. Looking at the bottom section of the outside border, it looks like the outside scoops of each vee were made with a round graver--is that correct? Looking at the bottom, that would be the bottom of upside down vees. It also looks like the top of the upside down vees (on the bottom border) was first defined by a shallow straight cut line and then a thin, but increasing width plunge cut was made up to the top inside border line on the bottom border area--is that correct, or was there some additional beveling to create the look of the inside portions of the outside borders?
 

papart1

:::Pledge Member:::
::::Pledge Member::::
Joined
May 23, 2015
Messages
1,341
Location
Michigan
Beautifully done, I love it. please post more!!!
 

wowilson

Elite Cafe Member
Joined
Jan 9, 2013
Messages
292
Location
Mansfield, Texas
@AllenClapp If you believe that I did not make the shape I intended, you are mistaken. It is meant to mimic the shape of the cockpit opening. I had intended to use the shape of the radiator but did not like how it looked.
Regarding the border, please use your considerable expertise to determine how it was done.
 

wowilson

Elite Cafe Member
Joined
Jan 9, 2013
Messages
292
Location
Mansfield, Texas
@AO84 You should give it a try. It's a lot like scrimshaw. Doesn't require any special tools to accomplish. No power, and not too much magnification.
 

AllenClapp

Elite Cafe Member
Joined
Aug 7, 2019
Messages
381
Location
Raleigh, NC
@AllenClapp If you believe that I did not make the shape I intended, you are mistaken. It is meant to mimic the shape of the cockpit opening. I had intended to use the shape of the radiator but did not like how it looked.
Regarding the border, please use your considerable expertise to determine how it was done.
Thank you. Now I understand the why of the design.
 

John B.

Lifetime Pledge Member
::::Pledge Member::::
Joined
Nov 9, 2006
Messages
3,956
Location
Los Angeles area, California.
Wowilson, thank you for posting your wonderful plate.
Some top class work for our enjoyment.
Your bulino work on the Jenny is absolutely outstanding.
As you are a past pro illustrator for Bell Helicopter. it would be an education to see the tools you used to create the image of the Jenny.
Very interesting, and hope you are willing to share pictures of them.
 

wowilson

Elite Cafe Member
Joined
Jan 9, 2013
Messages
292
Location
Mansfield, Texas
Wowilson, thank you for posting your wonderful plate.
Some top class work for our enjoyment.
Your bulino work on the Jenny is absolutely outstanding.
As you are a past pro illustrator for Bell Helicopter. it would be an education to see the tools you used to create the image of the Jenny.
Very interesting, and hope you are willing to share pictures of them.
Thanks for the kind words, John. I owe Mr. Biggs an article for the Engraver. Maybe I can just document the making of this plate.
 

Latest posts

Sponsors

Top