
Keeling_Machines
Member
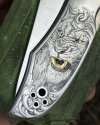
Hey all, I’m halfway finished with this Spyderco and thought I’d share my progress.
I’m starting to feel comfortable with my bulino lines but I’m still struggling with bulino dots.
I feel that’s it’s very difficult to get them to blend smoothly and consistently without it getting too dark and clumpy.
I’m using a 70 degree graver on the Lindsay bulino template without a heel for the dots and a 116 graver on the Lindsay template with a very short heel for the lines.
If you have advice on getting bulino dots smoother, finer, and more consistent please let me know what works for you!
I’ve found for my lines that using a “dull” graver seems to work well for achieving very light “grey” lines, and then going back in with a sharper graver to deepen and darken the higher contrast areas.
Any advice or constructive criticism is always welcome.
Thanks!
Attachments
-
 4224FC01-9398-4D5D-B249-AB74E8C55A26.jpeg189.9 KB · Views: 147


