
BrianPowley
~ Elite 1000 Member ~
Customer was on a budget, but I felt it necessary to slightly over-deliver.
I also did the rust blue finish---8 coats of Pilkington's American Rust Blue.
I also did the rust blue finish---8 coats of Pilkington's American Rust Blue.
Attachments
-
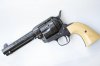 JJ Jolly Single Action 005.jpg28 KB · Views: 193
 -
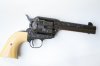 JJ Jolly Single Action 004.jpg25.1 KB · Views: 202
Last edited:


