Question: bevel cuts

JenBrockman

Member
Joined
Jul 13, 2012
Messages
7
Location
Iowa
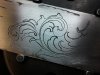
So....I'm just learning. I was fiddling around with this trying to figure out the beveled cuts on leaves. More than anything I have such a tough time with "rolling" the graver to get a beveled cut. I just CAN NOT figure that out! Practice practice practice....I know. I will get it eventually. My question is.....are there rules to bevel cutting? You should cut towards the inside right? Any other rules.
This is a practice piece i was messing around with. I think the design belongs to Sam, it was a practice design I printed from the cafe.
I can point out lots of ooops now that I look at the pic....i didn't back cut, see lots of "flat" spots, lines crooked, a few I deviated from the design and mucked it up, etc.....it all comes with learning. And like I said....just fiddling so this is not something I would consider to be a nice finished piece.
Suggestions??? Advice???
 

Attachments

  • 2012-08-08 19 58 30.jpg
    2012-08-08 19 58 30.jpg
    125.3 KB · Views: 379

Sam

Chief Administrator & Benevolent Dictator
Staff member
Joined
Nov 6, 2006
Messages
10,491
Location
Covington, Louisiana
Jen: I would say that the 'rules' are 1.) to always bevel to the inside of the element that you're engraving, and 2.) always cut thin to thick. Following those two rules will get you on the right track, and based on your photo, you're getting close.

The rule of thumb for ornamental engraving is that the graver is rolled to the inside of each element. I cut scroll backbones straight up and down, or if I do roll, it's barely apparent. So if you roll to the inside, then the deepest part of the cut is around the outside of the element, and the shallowest part of the cut is on the inside.

You might also want to practice these cuts with a smaller scroll as beveling larger elements requires more graver control than smaller ones. I would scale that design down and cut it again, and I think you'll notice a difference.

Here's a recent thread I started on this very topic: The Importance of Beveling Cuts
 

monk

Moderator
Staff member
::::Pledge Member::::
Joined
Feb 11, 2007
Messages
10,872
Location
washington, pa
not too shabby, if you ask me ! what graver shape are you using ? flats are much easier for me to roll than the others. one very good thing about what you show here-- you have an understanding of where your weak points are. knowing that- you only need to keep at it- never give up. btw: welcome to this place called the cafe. as for borrowing someone elses design, study theirs carefully, but practice drawing them as well. drawing is as important as the cutting you do. there's so many ways to do pattern transfer, but these techniques only go so far. there are surfaces on many objects, such as guns, that force one to draw the pattern. all here are willing to help. it's a big help for us to know what tools you're currently using. knowing that, it's far easier to give advice that's applicable in your particular situation.
 

Andrew Biggs

Moderator
Joined
Nov 10, 2006
Messages
5,034
Location
Christchurch, New Zealand
Hi Jen

There is a lot to learn isn't there :)

Bevelling cuts or flaring them is a matter of rolling the graver to the left or the right..............think of turning a key in a lock. The wrist rolls.

If you are using a 90 degree V graver then the flare is not so pronounced. It can be very subtle. If you have a small heel you have to roll your wrist right over. To combat a small heel, which is generally desirable, you could try a parallel heel which would give you a longer cutting edge and still retain a small heel length.

The other extreme is a 120 degree V graver. Because it is wider you can get a dramatic flare simply by rolling the wrist very slightly. But be careful with a 120 graver because it can flare the cut too much.

Now that all sounds rather technical and complicated but in reality it isn't. Don't worry, your still getting to grips with the basics and there will come a day, with lots of practice, that this will all become second nature to you :)

Cheers
Andrew
 

Roger Bleile

~ Elite 1000 Member ~
Joined
Oct 4, 2007
Messages
2,988
Location
Northern Kentucky
Jen,

Welcome to the Engravers Cafe'.

Sam has said above "always cut thin to thick." That is the standard approach that was developed by those using the burin. That is because with a manually pushed graver the engraver had to build up some momentum at the beginning of the cut to get to the thick end where he or she would then "pop" the chip out with a flick of the wrist. Also, when manually pushing, if you managed to get some momentum built up from the thick end of a cut you were in real danger of having a fly out when you got to the thin end.

I was not trained with a burin and began with H&C before eventually changing to a Gravermeister. I taught myself to use a burin later. Since I didn't "know better" I developed a technique of starting on the thick end of a cut and ending on the thin end when I used my Gravermeister and subsequently my Palmcontrol Airgraver. This technique has the advantage of not having to force out a large chip at the end of the cut, which on deep beveled cuts can take a couple of trys, causing a rough spot at the end.

The exception in my work is that I do go thin to thick on fine shading lines where I skid the graver on its heel for about a thousanth of an inch to get the finest point on the exposed end of the shade line.

Until a few years ago, I wasn't aware that most other engravers cut everything thin to thick because my brother, Carl also cuts thick to thin when using a power assisted graver and I never bothered to ask anyone else until I read about it on this forum when I joined.

I don't want to muddy up the waters for you but I have found that there are few absolutes in hand engraving because I keep running into people who have an odd but successful approach to technique. Nevertheless, if you cut thin to thick you will be in good company.

Here is a link to my transitional/flare cutting tutorial. All of the cuts were done thick to thin with a 90 degree graver which illustrates just how much a cut can be flared or beveled with a 90.

http://www.engraverscafe.com/showthread.php?3203-Tutorial-Transition-Cut-tutorial-by-Roger-Bleile

Cheers,
Roger
 

Sam

Chief Administrator & Benevolent Dictator
Staff member
Joined
Nov 6, 2006
Messages
10,491
Location
Covington, Louisiana
Roger: many thanks for refreshing my memory on your great tutorial. It good seeing it again, and I love your sparkling flare cut work :thumbsup:
 

JenBrockman

Member
Joined
Jul 13, 2012
Messages
7
Location
Iowa
Monk: Yes, I need to work on my own designs. I started drawing months ago. I have Sams DVD and a handful of books that have been amazingly helpful. I do have some designs but have to work on scaling them down and the asthetics....what looks better together and so on.
I used a 90 for the cuts on this practice piece. I also have a 105 and a 120. I am having trouble with the heels on the 105 though. When I sharpen the 105, one heel wants to be longer than the other! I am not sure what I am doing wrong there. I have a dual angle sharpener. I need to read up on graver sharpening, I have seen there is a lot of good info on here. I tried to cut another design with the 105, it worked better, but the heel thing is really bugging me. I'm confused. Is there a formula for cutting? Total to equal 180. So if the graver is 105 then the heels should be each 37.5? is that right? So when I cut the heels at 15degrees the front angle should be turned to what?? Ugh...my brain doesn't work this way :)
So....I can use a flat just to cut the leaves with the bevel cuts? I cut with the "corner" of of the flat and then roll it? Sorry, I don't know all of the correct engraving terminology yet :)
Thank you again for all of your help!! The advice i get from all of you is priceless! I am a nurse by day....and we eat our young (or so they say). The dynamics are so different! Thank you for helping to pass down all this great information to beginners!
 

Andrew Biggs

Moderator
Joined
Nov 10, 2006
Messages
5,034
Location
Christchurch, New Zealand
Hi Jen

there may be 3 reasons that your 105 heel is longer than the other.

1. The sides are not uniform. Make sure they are tapered evenly.

2. Your graver bottom angles are not both exactly the same and meeting in the middle. The sharpener may have slipped or not quite the same angle was used, or too much pressure on one side.

3. The dual angle sharpener is out of whack. Read the instructions to rectify.

I would try the first two options before trying number 3.

Don't worry about the lingo.........you'll be speaking the same language soon enough :)

Cheers
Andrew

P.S. There is also a 4th reason.......your face angle may be not square to the graver.
 
Last edited:

Roger Bleile

~ Elite 1000 Member ~
Joined
Oct 4, 2007
Messages
2,988
Location
Northern Kentucky
Jen,

To help with the terminology click on the link under my signature which will send you to the engraving glossary. It's all there with illustrations.

Cheers,
Roger
 

GTJC460

~ Elite 1000 Member ~
Joined
Mar 24, 2010
Messages
1,327
Location
Tullahoma TN
You may want to give a uniform parallel heel a try. It makes cutting flared/beveled cuts super easy.

GRS just developed a new fixture, and Lindsay has his setup too. I just started using this geometry for some of my work. It makes this style almost effortless. With a carbide graver and highly polished heels, you will be amazed at how bright your cuts will be.
 

Latest posts

Sponsors

Top