Belt Buckle

nhcowboy1961

Elite Cafe Member
Joined
Feb 27, 2008
Messages
174
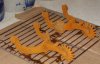
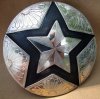
Hi all, just thought I'd check in and not be such a lurker all the time:) This was my latest belt buckle for a client; he wanted bright a cut letter C and flowers so this is what I came up with. It's nothing spectacular but I like the way it came out. Also one of my horn caps (only made three so far).
It's nice to be back in the swing of things after two weeks laid out flat on the couch with a crippled up back unable to walk. Note to self, never ever move a 375 pound pellet stove off a truck and into the house all by myself just becasue I think I still 'got it". It's a guy thing but stupid in the end for all the lost time-Yikes!
Paul
 

Attachments

  • RoymoBuckle.jpg
    RoymoBuckle.jpg
    122.6 KB · Views: 323
  • BG-Horncap1.jpg
    BG-Horncap1.jpg
    101.7 KB · Views: 296

Ron Smith

~ Elite 1000 Member ~
Joined
Apr 6, 2007
Messages
1,455
Paul, very striking! Nothing will catch your eye like a very well done belt buckle. And that is definately an eye catcher. It is good advertisement too.
Rock on!
 

monk

Moderator
Staff member
::::Pledge Member::::
Joined
Feb 11, 2007
Messages
10,873
Location
washington, pa
beautiful contrast between the hammered iron and the engraved silver. very nice.
 

nhcowboy1961

Elite Cafe Member
Joined
Feb 27, 2008
Messages
174
beautiful contrast between the hammered iron and the engraved silver. very nice.
That is a neat hammered look to the buckle Monk but I found a serendipitous way of achieving that with no effort on my part. At the metal boneyard I found a piece of very very rusted metal, fully intending to sand it smooth. When I cut a buckle and simply wire brushed it (after soaking in muriatic acid briefly) the look was awesome. Sure wish I got more of that "crappy" metal but I have a large piece outside for a year now-maybe by next year it'll be ready :)
 

jcsilver

Member
Joined
Jun 10, 2008
Messages
61
Location
Whitesboro, Texas, United States
nhcowboy1961, before I use to use spartex which I got from IJS. Can't remember if it was 1 or 2 but it was for metal, put in a crock pot with heat and it would eat the steel pretty good, not sure if the pits would get that big and deep though, but worth a try. jcsilver
 

RT Bit and Spur

Elite Cafe Member
Joined
May 17, 2007
Messages
279
Paul
I to liked the rough steel background and the silver. Sometimes the silver doesn't stick to well to steel like that but you did it. The engraving on the C is good also considering the small space. Keep making and keep posting.
Rod
 

bronc

Elite Cafe Member
Joined
Nov 12, 2006
Messages
919
Location
Portales, NM
Paul,
Very nice. You have some really neat elements in your work. I look forward to seeing more.

Stewart
 

John B.

Lifetime Pledge Member
::::Pledge Member::::
Joined
Nov 9, 2006
Messages
3,956
Location
Los Angeles area, California.
For that old pitted look on iron or steel try burying for a couple of weeks in the used wet urine soaked straw bedding from a horse stall.
That's a old trick used to age iron or steel fake swords, knives, armour, spurs, guns and such.
Just don't ask me how I know this. Ha ha. Seems to work faster than salt.
It sure made a great look on that buckle and a nice contrast to the silver. Very rich.

John. B.
 

Christopher Malouf

~ Elite 1000 Member ~
Joined
Jun 19, 2007
Messages
2,037
Location
5mi from the nearest Dunkin Donuts in Tennessee
I've been following along with this thread and it's interesting to learn how you made the buckle.

I wonder if you could forge the steel? The right composition of carbon/iron should give a nice color and pitted effect and you wouldn't have to worry about the corrosion. Stainless pits real well when heated to critical too.

I never realized how much work went into these. Excellent work.

Chris
 

nhcowboy1961

Elite Cafe Member
Joined
Feb 27, 2008
Messages
174
Another trick to try

Thanks for all the tips guys about pitting steel, the more ways the merrier! It just dawned on me another approach and a novel one at that. Years back in my blacksmith apprenticeship I came across some magazines of interest for ideas and techniques of all sorts. One very interesting one involved removing rust electronically with a 12 V battery charger like you’d use to jump your car battery. A non metallic large pot of water has lots of baking soda added to it for an electrolyte. One of the terminals is clamped onto a clean piece of metal and the other to the rusted metal-say a wrench and both are submerged in the water/soda solution and the charger turned on .I forget which polarity goes to what metal piece where so sorry about that. As a way to remove rust it’s incredible, since it’s on an atomic level and will get in screw threads and everywhere-somebody was thinkingâ€
I did it backwards though on purpose so I was taking the rust off a rusty piece of metal and depositing it on the clean metal of the spurs-took about a half hour maybe less. I wanted to age them up and look old-way before I learned about Birchwood Casey’s plum brown finish-Duh!!! Interestingly though if they’re left in there too long it pitted the metal pretty bad for my purposes then but now…..the wheels are spinning.
**WARNING** playing with electricity and water is obviously something to be careful of, but 12 volts ain;t too bad, I even stuck my hand in there “just to see†and got no shock-what would my Mom think?

PS: The attachment is a pair of spurs after they came out of Frankenstein’s lab. I’d let them dry and juice them up good with bowling alley wax-it actually worked well, bass akwards but it worked :)
 

Attachments

  • rusty-spurs.jpg
    rusty-spurs.jpg
    75.6 KB · Views: 66

Mike Cirelli

~ Elite 1000 Member ~
Joined
Nov 8, 2006
Messages
1,690
Location
Western PA
Really nice buckle. The strong contrast you got with the metal finishes looks great. Cool technique.
John: I don't think your method is very convenient for us city folk:)
 

jbmartin

Member
Joined
Dec 21, 2007
Messages
44
The first two buckles I made were from an old disc from a farm implement that had that texture, but never again. That stuff was tempered way too good!
One of the best things I've found for keeping a brown or rusted finish on the steel is to coat it with Hoppes gun oil after the browning. I use Birchwood Casey Plum Brown, just heat with a torch until it is hot enough to sizzle then sponge on and leave until cool. Just make sure not to get it too hot, you can wipe off lettering if the solder gets too hot. One to three coats is a nice brown, four to six and it will almost be black. Then put the gun oil on and leave overnight, wipe off the excess the next day. I always tell my customers to use the gun oil as it lasts a really long time and won't let the red rust form at all.

Hope this helps!

JB
 

Latest posts

Sponsors

Top