Critique Request An attempt at redemption

alwayslearning2012

:::Pledge Member:::
::::Pledge Member::::
Joined
Aug 24, 2012
Messages
44
Location
Louisville, KY, USA
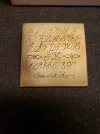
This plate was an extra practice plate from October. It was an acetone transfer. The bottom I had to basically guess what it was telling me. So I improvised, albeit poorly. I feel that acetone transfers are okay for a light first pass. I can't really tell the width of the chip, or what the cut is doing with the ink mixed in. It's really hard to tell what I've created until I remove all that transfer.

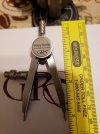
I refaced the gravers I sharpened the other day. this was a 120. I'm trying this heel technique. There is some heel drag, but I'm happy that for the most part, it's not there. There are a few errant scratches, (I'll work on that).

Still in a constant battle relaxing the hand, and tend to force the graver to my will. Anyway, I welcome all comments.

AL12
 

Attachments

  • cursive practice.jpg
    cursive practice.jpg
    124 KB · Views: 121

T.G.III

:::Pledge Member:::
::::Pledge Member::::
Joined
Jul 25, 2009
Messages
345
Location
Oregon
On the acetone transfer, it takes a bit of extra time but using a scribe and tracing over the design allows for the removal of the ink and leaves clean lines to follow, just be sure to trace all of the lines before you remove the ink.

There are threads in the forum about dressing the tip of the scribe so it leaves a nice polished line versus scratching a mark into the surface of the work
 

alwayslearning2012

:::Pledge Member:::
::::Pledge Member::::
Joined
Aug 24, 2012
Messages
44
Location
Louisville, KY, USA
On the acetone transfer, it takes a bit of extra time but using a scribe and tracing over the design allows for the removal of the ink and leaves clean lines to follow, just be sure to trace all of the lines before you remove the ink.

There are threads in the forum about dressing the tip of the scribe so it leaves a nice polished line versus scratching a mark into the surface of the work
Thanks so much for that. I never thought of that. Ya know, I really need to get that light bulb switch fixed.
 

ByrnBucks

:::Pledge Member:::
::::Pledge Member::::
Joined
Dec 25, 2020
Messages
190
Location
Chattanooga, TN
Good evening Always, looks like good subject matter for practice, maybe cut that same layout 3 or 4 times over

Try to slow down and focus each cut as your following your transfer. Pay close attention to the slightest variation once you are committing to a curve….. Unsure if this is a coherent explanation so please excuse scribbling on you image.

These spots that have been outlined all make a more abrupt change in angle, be that from a start and start point or just focusing on where your headed instead of the next millimeter in from of your graver. I fine if you need to cut a super straight line doing so not ever gazing toward the end but only the next few millimeters. If yo go slowly you will catch these devastations before they are large enough to be seen as a whole.

Have a wonder day. BB IMG_3358.jpeg
 

T.G.III

:::Pledge Member:::
::::Pledge Member::::
Joined
Jul 25, 2009
Messages
345
Location
Oregon
Thanks so much for that. I never thought of that. Ya know, I really need to get that light bulb switch fixed.
Ha, light bulb switch, took me years before I started tracing over the transfer, like you mentioned, just got tired of the ink chipping and congregating at the point, not to mention that under a scope the lines are never really "hairline"

Also, by using the scribe it helps to develop that super light touch we all seek as well as the eye hand coordination we all want to improve our drawing abilities.

Enjoy
 

allan621

:::Pledge Member:::
::::Pledge Member::::
Joined
Jan 10, 2007
Messages
365
I'm not sure redemption is what you need. I think you actually need a divider.

With a divider you can scratch in level lines onto the plate. So if you are doing a transfer where you can see through the letters to the plate, scratch in a level line and then carefully place the transfer letters onto the line, making sure the bottoms are on the line and not below it.

If you are using an opaque transfer where its hard to see the plate below apply the transfer. After its on use the dividers to scratch on a level line close to the bottom of most of the letters. If you can correct the transfer with a scribe so the letters are on the line it will look a lot better from the get go.

Try and work slow, just one thing at a time. One thing like making sure your tool is sharpened correctly, make sure your guide lines are straight and don't get in your own way by rushing onto the next letter to see what its going to look like at the end. In other words don't go thinking about the next thing while you're still working on the one thing before you.

I'm at the point where I concentrate on the line I'm drawing, the line I'm cutting, the layout of the guidelines. One thing. Just one thing.

Allan
 

alwayslearning2012

:::Pledge Member:::
::::Pledge Member::::
Joined
Aug 24, 2012
Messages
44
Location
Louisville, KY, USA
"I'm not sure redemption is what you need. I think you actually need a divider."

Do you mean like this one?

I can see the potential in that advice.

Thank you all to whom have experienced the frustration and hair pulling in your early careers as artisans, and are willing to share the benefits and wisdom to the others that follow behind you. It is greatly appreciated.
 

Attachments

  • alex divider.jpg
    alex divider.jpg
    97.3 KB · Views: 32
Last edited:

allan621

:::Pledge Member:::
::::Pledge Member::::
Joined
Jan 10, 2007
Messages
365
Sorry for taking so long to reply.

That's a very fine set of dividers, expensive, but if you do precise work its great. I have the same.

Looking at your plate there are a few problems with the layout. Script requires a sense of balance and proportion. The balance comes from having everything on straight lines leaning or not leaning at the same angle. . The proportion comes from have the letters evenly sized and spaced.

Most of the fonts from a word processing program used for transfer will have all the letters balanced and in proportion. The problem is that the plates engraved on don't have lines to lay the transfers on straight. So when I lay out a plate to practice on ( 45 years and I still practice once a week ) I take the dividers and scratch a line parallel to either the top straight edge or the bottom. When I have them on I carefully lay thetransfer onto the straight line and burnish it in. When the transfer is on correctly I do what TGIII says and take a scribe and scratch in the outlines of the letters. When done wipe off the transfer and look at the result. It should be ready for cutting.

If you go over to Youtube and look up his lettering video introduction he uses a kind of tool to scribe in guide lines.

Hope this helps.

Allan
 

Latest posts

Sponsors

Top