Andrew Biggs
Moderator
How to draw for beginners
First up I want to say that this is not about how to draw scrolls or anything like that. Ron Smith has produced his wonderful book on Advanced Scroll Design and he can explain it scroll design far better than I ever could.
This is about the process of drawing. Everyone will have their own unique way of doing this. This isn’t the right way or the only way……….it’s just the way I do it.
All I really want to achieve is showing people that are struggling with their designs a simple but effective way of how to go about it.
So lets make a start………………..
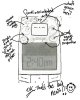
1. Outline of what is to be engraved. Get the border/outline of what is to be engraved. This can be done however you like, computer, photocopier, hand drawn…….it doesn’t matter so long as it’s as accurate as you can possibly get.
2. Enlarge the outline. Blow the drawing up to a more manageable size. Don’t go too overboard on this. If you go too large when you reduce the size of the drawing to actual size you run the danger of having 1mm scrolls!!!! Time will teach you what is about right but a good starting point is roughly X4.
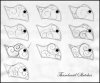
3. Thumbnail sketches. These are just little more than doodles about the size of your thumb. All you are doing is trying to stimulate ideas and get used to the shape of what you are working on. Sometimes a couple of thumbnails and you are away. Other times it takes 10, 20, 30. There’s no rules on this, just do as many as it takes till the design starts taking a bit of shape. Don’t go into any details all you are doing is trying to work out the main lines of the design and develop ideas and direction.
Things to consider at this stage are the origin of the scroll design and the flow/direction of the overall design.
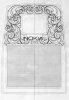
4. The main design and borders. Once you have a good thumbnail sketch it’s time to work on the main design stage. Borders come first and any shapes within the borders. Single border, double border, ovals etc. Draw them in first very accurately because we are now starting the final drawing phase.
5. Scroll backbones (draw lightly). This is the most critical part of the design. If the scrolls aren’t right then no matter how hard you try the design will be a failure. DO NOT SKIMP AT THIS STAGE!!!! The backbone of the scroll should be drawn very, very lightly as you will constantly be rubbing out and making alterations. Dotted lines are a great way to build these up. Do not start putting in leaves at this stage, just concentrate on the scroll backbones.
a. Start by drawing the scrolls fairly quickly so they are placed in approximately the right place where you want them to be.
b. Go back and slowly start refining them by rubbing out and constantly adjusting them so they start taking the right shape. You will constantly be drawing and rubbing out so keep your lines light!!!
c. Keep repeating this process till the scrolls are as perfect as you can draw. Turn the drawing upside down and sideways etc. The scroll backbones should be pleasing to the eye in all directions. Keep making minor adjustments by rubbing out and altering. Keep going till you are satisfied at this stage because you will still do some fine tuning later.
d. Get rid of all bumps, flat spots etc………get them as perfect as you can.
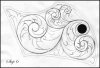
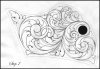
6. The leaves. Now you can start drawing in the leaves. Keep them light.
7. Fine tuning. You will notice that some leaves will become over-extended and some areas of your scroll heads are too tight or too loose to add leaves. Some scrolls that you thought were looking pretty good are no longer looking this way!!! This is where the fine tuning process comes in.
a. Over extended leaves can be cured by breaking the leaf up to smaller elements.
b. Scroll heads that are too tight or too loose will need to be opened up or closed to accommodate the leaves. Make the necessary adjustments.
c. Break areas down. Some areas will have to be filled with leaves that are to large for the design. Break these areas down by adding a smaller scroll so it can accommodate a smaller, more appropriate size leaf.
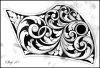
8. Final stages. Keep fine tuning the design till it’s as good as you can get. Gradually darken your pencil stokes as the more satisfied you become with the design.
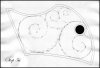
9. Shading. While you are drawing always try to keep in mind how it will be shaded. Don’t draw the shade lines in but just keep in mind how it will all work together.
10. Background. If you like you can darken your background in with pencil or the computer. This will also show you some very obvious spots in the design that may need re-working
9. One final trick. Sometimes to change something requires a major rubbing out and redraw or the alterations start making everything messy………….this is where tracing paper can come in real handy. Tape the tracing paper over the design and trace the elements that are OK and start redrawing the alterations.
Always remember that the design is everything. If you have a crap design then no matter how well you cut it……..it will still be crap. All you have done is take a bad pencil design, transferred it to metal and cut it repeating all the same mistakes. If you notice something is not right in the design then fix it, either in the drawing or in the cutting.
However if you have a good design and your cutting skills still need some practice……..then the chances are that the overall engraving will look quite good even though the actual cuts may not be the best.
Cheers
Andrew
First up I want to say that this is not about how to draw scrolls or anything like that. Ron Smith has produced his wonderful book on Advanced Scroll Design and he can explain it scroll design far better than I ever could.
This is about the process of drawing. Everyone will have their own unique way of doing this. This isn’t the right way or the only way……….it’s just the way I do it.
All I really want to achieve is showing people that are struggling with their designs a simple but effective way of how to go about it.
So lets make a start………………..
1. Outline of what is to be engraved. Get the border/outline of what is to be engraved. This can be done however you like, computer, photocopier, hand drawn…….it doesn’t matter so long as it’s as accurate as you can possibly get.
2. Enlarge the outline. Blow the drawing up to a more manageable size. Don’t go too overboard on this. If you go too large when you reduce the size of the drawing to actual size you run the danger of having 1mm scrolls!!!! Time will teach you what is about right but a good starting point is roughly X4.
3. Thumbnail sketches. These are just little more than doodles about the size of your thumb. All you are doing is trying to stimulate ideas and get used to the shape of what you are working on. Sometimes a couple of thumbnails and you are away. Other times it takes 10, 20, 30. There’s no rules on this, just do as many as it takes till the design starts taking a bit of shape. Don’t go into any details all you are doing is trying to work out the main lines of the design and develop ideas and direction.
Things to consider at this stage are the origin of the scroll design and the flow/direction of the overall design.
4. The main design and borders. Once you have a good thumbnail sketch it’s time to work on the main design stage. Borders come first and any shapes within the borders. Single border, double border, ovals etc. Draw them in first very accurately because we are now starting the final drawing phase.
5. Scroll backbones (draw lightly). This is the most critical part of the design. If the scrolls aren’t right then no matter how hard you try the design will be a failure. DO NOT SKIMP AT THIS STAGE!!!! The backbone of the scroll should be drawn very, very lightly as you will constantly be rubbing out and making alterations. Dotted lines are a great way to build these up. Do not start putting in leaves at this stage, just concentrate on the scroll backbones.
a. Start by drawing the scrolls fairly quickly so they are placed in approximately the right place where you want them to be.
b. Go back and slowly start refining them by rubbing out and constantly adjusting them so they start taking the right shape. You will constantly be drawing and rubbing out so keep your lines light!!!
c. Keep repeating this process till the scrolls are as perfect as you can draw. Turn the drawing upside down and sideways etc. The scroll backbones should be pleasing to the eye in all directions. Keep making minor adjustments by rubbing out and altering. Keep going till you are satisfied at this stage because you will still do some fine tuning later.
d. Get rid of all bumps, flat spots etc………get them as perfect as you can.
6. The leaves. Now you can start drawing in the leaves. Keep them light.
7. Fine tuning. You will notice that some leaves will become over-extended and some areas of your scroll heads are too tight or too loose to add leaves. Some scrolls that you thought were looking pretty good are no longer looking this way!!! This is where the fine tuning process comes in.
a. Over extended leaves can be cured by breaking the leaf up to smaller elements.
b. Scroll heads that are too tight or too loose will need to be opened up or closed to accommodate the leaves. Make the necessary adjustments.
c. Break areas down. Some areas will have to be filled with leaves that are to large for the design. Break these areas down by adding a smaller scroll so it can accommodate a smaller, more appropriate size leaf.
8. Final stages. Keep fine tuning the design till it’s as good as you can get. Gradually darken your pencil stokes as the more satisfied you become with the design.
9. Shading. While you are drawing always try to keep in mind how it will be shaded. Don’t draw the shade lines in but just keep in mind how it will all work together.
10. Background. If you like you can darken your background in with pencil or the computer. This will also show you some very obvious spots in the design that may need re-working
9. One final trick. Sometimes to change something requires a major rubbing out and redraw or the alterations start making everything messy………….this is where tracing paper can come in real handy. Tape the tracing paper over the design and trace the elements that are OK and start redrawing the alterations.
Always remember that the design is everything. If you have a crap design then no matter how well you cut it……..it will still be crap. All you have done is take a bad pencil design, transferred it to metal and cut it repeating all the same mistakes. If you notice something is not right in the design then fix it, either in the drawing or in the cutting.
However if you have a good design and your cutting skills still need some practice……..then the chances are that the overall engraving will look quite good even though the actual cuts may not be the best.
Cheers
Andrew
Attachments
-
 Thumbnails.jpg78.8 KB · Views: 519
 -
 Step-5a.jpg48.2 KB · Views: 438
 -
 Step-5c.jpg49.2 KB · Views: 414
 -
 Step-6.jpg65.9 KB · Views: 444
 -
 Step-7.jpg76.7 KB · Views: 515
 -
 Step-10.jpg92 KB · Views: 508

") . Just work through it page by page, exercise by exercise. That's how Hillary conquered Mt Everest............one step at a time. Glad you liked the Mr. Potatohead and it got you up and going again.
. Just work through it page by page, exercise by exercise. That's how Hillary conquered Mt Everest............one step at a time. Glad you liked the Mr. Potatohead and it got you up and going again.