Good evening to all,
This is one step removed from engraving but I thought maybe some may find it intriguing. Four years ago beginning an endeavor to create something particularly unique proved to be most challenging. Although balancing expectations whilst attempting fulfillment of a lifelong dream has been one of the most satisfying experiences to behold.
Firstly I have zero assumptions that this process has not been know, used, and perfected by many over time. But having no real idea whether or not this may be common or even elementary to those in a type of smithing capacity, I began from scratch and spent about a year before the success rate rose above eighty five percent.
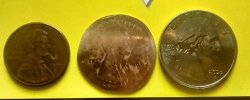
Well that out of the way here’s the seemingly simply process shown in this video. I begin with a penny that is 1981 or prior so its copper and not copper coated zinc. The first couple of years I mostly did I the zinc ones as they seemed more malleable. Unfortunately over the years discovered that after engraving and prolonged exposure to pocket sweat or temperature changes the exposed zinc would corrode, destroying the engraving.
Starting with a semi hand made “Im going to call a blank Die” as well as a fashioned portable anvil and a trusty old sledgehammer its time to make a bit of noise. Beginning in the center of the penny I push enough material outward so I can expand the sides without fracturing the edge. Then moving around the sides evening as I go the circumference of the penny grows a bit maybe a couple of millimeters on each side. Then another go around the center pushing enough towards sides that most all the texture is removed before doing the same around the edges once more.
Changing to a smaller hammer I try to remove any deep impact spots first then change to smoothing the entire surface again from the center moving outward. Once 90% of and light catching strike points are gone I’m left with a slightly concave blank so using a wooden block and smaller sledge I mostly flatten back down the blank and give it a finishing pass, lightly the strikes with every step. Finely one more flattering with the wooden block and one more extremely light finishing passes leaving me with an mostly flattened and totally blank copper coin to be engraved.
I’ve kept this process hidden away as most people whom I’ve shown the engraved piece assume and say “oh you smashed it with a hammer” underwhelming feeling to say the least haha. But never the less Im interested to hear from the community what they think of this process. Positive or negative, intrigue or boredom. Is this something that has been done by many or anyone who knows about this sort of thing wouldn’t waste they’re time on what would be a simple task to them.
After making this video I made another showing the first part of engraving this coin. Turns out Im not equipped to video any good close ups of the work but I posted it anyways as I think It shows ok graver control. I’d like to capture this from start to finish but the next step hopefully I can focus on the piece and Ill try my hand at editing it down to a watchable length. Lastly the design be engraved is a McKenzie scroll from Sam Alfano’s Pendant/Key fob design kit which is awesome for beginners.
Thanks for watching and I hope everyone has a wonderful day. BB
This is one step removed from engraving but I thought maybe some may find it intriguing. Four years ago beginning an endeavor to create something particularly unique proved to be most challenging. Although balancing expectations whilst attempting fulfillment of a lifelong dream has been one of the most satisfying experiences to behold.
Firstly I have zero assumptions that this process has not been know, used, and perfected by many over time. But having no real idea whether or not this may be common or even elementary to those in a type of smithing capacity, I began from scratch and spent about a year before the success rate rose above eighty five percent.
Well that out of the way here’s the seemingly simply process shown in this video. I begin with a penny that is 1981 or prior so its copper and not copper coated zinc. The first couple of years I mostly did I the zinc ones as they seemed more malleable. Unfortunately over the years discovered that after engraving and prolonged exposure to pocket sweat or temperature changes the exposed zinc would corrode, destroying the engraving.
Starting with a semi hand made “Im going to call a blank Die” as well as a fashioned portable anvil and a trusty old sledgehammer its time to make a bit of noise. Beginning in the center of the penny I push enough material outward so I can expand the sides without fracturing the edge. Then moving around the sides evening as I go the circumference of the penny grows a bit maybe a couple of millimeters on each side. Then another go around the center pushing enough towards sides that most all the texture is removed before doing the same around the edges once more.
Changing to a smaller hammer I try to remove any deep impact spots first then change to smoothing the entire surface again from the center moving outward. Once 90% of and light catching strike points are gone I’m left with a slightly concave blank so using a wooden block and smaller sledge I mostly flatten back down the blank and give it a finishing pass, lightly the strikes with every step. Finely one more flattering with the wooden block and one more extremely light finishing passes leaving me with an mostly flattened and totally blank copper coin to be engraved.
I’ve kept this process hidden away as most people whom I’ve shown the engraved piece assume and say “oh you smashed it with a hammer” underwhelming feeling to say the least haha. But never the less Im interested to hear from the community what they think of this process. Positive or negative, intrigue or boredom. Is this something that has been done by many or anyone who knows about this sort of thing wouldn’t waste they’re time on what would be a simple task to them.
After making this video I made another showing the first part of engraving this coin. Turns out Im not equipped to video any good close ups of the work but I posted it anyways as I think It shows ok graver control. I’d like to capture this from start to finish but the next step hopefully I can focus on the piece and Ill try my hand at editing it down to a watchable length. Lastly the design be engraved is a McKenzie scroll from Sam Alfano’s Pendant/Key fob design kit which is awesome for beginners.
Thanks for watching and I hope everyone has a wonderful day. BB