A Banknote Case Study

Tim Wells

~ Elite 1000 Member ~
Joined
Nov 9, 2006
Messages
1,331
Location
Dallas, Georgia
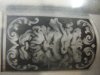
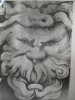
Here are a couple of pictures I took of a photo in Steve Lindsay's portfolio. It is a knife bolster he did years ago in what I'd call a banknote style. They are posted here with Steve's permission.

One is a bad photo on my part due to it being taken through the cellophane sleeve; of the whole bolster. The other is an extreme closeup taken of the 8X10 out of the plastic sleeve.

I took this as a case study in banknote technique and because you can see every cut nearly, it is possible for one to see how the different shadows and light values were achieved. Enjoy.
 

Attachments

  • IMG_1133-50.jpg
    IMG_1133-50.jpg
    87.8 KB · Views: 564
  • IMG_1136-46.jpg
    IMG_1136-46.jpg
    85.6 KB · Views: 580
Last edited:

jacques herbst

Elite Cafe Member
Joined
Nov 9, 2006
Messages
153
Location
kokstad natal south africa
thanks tim.this is a style that i like to do one day.i have been looking at banknotes for some help.i dont know if it is legal to post the photos of the bank notes,if it is let me know and i will post them(south african bank notes) it would be nice to see other countries banknotes to.
 

Bill Tokyo

Member
Joined
Jan 25, 2007
Messages
83
Banknote engraving--black filled?

Although this question sometime seems like a red flag for a bull, in as much as there are several different
opinions among engravers about this, is this the black filled? I've often marveled at the deep black Steven
Lindsay achieves.

Some of the books I've read recommend filling an engraving with black engravers wax to make it more
visible. Particularly as I am about to do an engraving on brass, I am curious how to fill or treat the
engraved lines so that they will look black.

Any and all knowledge is welcome.

Bill
 

Sam

Chief Administrator & Benevolent Dictator
Staff member
Joined
Nov 6, 2006
Messages
10,491
Location
Covington, Louisiana
This is an excellent example of what can be achieved with line engraving as opposed to dots. I'm of the opinion that line banknote has a boldness that can be seen from different angles. Some all-dot work I've seen (and done) doesn't have this characteristic. A combination of lines, small cuts, and dots is the choice of many engravers, including Churchill.

Close examination of US banknote portraits will show masterful examples of line engraving. For study, check out prints from old books. Some are incredible, and can be found for a few dollars on eBay. I have one done in lines and dots that is unbelievable, and I think I paid $8 for it.

As far as blackening goes, I believe Steve blackens most of his work. In line and dot work it can be difficult to get paint or ink to stay in fine cuts as you wipe off the surface. I don't think Churchill blackens his.

Polished gravers will render a 'darker' line than unpolished gravers.
 

Martin Strolz

Elite Cafe Member
Joined
Dec 12, 2006
Messages
339
Location
Steyr, Austria
Steve Lindsay’s engraving is well done. The source for this motif is published in:
"Scroll Ornaments Of The Early Victorian Period" 71 Engravings by F. Knight.
Dover, ISBN 0-486-23596-3, see Page 24, Fig 35.
I have used this motifs for practice plates in school as well as a background for the picture of a carved Colt Python.

Best wishes
Martin
 

Tim Wells

~ Elite 1000 Member ~
Joined
Nov 9, 2006
Messages
1,331
Location
Dallas, Georgia
If you surf on over the Steve's site and go the the engraving school site I think he goes into what he uses to blacken the fine cuts and has a link to where to get it.

I bought some and one tube will last a lifetime. The larger cuts he uses the stuff you get from Ray Philips, you know that antique black made by Grobet I believe. It comes in a brown bottle with another bottle of solvent made for it in a kit. The ink in a tube is used for the fine cuts and wiped off with newspaper or the heel of your hand. (best ink/paint squeege in the world).

Sam,

Thanks for that tip about the polished graver yielding a darker line, I never heard that til now.
 

Lee

~ Elite 1000 Member ~
Joined
Nov 17, 2006
Messages
1,047
Tim, Thanks for posting. This is a great piece by Steve and as you said a wonderful piece from which to study banknote. I was quite smitten at the recent FEGA show in Reno by Robert Swartley's banknote. It's a style not often seen anymore. Swartley and Lindsay's piece have impressed upon me once again that many styles yield magnificent engravings. The placement of the mark (line or dot) is always in my opinion more critical than which type of mark one uses.
 

pilkguns

~ Elite 1000 Member ~
Joined
Nov 14, 2006
Messages
1,874
Location
in the land of Scrolls,
Florid Victorian Ornament is another Dover book that I consider a must have for every engravers library. It has many examples of scroll, animals, and grotesques of this same banknote style. And it is always interesting to see these "pop" up in various engraving scenes done over the years.
 

Dave London

~ Elite 1000 Member ~
Joined
Nov 12, 2006
Messages
1,766
Location
Colorado
John B on a previous thread said he used speedball oil base printers ink # 3550. I have tryed it and as usual he is right on worked great and easy to get at almost any art store. I also use the paint the Ray at Ngraver sells it works but is harder to control the hue with my limited skills than the ink. I also have two large tubes of finger print ink free to any one who wants it, never drys on metal:eek:
 

Tim Wells

~ Elite 1000 Member ~
Joined
Nov 9, 2006
Messages
1,331
Location
Dallas, Georgia
Although this question sometime seems like a red flag for a bull, in as much as there are several different
opinions among engravers about this, is this the black filled? I've often marveled at the deep black Steven
Lindsay achieves.

Some of the books I've read recommend filling an engraving with black engravers wax to make it more
visible. Particularly as I am about to do an engraving on brass, I am curious how to fill or treat the
engraved lines so that they will look black.

Any and all knowledge is welcome.

Bill

I forgot to mention this in the last post. Since you are working on brass you can use cold blue solution, Birchwood Casey works well I think it's called Super Blue available anywhere there's a sporting goods section in a store. Oxpo blue works good too from Brownells.

Cold blue will turn brass or nickel silver flat black. On practice plates of brass I just use a Qtip and smear some in the cuts and let it sit a minute while I drink a Sam Adams then lightly sand any of it off the top with 600 grit.
 

Bill Tokyo

Member
Joined
Jan 25, 2007
Messages
83
Thanks for all the useful information

Thank you everybody for all the useful information. What a wealth of information and good will there is on
this forum.

Bill
 

Martin Strolz

Elite Cafe Member
Joined
Dec 12, 2006
Messages
339
Location
Steyr, Austria
Best examples of fine European engravings and prints can be found online in the Fine Arts Museum Of San Fancisco. They provide a wealth of scanned artwork of exeptional quality, zooming to full detail possible. Search the image base following this link:
http://www.thinker.org/fam/about/imagebase/index.asp

What has started with artists like Martin Schongauer and Heinrich Aldegrever has been take to the extreme by Pierre Drevet, Claude Mellan, Hendrik Goltzius, Jan Harmenz Muller, Antoine Masson etc.

Martin
 

Sam

Chief Administrator & Benevolent Dictator
Staff member
Joined
Nov 6, 2006
Messages
10,491
Location
Covington, Louisiana
Martin: This is an excellent resource! The zoom function works quite well. I'd like to get just a little closer, but this is really a great site. Thanks for posting this info. / ~Sam
 

allan621

:::Pledge Member:::
::::Pledge Member::::
Joined
Jan 10, 2007
Messages
365
sam

If you're on a mac with a mighty mouse hold the control button and then roll the top ball forward to activate the zoom. that's what I did to get more of a look.

Allan
 

banjo_art

Member
Joined
Nov 9, 2006
Messages
26
Location
Phoenix, AZ
Does everyone let the paint or ink dry and then sand the top to clean the surface? If you wipe while wet it seems to remove 50% of the ink from the cuts no matter how I do it. I've tried my hand, crumpled newspaper, rubber squeegie and anything else I could think of.

How do you get the cut to be completely full of material and flush with the top surface?

Thanks
--Art
 

pilkguns

~ Elite 1000 Member ~
Joined
Nov 14, 2006
Messages
1,874
Location
in the land of Scrolls,
Art, there are several factors at play here. how deep are the cuts, how thick is the pigment of the ink or paint, how thick is the binder(glue) that holds it together, and how slick is the paper that you are trying to wipe with. Some paint or inks are just bigger granuled than others (we are talking microscopic here of course) and just won't fit into fine lines. If its pulling out when you wipe, try a different paint, or thin it down more with an appropiate thinner. newspaper is very rough, and will pull most anything out. Some slick coated paper works better, but some coatings will also pick up the ink. I have found NCR paper works best for my application, epoxy paint, but YMMV depending on what you use.
 

Sam

Chief Administrator & Benevolent Dictator
Staff member
Joined
Nov 6, 2006
Messages
10,491
Location
Covington, Louisiana
Firmo Fracassi gave me a tube of brown printer's ink that, at the time (23 years ago), he was using to darken engraving. Not sure if he still uses it or not. One thing hasn't changed, and that is the lighter the work the more difficult-to-impossible it becomes to darken with paint, ink, etc. Churchill mixes a bit of lamp black with oil to help with contrast in photography of his engraving. This is obviously temporary, and he doesn't use paint on finished pieces. / ~Sam
 

Billzach

Elite Cafe Member
Joined
Nov 8, 2006
Messages
510
Location
mayfield, ky
Steve Lindsay’s engraving is well done. The source for this motif is published in:
"Scroll Ornaments Of The Early Victorian Period" 71 Engravings by F. Knight.
Dover, ISBN 0-486-23596-3, see Page 24, Fig 35.
I have used this motifs for practice plates in school as well as a background for the picture of a carved Colt Python.

Best wishes
Martin
I just found this book on ebay and purchased it, thank you for letting us know about this book..
 

Tim Wells

~ Elite 1000 Member ~
Joined
Nov 9, 2006
Messages
1,331
Location
Dallas, Georgia
Does everyone let the paint or ink dry and then sand the top to clean the surface? If you wipe while wet it seems to remove 50% of the ink from the cuts no matter how I do it. I've tried my hand, crumpled newspaper, rubber squeegie and anything else I could think of.

How do you get the cut to be completely full of material and flush with the top surface?

Thanks
--Art

Don't crumple the newspaper first of all, lay it flat and wipe lightly. If you're using that 2 part kit, let the black dry all the way then dab a little of the accompanying solvent on your news print or one of those slick adverts in the Sunday paper and wipe it lightly accross the cuts if you can and not with them if possible.

This is how I've got it to work, same for the Rustoleum method.
 
Top