
During my advanced class last week I experimented with a different gold overlay procedure which worked pretty well. Instead of the usual way of cross cutting rows of teeth (per iGraver tutorial on Gold Overlays) to create a diamond pattern, I cut a few teeth with a #42 flat graver, turned the work around and cut a few more in a different direction. I kept repeating the process until the area to receive the gold was densely covered with sharply undercut rows of teeth facing different directions. It seemed to go quite fast and holds the .008" (.2mm)24k sheet gold very well. I'm not saying it's better than other methods (although I think my first test seems to be as good), but I think it's worth considering if you're doing overlay work.
Cheers / ~Sam
Cheers / ~Sam
Attachments
-
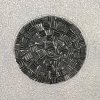 overlay1.jpg107.4 KB · Views: 598
 -
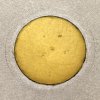 overlay2.jpg61.5 KB · Views: 534
 -
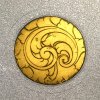 overlay3.jpg90.7 KB · Views: 554
 -
 overlay4.jpg78.8 KB · Views: 570
 -
 overlay5.jpg88 KB · Views: 595
") ). I do the same thing by running the flat "sideways" and can really buzz those cuts out. You must be careful in small areas however and your new method would be better for that. I do a similar method for those small areas and also around the edges of an inlay to make sure it will seat.
). I do the same thing by running the flat "sideways" and can really buzz those cuts out. You must be careful in small areas however and your new method would be better for that. I do a similar method for those small areas and also around the edges of an inlay to make sure it will seat.


