Bright cut and bright cut bead set with resheped onglette gravers

Dmitriy Pavlov

Elite Cafe Member
Joined
Nov 23, 2006
Messages
108
Location
DeForest, WI
Hello all.
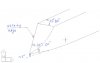
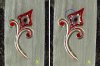
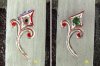
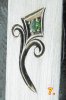
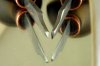
These are the tutorials that I have promised a while ago on the bright cut, and bright cut bead set. Sorry for the delay, I had a lot of work to finish asap. This bead set is different from the norm, because the beads are lifted up first, and only then is the metal cut around it, as shown in picture #5. The small cuts on picture #4 are intended to stop your graver from running into the beads, and also make the work much easier and faster. For this kind of bright cut, and bright cut bead set, use the reshaped onglette gravers.
 

Attachments

  • 1.jpg
    1.jpg
    100 KB · Views: 233
  • 2.jpg
    2.jpg
    111.4 KB · Views: 212
  • 3.jpg
    3.jpg
    112.2 KB · Views: 216
  • 4.jpg
    4.jpg
    107.8 KB · Views: 252
  • gr.jpg
    gr.jpg
    77.7 KB · Views: 253

Dmitriy Pavlov

Elite Cafe Member
Joined
Nov 23, 2006
Messages
108
Location
DeForest, WI
Dmitriy, Thanks for the photo of the engravers. Could you explain the angles of the faces, and sequence of cuts for the brightcuts around the stone.
Thanks,Don
www.Bellknives.com

Hi, Don.
A sharpening angle is depend from hardness of a metal what you cut. For a sterling it will be around 45-50 degrees. I can not tell it more correct because I prefer sharpening my gravers by hands on a sharpening stones.
Usually I make first 2 small cutes around a bead. It will works as stoppers for my graver, and protect a bead. Later I make a bright cut at an opposite bead end a next cut have a towards direction so that on top there was only a thin line.
My apologies for my broken English, but I hope, that I have written can be understandable:rolleyes:
 

Attachments

  • graver copy.jpg
    graver copy.jpg
    39.7 KB · Views: 119

S.Hartzell

Member
Joined
Oct 16, 2007
Messages
14
Dmitriy yes relay great work for someone like me learning at home seeing it from start to finish is truly inspiring keeps me chipping a way hope to be in a class room learning as soon as my back surgery is done thanks for posting s.hartzell
 

jlseymour

Elite Cafe Member
Joined
Dec 22, 2006
Messages
695
Location
Mt. Dora FL
Dmitriy,
Great info for a jeweler that just taking up engraving.
There's alot tricks and other ways we all need to learn.
Thanks for sharing, it will come in very handy...
Jerry
 

Sam

Chief Administrator & Benevolent Dictator
Staff member
Joined
Nov 6, 2006
Messages
10,491
Location
Covington, Louisiana
Dmitriy: THANK YOU for taking the time to create a very nice tutorial. I appreciate your effort and I have added it to the Tips Archive. Efforts like this help to make the Cafe a fantastic resource for all of us. ~Sam
 

Dmitriy Pavlov

Elite Cafe Member
Joined
Nov 23, 2006
Messages
108
Location
DeForest, WI
Hi, Donald.
If your right site onglette have a really sharp down edge, don't forget protect the thumb. You may cut it very strong.
 

Latest posts

Sponsors

Top