GTJC460
~ Elite 1000 Member ~
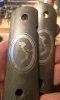
Right now I'm working on a 1911 A1 project. The grips are being replaced with custom made Damascus steel grips. I'm working on the inlay of fine silver and pure gold.
The border lines look a little rough right now as those are being inlayed as well.
I thought I'd post this quick pic as its really starting to come together as the grips are the final segment of this job.
The border lines look a little rough right now as those are being inlayed as well.
I thought I'd post this quick pic as its really starting to come together as the grips are the final segment of this job.
Attachments
-
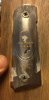 image.jpg64.6 KB · Views: 511