
Doc Mark
~ Elite 1000 Member ~
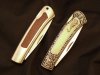
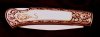
This is an inexpensive Kershaw folder I bought at a local gunshow. I wanted a simple, clean knife to use for my first "full engraving". I replaced the cocobolo wood insert with some ivory that I scavanged from a junked piano, and plugged the lanyard hole with a steel dowel pin. I have done a few simple plain-sided Case and Buck knives with simple scrolls and monograms, but this was the first with a relieved background. What a pain in the butt! God knows I'm used to using a rotary handpiece but cutting metal without "going out of the lines" is a totally different experience. The bur always wanted to "escape" on it's own if I let my concentration lapse for even a second. I used flat gravers for much of the bulk metal removal and then 1/4 round burs in an electric Micromotor handpiece. This is much slower (35,000 rpm) than the air-driven handpieces. My Silent Air compressor can't handle the air-driven handpieces, not enough CFM output. On one side of the knife I actually removed an entire small leaf from the design before I realized it! The knife doesn't look too bad unless you use magnification. Boy, then you can really see the errors jump out at you!
I now have even greater regard for you masters who do large knives and firearms with relief work over the entire surfaces. I cannot even guess how long you must struggle with this tedium before you can do the "fun stuff" like the detail shading. I can see I've got a lot of "tool control issues" to work on before I move on to my planned goal of doing a firearm. I hate to admit it, but this is the only aspect of engraving that I've found to be unpleasant. Oh well, it can't all be fun. It makes you appeciated the others aspects even more. (Notice my attempt at rationalization!)
As usual, your coments and suggestions are appreciated.
Mark
Attachments
-
 Knife before-after.jpg87.2 KB · Views: 257
 -
 Kershaw knife side.jpg61.3 KB · Views: 265


