Multicolor inlay (first try)

Mike576

:::Pledge Member:::
::::Pledge Member::::
Joined
Nov 20, 2020
Messages
207
Location
Ledyard Connecticut
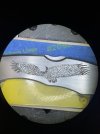
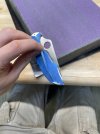
I’m working on my first multi color inlay. Copper, 24k gold, and fine silver. I plan to do the copper as a 20 gauge sheet inlay and the gold/silver with 24 gauge dead soft wire.

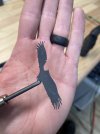
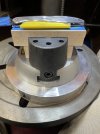
I started by sanding the stainless steel spyderco delica against my surface plate with 120, 400 and 600 grit to get it dead flat. I use a trick I’m sure some of you know to maker it easier to hold the piece while sanding. You can fold painters tape to make a small handle for yourself as shown in the photos.

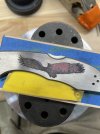
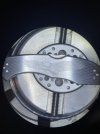
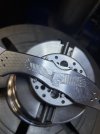
Im working on removing the material before undercutting the edges and raising a field of burrs to hold the copper in place.
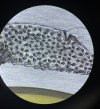
I plan next to do the fine silver inlay near the head and tail feathers. Not a lot of difference in color between the .999 silver and stainless steel but I like the challenge/learning experience. Also the silver seems to be a bit more white vs silver of the stainless.

Any critiques welcomes, I’ll post more on this thread as I move along.
 

Attachments

  • 81D60099-90A9-4EEB-BA5E-E0F6CE41B8F1.jpeg
    81D60099-90A9-4EEB-BA5E-E0F6CE41B8F1.jpeg
    108.3 KB · Views: 117
  • 566740C3-C528-4D4D-899B-86636CF27E83.jpeg
    566740C3-C528-4D4D-899B-86636CF27E83.jpeg
    94.3 KB · Views: 116
  • DAB95D7A-4041-4802-BE64-6CD4ED5FBEE2.jpeg
    DAB95D7A-4041-4802-BE64-6CD4ED5FBEE2.jpeg
    91 KB · Views: 116
  • 2A470CFE-0D29-4C87-AD6E-70C0D6DA5E0D.jpeg
    2A470CFE-0D29-4C87-AD6E-70C0D6DA5E0D.jpeg
    83.6 KB · Views: 112

John B.

Lifetime Pledge Member
::::Pledge Member::::
Joined
Nov 9, 2006
Messages
3,956
Location
Los Angeles area, California.
I would suggest that you open the blade and tape it well for safety.
Then insert some thin wood, like tongue depressors. in the blade space to give the knife scales solid support while undercutting or installing the inlay.
This will help to take any bounce out of the area and make the work more secure and enjoyable.
Your idea and drawing look good and best of luck with it.
 

Mike576

:::Pledge Member:::
::::Pledge Member::::
Joined
Nov 20, 2020
Messages
207
Location
Ledyard Connecticut
I would suggest that you open the blade and tape it well for safety.
Then insert some thin wood, like tongue depressors. in the blade space to give the knife scales solid support while undercutting or installing the inlay.
This will help to take any bounce out of the area and make the work more secure and enjoyable.
Your idea and drawing look good and best of luck with it.
Thanks for the tip! The blade is taped up really well (5 layers of painters tape) I hadn’t thought of filling the inside though. Sounds like a good idea, I’ll make a shim that fits. Thanks!
 

Mike576

:::Pledge Member:::
::::Pledge Member::::
Joined
Nov 20, 2020
Messages
207
Location
Ledyard Connecticut
Got the inlay all cut and filed to shape annealed and ready to inlay. Just have to raise a burr field and under cut the area.
 

Attachments

  • 505F881C-E5E5-47D9-BE29-FCCD9AE4C5DE.jpeg
    505F881C-E5E5-47D9-BE29-FCCD9AE4C5DE.jpeg
    87.8 KB · Views: 59
  • 5F76E39A-D082-4672-95A5-4D37C8852C54.jpeg
    5F76E39A-D082-4672-95A5-4D37C8852C54.jpeg
    113.7 KB · Views: 60

SamW

:::Pledge Member:::
::::Pledge Member::::
Joined
Jan 31, 2007
Messages
2,432
Location
Castle Valley, UT in the Red Rock country
John B mentioned bounce and that will be a real problem if any exists. It keeps the inlay from setting into the undercuts/teeth. So if you have a problem setting the copper check bounce first. I have had on occasion had to place a block of hardwood or metal under the item and resting on the vise block to firm up the mounting.
 

Mike576

:::Pledge Member:::
::::Pledge Member::::
Joined
Nov 20, 2020
Messages
207
Location
Ledyard Connecticut
John B mentioned bounce and that will be a real problem if any exists. It keeps the inlay from setting into the undercuts/teeth. So if you have a problem setting the copper check bounce first. I have had on occasion had to place a block of hardwood or metal under the item and resting on the vise block to firm up the mounting.
Thanks for the tip! I never realized how much bounce there was in a knife scale until I followed your and John b advise. I found a piece of plastic from an old epoxy spreading tool. Cut to fit and sanded the thickness down to a nice press fit. Made removing the remainder of the background 5x faster since it was solid as a rock!
I also changed the mount to the painters tape and super glue trick onto a piece of hard maple which is thick enough to make contact with the vise so there is no air gap. As opposed to just holding the knife with pins on the edges.

Only way I could make it more solid is to remove my shimpo banding wheel from the setup which I plan to do for the inlay portion.

Thanks everyone for the tips!
 

Mike576

:::Pledge Member:::
::::Pledge Member::::
Joined
Nov 20, 2020
Messages
207
Location
Ledyard Connecticut
Well they aren’t all a win! Total fail on the copper inlay. Teeth would not hold the copper at all. I think I made the teeth too wide and dull. Copper work hardened like it usually does but not before stretching the inlay oversized. I set it in 2 areas one spot on each wing then moved to the wing tips. By that point the first spot popped out so I brought it back over and re annealed it to get it soft again. But down hill from there.

I guess my only option now is to make a new inlay and reshape a new set of teeth (making everything deeper).
 

Attachments

  • 981016D4-15ED-4640-8E2D-509152ED79CF.jpeg
    981016D4-15ED-4640-8E2D-509152ED79CF.jpeg
    115.9 KB · Views: 40
  • 3584E4BB-F319-422D-B8DC-FF368158F21D.jpeg
    3584E4BB-F319-422D-B8DC-FF368158F21D.jpeg
    201.6 KB · Views: 41

Mike576

:::Pledge Member:::
::::Pledge Member::::
Joined
Nov 20, 2020
Messages
207
Location
Ledyard Connecticut
For anyone interested here is a photo of the setup. I had my tungsten piston in the Lindsay hand piece with about a medium stroke at 65 psi.
 

Attachments

  • A2CDEDBF-EDC4-4D13-BFEC-107D003620BE.jpeg
    A2CDEDBF-EDC4-4D13-BFEC-107D003620BE.jpeg
    132.5 KB · Views: 26

DKanger

~ Elite 1000 Member ~
Joined
Sep 30, 2007
Messages
1,054
Location
West TN
I guess my only option now is to make a new inlay
Back in the late 40s when Ford flatheads had copper head gaskets, you could heat them and it would restore them to their original size. Then they could be reused. I don't know if it would shrink a copper inlay, but it's worth a shot.
 

Mike576

:::Pledge Member:::
::::Pledge Member::::
Joined
Nov 20, 2020
Messages
207
Location
Ledyard Connecticut
Back in the late 40s when Ford flatheads had copper head gaskets, you could heat them and it would restore them to their original size. Then they could be reused. I don't know if it would shrink a copper inlay, but it's worth a shot.
Thanks for the idea, I think that option is out for this though since the metal is displaced by the hammering in of those areas thereby stretching the inlay slightly in all directions. Thinking back I should have started at the edges not the middle. I also should have made the “hooks” sharper with a smaller degree graver so they would bite in more readily. I used a 116 degree like I normally do. Slightly bummed out but I learned a lot as far as I got with it! So not all is a loss!
 

SamW

:::Pledge Member:::
::::Pledge Member::::
Joined
Jan 31, 2007
Messages
2,432
Location
Castle Valley, UT in the Red Rock country
Copper takes a good first hit to set. One thing I do is make/use a flat bit of steel large enough to cover the inlay sheet so I can "hit" the whole area the first whack. I have not done a copper inlay the size you are attempting.
 

Mike576

:::Pledge Member:::
::::Pledge Member::::
Joined
Nov 20, 2020
Messages
207
Location
Ledyard Connecticut
Copper takes a good first hit to set. One thing I do is make/use a flat bit of steel large enough to cover the inlay sheet so I can "hit" the whole area the first whack. I have not done a copper inlay the size you are attempting.
That is a great tip I’ll make sure to try that in the future. I to try and do large projects from time to time which are probably too hard. I learn a lot in the process and carry that over to normal easier projects.
 

John B.

Lifetime Pledge Member
::::Pledge Member::::
Joined
Nov 9, 2006
Messages
3,956
Location
Los Angeles area, California.
Sorry you had a failure, Mike.
Copper sheet inlay is difficult and needs closely spaced and sharp teeth to hold.
And as Sam said, copper needs a sharp hit to bite the burs and flow into the undercut.
You have the teeth too far apart, to much un-toothed metal between them!
And in my experience, you will have more luck using a hammer with a steel or hard brass punch to seat the perimeter first.
The pneumatic tool will then work to seat the interior of the inlay, if you wish.
Best of luck on your next try, Mike.
 
Last edited:

Mike576

:::Pledge Member:::
::::Pledge Member::::
Joined
Nov 20, 2020
Messages
207
Location
Ledyard Connecticut
Sorry you had a failure, Mike.
Copper sheet inlay needs closely spaced and sharp teeth to hold.
And as Sam said, copper needs a sharp hit to bite the burs and flow into the undercut.
In my experience, you will have more luck using a hammer with a steel or hard brass punch to seat the perimeter first.
The pneumatic tool will then work to seat the interior of the inlay, if you wish.
No worries! Learned a lot in the process, they can’t all be winners when trying something new. I’ll keep that in mind next time. Last copper inlay I did was on a zero tolerance 0456 pocket knife, titanium handle scales and it was a smaller inlay. Set pretty easy but I was using wire and the metal was very very hard so there was no way those teeth were going to deform.

thanks for all the tips everyone! I’ll keep at it copper hasn’t beaten me yet haha
 

MoldyJim

Elite Cafe Member
Joined
Sep 12, 2015
Messages
195
Location
JUNCTION CITY OREGON
When doing copper my experience has been, that your first hit with copper, should be with a fairly aggressive texture on the punch. It seems to hold the copper from expanding as much. And it should be a firm hit.
I even have a small faced hammer that I used a fine checkering file to crosshatch on the face. It's worked pretty well for me if it fits.
 

Mike576

:::Pledge Member:::
::::Pledge Member::::
Joined
Nov 20, 2020
Messages
207
Location
Ledyard Connecticut
When doing copper my experience has been, that your first hit with copper, should be with a fairly aggressive texture on the punch. It seems to hold the copper from expanding as much. And it should be a firm hit.
I even have a small faced hammer that I used a fine checkering file to crosshatch on the face. It's worked pretty well for me if it fits.
Thanks for the tip, great idea with the textured face!
 

mitch

~ Elite 1000 Member ~
Joined
Jul 23, 2007
Messages
2,636
Instead of sharp pointed teeth made with a square or onglette, i set my teeth with a round graver. I originally started doing this to avoid tiny steel points poking thru the inlay, but learned they’re stronger and less prone to collapse. I make them in paired opposing rows- maybe some offset, not directly opposite each other, so they create dovetailed channels that trap the inlay between the teeth, not just provide a little extra grab in the field.
 

Latest posts

Sponsors

Top