Latest new project -Whiskey Flask

silverchip

~ Elite 1000 Member ~
Joined
Jun 1, 2007
Messages
1,877
Location
Fishermans Paradise,Idaho
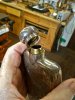
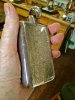
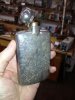
Yesterday I started a new project for an upcoming show. I am using sheet silver that I made myself for this Little Stubby Whiskey Flask. I thought it might be fun to post a little progression as time goes by.
And yes I was watching Sams engraving video when I took the photo of the flask sitting on my bench!!!!
New Stubby Flask.jpg
 

Brian Marshall

~ Elite 1000 Member ~
Joined
Nov 9, 2006
Messages
3,112
Location
Stockton, California & Taxco, Guerrero, Mexico
How much does it weigh at this point? (with cap & chain or whatever safety device it's gonna require to be able to find the cap after you empty the flask)

Might be interesting to weigh it again when it has been cut... see what percentage actually gets removed by engraving.


B.
 

rod

~ Elite 1000 Member ~
Joined
Nov 19, 2006
Messages
1,609
Location
Mendocino. ca., and Scotland
This could be fun, Dave!

I will be tuning in...

By the way, can you tell us more about making the flask, are you rolling thicker plate commercial sterling, or are you melting your scrap down, casting this and rolling your plate. I have always run into problems when doing this, and concluded that I used up too many hours doing it, so cost was not much of a bargain. Mostly I got some granulation in the results, whereas melting my gold turnings down and casting in cuttle fish bone would produce better results?

best

Rod
 

mtgraver

Elite Cafe Member
Joined
Mar 19, 2007
Messages
680
Location
Dayton, Virginia, United States
Dave
That was a quick start on the flask, lol, you should be done tomorrow at this rate. Look forward to seeing the finished piece and as everyone else thinks it should be a beaut!
Mark
 

silverchip

~ Elite 1000 Member ~
Joined
Jun 1, 2007
Messages
1,877
Location
Fishermans Paradise,Idaho
Well, I'll answer your questions in the order of importance-
Arnuad- It will hold about a pint,that is an estimate,I never set out to make it hold a specific amount but enough to do the trick!!!!!It's a little over 3 1/2" wide and 3 5/" at the shoulders and about an inch thick.
Brian- my little electric scale goes to 99.9 DWT,that's 5 oz. So I am not sure but my best guess is 8-9 oz. at the moment.I haven't decided on what kind of cap attachment to use yet,but I am leaning towards a solid hinged affair vs. a chain,what do you think?
Shawn- I probably will use both single point and brightcut or should I say brightcut single point as it applies where needed?
Rod- I spent about a day casting ingots for plate and rolling them out, My rolls are 6" wide but the mill it's self isn't meant to take the constant abuse of that much strain.(I busted some gears last year doing this!!!)So most of my plates end up being 3-4" wide.
I built a forming die for the top and bottom from 1" steel and a wooden form for the body. The neck collar is from a concho die that I made. The neck itself is formed like two flat rings and threaded with a tap and die 1/2X14.
A little tip for you- heat up your ingot mold first and use a carbon stirring rod to make sure your metal is very fluid before pouring it in as fast as it will allow without stopping of course.
Mark- I get a little distracted from things at times and this is the result of one of those times!!!!!! I have to finish another job I had intended on having done Saturday first, so I will be taking a little break for a day or so.
I need to design a gold shield and decide where it should be placed for my next step and then on to finishing it.
If anyone know where to get Scotch stones, I am looking.(Rod or Mark?)
Rod, what do you know about using pumice as a prepolish with a buffing wheel?
 

Dave London

~ Elite 1000 Member ~
Joined
Nov 12, 2006
Messages
1,765
Location
Colorado
Dave
I have searched high and low to find the scotch stones, the mine they came from is closed. I have one left, if I had more I would give you one. Cool flask
 

Brian Marshall

~ Elite 1000 Member ~
Joined
Nov 9, 2006
Messages
3,112
Location
Stockton, California & Taxco, Guerrero, Mexico
Hinged is fine. Less chance of losing it, depending on how powerful the contents of the flask are gonna be.

The one time we tried the pumice on a buffing machine was not what I would call a great success. We used oil to keep it on the cotton wheel but it still flew all over the shop. Did help to keep the buffer boogers down... but best done outdoors.

The die sinkers stones are as good or better than the old scotch stones these days and they come in graded grits. I prefer the ones that are designed for use with water or oil. I also like the rubberized abrasive blocks that come from knifemakers suppliers. All depends on what you have to get done...


B.
 

mtgraver

Elite Cafe Member
Joined
Mar 19, 2007
Messages
680
Location
Dayton, Virginia, United States
Dave
I've looked for the stones also and agree with Brian, there is a lot of selections out there now. I'm using the micro abrasive cloth for the final polishing which is 3200 micron, it's sheet, rubber backed cloth and cuts very clean. Sometimes that will be my final polish, I do use a buffer on some silver pieces but generally hand polish is all.
When I was just out of high school my first job was in the dental lab business. I polished many a denture using pumice, yep, pretty messy affair if you got the pumice too soupy or stood in front of the wheel. Like a polishing station it was enclosed with an open front that had a lip on the tray to retain the wet pumice. I would think it would work well but the problem I see would be grit size, you'd need a station for each grit if you were to go down to say rottenstone. I don't remember the speed of the wheel I'm thinking the motor was 1725 rpm probably a 1 hp. Just my two cents.
I would also agree with Brian with the hinged top, wouldn't want a chained top to bang up that beauty you're cut all over it!
Fare well,
Mark
 

rod

~ Elite 1000 Member ~
Joined
Nov 19, 2006
Messages
1,609
Location
Mendocino. ca., and Scotland
Dave London has done a good search for the Scotch stones, and concludes we need to go back over there and cut our own!

You are getting good rolling results, Dave. With gold, I apply an old trick that maybe is well known? Cut a fresh green twig from your tree, melt gold scrap in a hollowed charcoal block, stir the molten metal with the green twig, below surface it can only burn by pulling any available oxygen from the metal and this helps purify the scrap, as well as the charcoal taking out oxygen.

I am sure Brian also is a fountain of wisdom on all of this, however, your silver scrap recovery looks perfect!

At the stage you have reached, my inclination would be to go for finer and finer sanding by using the paper on the surface contour as would a shoe polisher, in a two handed stropping motion. This will both smooth the surface and correct any hills and valleys on the surface, the tensioned paper will lower the hills until they reach the valleys to give that all important reflecting surface which otherwise might show up like old glass panes. Finally, polish with a set of those polishing papers from Gesswein, color coded at various micron grades... about $9 a set, and worth having available? Of course, I defer to more experienced jewelers in these matters.

For fun, I include a photo or two of my own 'lonely man's best friend', made in Edinburgh in the 1800's, has a nice bayonet lid with gasket, not easily made as a one off, and of course shaped for your hip, it goes hand in hand with the one liner, "... with traditional Highland generosity, he had remembered to bring his own whiskey..."

While I am lowering the tone of this thread, did you hear about the Glasgow worker, having squandered most of his weekly wage in the pub on a Friday night, somewhat tipsy, he bought a mickie of whiskey to take home using the last of his wage, stuck it in his hip pocket, staggered outside but soon tripped on the sidewalk, and took a header. Picking himself up and dusting off, he felt a certain wetness near to his hip pocket. "My god", says he, "I hope that's blood!"

Really looking forward to your progress postings, Dave!

Rod
 

Attachments

  • IMG_0805.jpg
    IMG_0805.jpg
    82.1 KB · Views: 340
  • IMG_0804.jpg
    IMG_0804.jpg
    93 KB · Views: 338
  • IMG_0797.jpg
    IMG_0797.jpg
    86.2 KB · Views: 343
Last edited:

silverchip

~ Elite 1000 Member ~
Joined
Jun 1, 2007
Messages
1,877
Location
Fishermans Paradise,Idaho
Thanks for the feedback on the pumice and scotch stones guys.
Rod I was thinking of inscribing it with a similar cowboy greeting:You can borrow my horse and you can borrow my hay but if you borrow this, please bring whiskey so we can share!!!!
 

Chujybear

~ Elite 1000 Member ~
Joined
Nov 3, 2011
Messages
1,079
Location
Haida Gwaii
I thought you guys meant whiskey stones , when referencing scotch stones. Seemed a good coincidence, since I've been carving some up.
But nevermind.
 

Sam

Chief Administrator & Benevolent Dictator
Staff member
Joined
Nov 6, 2006
Messages
10,491
Location
Covington, Louisiana
I've seen one of Dave's flasks in person awhile back, and I can tell you that it was spectacular. No doubt this one will be as well.
 

Peter_M

Elite Cafe Member
Joined
Jun 28, 2009
Messages
491
Location
BC, Canada
Dave of you need someone to break it in once done I probably still got enough 12 year old double cask around ;)

Peter
 

GTJC460

~ Elite 1000 Member ~
Joined
Mar 24, 2010
Messages
1,327
Location
Tullahoma TN
When I do silver work in the shop, I simply use Emory paper and go to 2/0 grit. Then straight to the polishing machine. I start with the graystar compound using a bristle type of brush, which allows me to get to hard to reach areas and most corners. Then with a stitched treated buff I use tripoli. Final polish with black rouge on a loose flannel buff. The black rouge really brings out the color and imparts a great polish on silver.

I use the gesswein rapid breakdown stones on really hard to reach areas as the stones are easily shaped to fit these areas.
 

rod

~ Elite 1000 Member ~
Joined
Nov 19, 2006
Messages
1,609
Location
Mendocino. ca., and Scotland
Dave,

I just revisited the other five page thread with a chorus of superlatives praising your finished flask from 2011, and belated add mine here! In that thread, you wrote that you had a slideshow of the work progressing, but were not sure how to post a slide show. I am sure many of us would be interested in the work process.

Might I suggest one way that works to share a slide show here, that is to upload your photos to a free "picasa" site that is offered by google. As an example, here is my picasa link, where a number of slide shows can be seen by clicking this link below:

http://picasaweb.google.com/rodcameron2

Click on the Sam Welch album, and view the photos one at a time, or as a slide show. It is a good way to share photos without needing a web page, and sending a 'link', rather than the actual photos is the way to go in this case.

Just google: : 'set up a picasa account'

If you run into any problems, do what I do, ask the nearest 12 year old to help you. The young seem to take the modern technology in their stride, they do not need to unlearn the old ways. I tend to make heavy weather of this stuff.

best

Rod
 

silverchip

~ Elite 1000 Member ~
Joined
Jun 1, 2007
Messages
1,877
Location
Fishermans Paradise,Idaho
Yea Rod, I discovered that I made a copy on disk before my last computer took the opportunity to commit suicide. At least I still have it somewhere in my archives.Today I have to fill an order and then I hope to get started on the top and fastener for the flask and decide what the little gold shield or plaque will look like.
 

Latest posts

Sponsors

Top