A New Pendant

Caty Blom

Elite Cafe Member
Joined
Dec 30, 2008
Messages
143
Location
Vlaardingen the Netherlands
I tried to draw and engrave a pendant, I show my design and pendant engraved in silver. Find it very difficult to make nice straight lines someone has an opinion. Do a practice in many lines inserted picture, but note that it is still difficult to get them all right afstand.I Hanger 27-05-2013.jpg Hanger-27-05-2013a.jpg know you have a lot of practice, but maybe there is a directive for this technique?
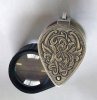
 

Willem Parel

~ Elite 1000 Member ~
Joined
Sep 2, 2009
Messages
1,364
Location
The Netherlands
Wow Caty, a surprizingly design and beware silver is not the easyest metal to cut.
I like it very much and you dis a good job by strictly folowing your design.
 

Andrew Biggs

Moderator
Joined
Nov 10, 2006
Messages
5,034
Location
Christchurch, New Zealand
Hi Caty

Drawing and cutting parallel lines is difficult to make it look right.

Here's a couple of things.

1. First and foremost your lines need to be exactly the same width apart. Minor variations show up quite badly….this is the most important part of the whole process. Then follow those lines exactly with your graver. And by exactly I mean exactly!!!

2. Use a slightly longer heel as this keep your graver going in a straight line better.

3. Start the cut a bit further down the line..........then back cut to the beginning of the line. This will help you avoid heel strike which means the back of the heel cutting the edges of your engraving. This means the lines also don't taper where you began the cut.

4. keep your lines light and thin so they don't overwhelm the work. They are a background remember so you don't want them dominating everything. You can always thicken in areas later if you need to.

5. You can go back and add an in-between line against the scroll and border. This forms a shadow against the scroll/border and disguises minor imperfections……….I've attached a photo so you can see what I mean as it's difficult to explain. It's a Serling Silver eye loop with the stylised initials WB

Cheers
Andrew
 

Attachments

  • KB-Loupe-2-small.jpg
    KB-Loupe-2-small.jpg
    127.7 KB · Views: 180

monk

Moderator
Staff member
::::Pledge Member::::
Joined
Feb 11, 2007
Messages
10,872
Location
washington, pa
neat work, caty. i created a straight line grid in corel draw. i also created a file for concentric circles. i can space the lines very easily that way. i then print to the needed size and apply to the object using any manner of transfer techniques. if you're unhappy with the result, you can always cut a batch of lines in the opposite direction. that is if the design would be ok with that. this way, the lack of uniformity would likely not be that noticeable.as andrew said, the least bit of variation in the lines really jump out at you.
 

Caty Blom

Elite Cafe Member
Joined
Dec 30, 2008
Messages
143
Location
Vlaardingen the Netherlands
Thanks for the advice, I'll definitely try more often. First I drew the outside, then the scrols and with a ruler lines inserted last. Even with a pencil drawing straight lines with the same distance is not easy.
Andrew, thanks for the explanation, and indeed I see your picture what you mean. Furthermore, I understand from your story that you should not go stabbing at the beginning of a line but a little further. And then later back stabbing to make off the line I will also take a look at the heel of the plug. You're right, the lines are too deep, better keep them lighter.

Monk I will try to work with a print of lines maybe I will get a better feel for it, thanks for the tip.
Willem these are all exercises, but if anyone want to buy it, I do it with pleasure! Greetings Caty.
 

monk

Moderator
Staff member
::::Pledge Member::::
Joined
Feb 11, 2007
Messages
10,872
Location
washington, pa
well, caty-- at least that way your spacing of the lines will no longer be a problem.
 

Latest posts

Sponsors

Top