Question: Finishing deep relief carving?

Artemiss

Elite Cafe Member
Joined
Mar 27, 2009
Messages
474
Location
South West England
Hi folks,

I've been trying my hand at deep relief carving recently. However, I seem to have hit a possible snag.

I've done all the cutting, sculpting and scraping, and I'm now trying to 'finish' it.
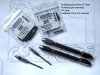
This is where my issue is. I've used the 160g - 600gt - 1200gt mini super stones to smooth further, but it's still not looking as smooth as I'd like. (looks a little scratchy even with 1200gt)
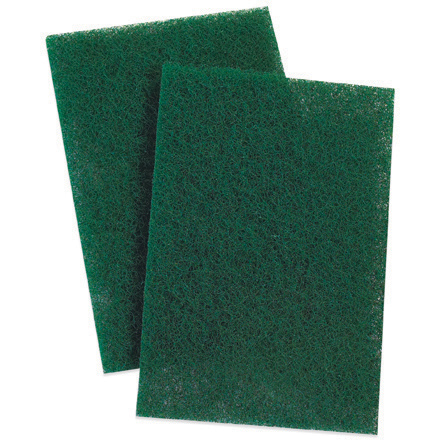
I even tried a small wire brush on a dremel type tool. Whilst it looks ok, it just tend to shine it up, and adds different scratches.

I look at the hobo nickels people are working on, and I really like the smooth, matt finish they're achieving.

Am I missing a crucial step?

Any advice, gratefully received.

Jo
 

mtgraver

Elite Cafe Member
Joined
Mar 19, 2007
Messages
680
Location
Dayton, Virginia, United States
Jo,
That's a great question, since I do most things by hand without use of rotary tools or abrasive wheels. I've resorted to burnishing the fine scratches on particularly the hobo nickels but that doesn't impart the mat finish. It will be interesting to see what the other folks do to finish. I wonder, does the object make a difference as to the degree of finish, say a gun or knife versus a jewelry piece?
Best regards,
Mark
 

mrthe

Moderator
Joined
Oct 20, 2010
Messages
1,787
Location
Spain
Jo, in my hobo nickels i use first 120 grit and after 1200 grit super ceramic mini stones,after that i pass it with a tooth brush with this mix : a drop of soap used to clean plats (i hope is a good translation) and i put the brush in pumice dust, and with some drops of water i use it to make a uniform surface making circulars movements....heare a photo of my last nickel finished in this way

285771_4078198234036_1251749865_n.jpg

i don't know if you want made something similar but is the way that i use to have a mat finish.


Another way that i use for mat surface is this ,i make little wheels of scotch brite


and i put it in a mandrel


and i use it at low speed with a micromotor for jewelery (you can use something like a dremel)

try it maybe work for you too ;)
 
Last edited:

Gil

Member
Joined
May 24, 2007
Messages
11
Location
Warrenton, Va
Hi Jo,
What kind of metal are you working with? Most of my work is in "soft metals" (gold, silver,etc.) and i've tried numerous ways to get a nice "satin finish" when working on seal rings. What I've found that best works for me is a combination of enameling stones and the brown Everlast rods (sold by Gesswein) used in combination with small pegwood sticks. I use my powerhone to shape the enameling stones to small square or rounded points first, then work over the area starting with a 600 grit stone to remove the "high" spots. Before brushing away the residue I then use a pegwood stick to further smooth the surface. I then continue working down with finer grits and finish off with the brown everlast rod and pegwood. I am quite particular about the wood, I use a different one for each grit, and I always work in a uniform direction. Depending on the area it may be horizontal or vertical lines or if the section is curved I follow the sweep of the curves.
Spellman.jpg Untitled-6.jpg
In the first picture you can see how I followed the flow of the mantling giving it a uniform finish that "moves" with the shapes. In the lower photo I used horizontal polishing strokes to give a nice finish which is satiny and highlights the charges within the shield. I used "verticle" strokes to finish the helmet whic gives it a contrasting surface (however subtle).

I hope this helps. Like Mark, I want to hear what others have to say on this subject. We're never too old or too skilled to learn something new!

All the best

Gil
 

Chujybear

~ Elite 1000 Member ~
Joined
Nov 3, 2011
Messages
1,079
Location
Haida Gwaii
I'll give you a reply, but take it w a grain of salt, since I'm doing mostly Jewellry
Before I add any sort of texture, I bring everything to a high polish. This is because of the sanctity of planes. Once all the planes are in place, I will either grave, and scrape it to smoothness. Or polish with rubber brushes (available rio, I forget the brand) . These rubber brushes allow a consistent wear around details, highs and lows . This contrasted with what a regular tuber wheel (which does have its place), which will tend to score the work...
If the detail of the work leans towards low relief I will use a satin brush (like myrth above), then go to white diamond polishing compound on the buffing wheel.
It's only after the polish has been applied to the large planes that I grave in the details, and then apply whatever final texture the piece is going to have...

I dont know the grits on those rubber brushes, but they do have some pretty aggressive ones.
 

mrthe

Moderator
Joined
Oct 20, 2010
Messages
1,787
Location
Spain
Yes Martin,this is another great alternative i use too for the nickels this type of finish (sculpting punch) and work great!

P.S.
For people that don't have this DVD ......this is one of the best instructional DVD avaible in the market,and very helpfull not only for jewellery,if you don't have it yet, buy it now your copy ! is a great investment and a must to have for all the engravers!
 

Artemiss

Elite Cafe Member
Joined
Mar 27, 2009
Messages
474
Location
South West England
Thank you guys for all of your suggestions. There seems to be a lot of different techniques out there.

Paolo, love the new hobo! :thumbsup:
Excellent idea with the pumice dust and 'plate' soap. ;)
Would pumice dust be available at jewellery making outlets?
I also like the scotch brite idea too, especially cutting your own circles. I know you can also get this in different 'grits'. So will try both techniques.

I'm carving on stainless, so I'm guessing that's harder than nickels or jewellery, so may be more of a challenge?!

Gil, very impressive.
I've taken a look at Gesswein, and the Everlast rods look great.
I'm curious though, what's your reason for preferring the Everlast over the Mini Super ceramic stones?

Martin, brilliant.
I actually have that DVD. But obviously haven't watched that far yet. (Guess I know what i'm doing later) :biggrin:

I love the look of the sculting punches. Are these something that are made or can be bought in sets?

Thanks again,

Jo
 

mrthe

Moderator
Joined
Oct 20, 2010
Messages
1,787
Location
Spain
Hi Jo , yes you can find the pumice dust at the jewelery tool shops, for the sculpting punches you can use old broked burrs to make it ( you have to sharp a 90 degree face in the point and pick it in a diamond Stone) or if you use the Lindsay template system ....check my template set "Paolo "mrthe" Curcio" , are thinked for hobo carvers and for sculpting in general and you can sharp with it 9 different points and the sculting punches too in different sizes or geometry ( round , square,rectangular) using the standard square graver blanks.
 

DKanger

~ Elite 1000 Member ~
Joined
Sep 30, 2007
Messages
1,054
Location
West TN
Would pumice dust be available at jewellery making outlets?
Jo,
You should be able to get pumice and rottenstone (finer) at your local paint or woodworking store. It's commonly used to rub out varnished wood surfaces. I use it to hand rub gunstock finishes. Just like sandpaper, these compounds come in different grits.
 

Gil

Member
Joined
May 24, 2007
Messages
11
Location
Warrenton, Va
Hi again Jo,

Why the everlast rods? Simply because I haven't had a chance to try the ceramic stones. They sound great though. And thank you very much for the compliment!

Gil
 
Last edited:

Martin Strolz

Elite Cafe Member
Joined
Dec 12, 2006
Messages
339
Location
Steyr, Austria
In England you can get puches from Walsh. But these are for repoussé work and quite likely too big. Considering the price it is wise to file your own set at home.
http://www.hswalsh.com/Matting-Punches-.aspx?i=TP62&c=177
http://www.hswalsh.com/Repousse-Punches-.aspx?i=TP63&c=177
Raw pieces of suitable unalloyed tool steel are called „Pranteln“ in German. These are way too expensive too. http://www.goldschmiedebedarf.de/advanced_search_result.php?keywords=Pranteln&x=0&y=0
Click on the picture of this item for the shapes. 6 – 10 and 17- 22 are nice and widely suitable. http://www.goldschmiedebedarf.de/product_info.php?products_id=8142
GRS offers nice Heat Treated Steel Points. Those can be ground into nice and delicate punches. Choose long- thin for #002-118 for hand work, or if you want to use them in a hand piece short- thick #001-624
Cheers, Martin
 

Andrew Biggs

Moderator
Joined
Nov 10, 2006
Messages
5,034
Location
Christchurch, New Zealand
Hi Joe

There are various ways you can finish it.

Burnish with a needle burnisher that you can make out of old darning needles..................Then tone the shine down with small abrasive rubbers. (see attachment) I brought mine from Rio Grande but check out someone local first and see if you can buy them. I use them by hand and not in a rotary tool.

Another method is to texture the surface with punches with a very light texture on them. The punches you will have to make yourself because they can't be brought from the suppliers.

Making punches...............there are two methods available and probably more.

The first is to make them out of old burs and beading tools. Just shape them up and you can smooth the faces off or lightly texture by tapping on a diamond stone/wheel. It's quick and easy.

The second method is a bit trickier but well worth learning how to do because you can make all sorts of things this way. It takes a bit of practice and patience as your first punches will probably be not all that good. Persevere as it's well worth the effort.

1. Buy silver drill rod from a local supplier (1/8th inch is a good size)
2. Shape
3. Harden by heating to bright red (don't overdo this. If it starts sparkling on the surface then you are burning out the carbon content which you don't want to do)
4. Quench in oil
5.Clean
6. Anneal by heating to straw yellow
7. Leave to air cool
6. Clean

Like anything..............practice on a bit of scrap first. If you start hitting really hard you will start moving metal around rapidly. For texturing use a feather touch.

Cheers
Andrew
 

Attachments

  • Polishing pins.jpg
    Polishing pins.jpg
    347.1 KB · Views: 165

mrthe

Moderator
Joined
Oct 20, 2010
Messages
1,787
Location
Spain
Jo ,more info....this thread i have to say have become very interesting,heare you can see a little example of my punch point in action

http://www.youtube.com/watch?v=ejKc667F7dI

You can sharp it directly from 3/32" graver blanks,not cheap like old burrs but not very expensive and will fit perfect in your handpiece like others gravers points ;)
 

Dave London

~ Elite 1000 Member ~
Joined
Nov 12, 2006
Messages
1,765
Location
Colorado
Jo
MTC, I also use a micro bead blaster, you can use different grades of glass beads, al oxide powder etc

Gill welcome to the cafe, beautiful work:clapping:
 

Artemiss

Elite Cafe Member
Joined
Mar 27, 2009
Messages
474
Location
South West England
Gil, if you haven't used the Mini stones yet, give them a go. I think they'll work really well for you.
I bought them from Chris DeCamillis' site. They're a good price and he's very reasonable on shipping costs.
I've been using the 0.9. However, something to be aware of... I ordered a couple of 0.5 thinking I had 0.5 technical pens here, so I wouldn't need to purchase further ones. Wrong. The technical pens fit a round size, whilst the mini stones are square, and therefore slightly bigger and don't fit the standard pens.

Andrew, many thanks for that.
Would these be the same creatures?
http://www.suttontools.co.uk/stick-1.html
http://www.suttontools.co.uk/special-mandrel-for-polishing-sticks.html

What is 'silver drill rod' as opposed to normal drill rods?
I do have burrs, but none that are ready for the bin yet.
Would it be as easy to just use a piece of 3/32 glensteel, as Paolo suggests?

Martin, thanks for suggesting Walsh's. It's nice to find other UK based companies.
I see what you mean about price though. Holy cow, I thought that price was for the whole set! ;)

Paolo, that video is really good. I like the simplicity of making a punch out of normal graver steel.
Although, I did purchase a set of beading punches a few weeks ago, so I'm wondering if I use a couple of the
larger ones to make punches?!

Dave, I have a little airbrush type bead blaster, which came with a tube of oxide powder. I did try it, however,
I wasn't that keen on the finish for this particular piece. I think I need to practice a bit more with it though.

I really do appreciate all the different suggestions made. I feel sure I can find something that suits me.

Jo
 

Andrew Biggs

Moderator
Joined
Nov 10, 2006
Messages
5,034
Location
Christchurch, New Zealand
Hi Jo

Yes, that looks like them. You will need a pin vise as well to hold the mandrel but the good news is..................they are dirt cheap :)

My mistake..........Down here the drill rod is called silver rod by some outlets. I learnt that after several enquiries, lots of rolled eyeballs, scratching of heads and bums, furrowed brows and tut tutting.

Yes, you can make the Glenteel gravers into punches as Paolo suggested. Drill rod is easier because it's softer to work with in it's annealed state which means you can shape them quicker. A very good one would be the steel points that Martin suggested from GRS. They would be perfect for the job.

The bottom line is.............use whatever works :)

Cheers
Andrew
 
Last edited:

mrthe

Moderator
Joined
Oct 20, 2010
Messages
1,787
Location
Spain
Like Andrew say you can use whatever work ,i use hss graver,hss drill rod and old hss burr like you can say in the photonand all works perfect.

Picture 19.jpg

beading tools are a good alternative too ;) you only have to try and see what is more easy to find for you and easy to sharp (all are very easy)
 

Sponsors

Top