If you have photos and description of your bench that you'd like to add to the thread, post them here and I'll copy them to the workbench thread in the Tips Archive (the Tips Archive is read-only). / ~Sam

You are using an out of date browser. It may not display this or other websites correctly.
You should upgrade or use an alternative browser.
You should upgrade or use an alternative browser.
Workbench thread
- Thread starter Sam
- Start date
fegarex
~ Elite 1000 Member ~
Here's my set up.
Attachments
-
 drill press2.jpg83.3 KB · Views: 6,077
coincutter
Elite Cafe Member
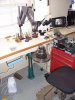
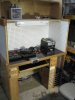
Bench in process

It's slowly getting glued together and I kick my self for not doing this a long time ago.
Drill stands rock and let the scope do more range of magnification. Gotta love that centering table for free.
Comfortable as all get out once you get past the shock and pain of hauling them down to the basement.
Think this may also give you a clue as to how many foot pedals it can take to be a carver and this is just 1/8th of the room!
The fun part is the lappy toppy in the back hooked up to skype, this mornings treat was listening to Rod Cameron and one of his friends give me a mini concert - when they should have been workin they were pickin. Tis a fun toy. We are setting the proggies up to switch from cam to cam around the shop through the scope and what not.
It would be cool if all here would give up the arguing and we just have some fun till we get old and die. Imagine a couple of hundred wacko engravers on webcams.")
It's slowly getting glued together and I kick my self for not doing this a long time ago.
Drill stands rock and let the scope do more range of magnification. Gotta love that centering table for free.
Comfortable as all get out once you get past the shock and pain of hauling them down to the basement.
Think this may also give you a clue as to how many foot pedals it can take to be a carver and this is just 1/8th of the room!
The fun part is the lappy toppy in the back hooked up to skype, this mornings treat was listening to Rod Cameron and one of his friends give me a mini concert - when they should have been workin they were pickin. Tis a fun toy. We are setting the proggies up to switch from cam to cam around the shop through the scope and what not.
It would be cool if all here would give up the arguing and we just have some fun till we get old and die. Imagine a couple of hundred wacko engravers on webcams.
msar24
Member
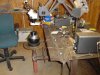
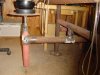
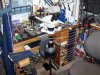
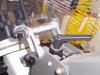
Used one of my welding tables with a few modifications. Not as nice as the drill stand but it is adjustable. (needs some painit to look pretty).
Attachments
-
 BE 001 (Small).jpg57.1 KB · Views: 5,606
 -
 Bench 2.jpg65 KB · Views: 5,298
Karl Stubenvoll
Elite Cafe Member
I agree wholeheartedly with Mike Cirelli on the use of the foot pedal. As a goldsmith with plenty of diamond setting experience, I am using a foot pedal with a flexible shaft tool for a large percentage of my work. Trying to get a feel for the Airtact/palm control has been strange. Even with trimming the rubber to get finer control, I find myself squeezing the palm control graver rather than pushing it.
My foot still seems to be way ahead in the general scheme, but it's had plenty of practice over the past thirty years. The finger control finally arrived, but I haven't had the time to try it.
My foot still seems to be way ahead in the general scheme, but it's had plenty of practice over the past thirty years. The finger control finally arrived, but I haven't had the time to try it.
msar24- i think your all thread setup may solve a problem for me. does the allthread wobble in the nuts ? or is it fairly stable ? this would be great for me, if it were fairly stable.
msar24
Member
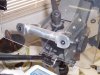
There are 3 nuts on the all thread. The bottom one is welded to the pipe and the top one is welded to the top plate where the vice rests. The third nut is tightened (with a big wrench) against the bottom nut and there is no wobble. I have the finer adjustment by using the all thread and course adjustment by using the bolt on the side of the verticle pipe. I can also loosen another bolt on the horizontal pipe and adjust the entire setup closer or farther from the table top. The microscope is bolted to the top of the table.
msar24
Member
The bench works well but the Air Conditioner (in the background) is by far my favorite piece of equipment. It hit 107F (41C) today.
kevin: thanx a bunch. i had considered a drill press, but would be less convenient for me. seing as how you use 1 nut as a jam nut, this is the way i will proceed. thanks again.
leschowe
Elite Cafe Member
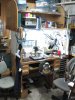
Here is my workbench
I am relatively new to engraving and this is my first real post to this forum.
I must say, that this is a great web site for a budding engraver. I have learned
quite a bit here and I really appreciate Sam making this websit available to the
engraving community.
Anyway, getting on to the the topic of this post:
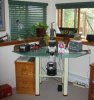
I built this workbench after I came home from the Basic Engraving class which I
attended at GRS in June. The bench measures 33 inches high and has a working
surface of about 4X4 feet. It seems to work quite well and it is very sturdy.
The base is a "leg system" which I purchased from Grizzly Industrial
(Model: H5741) and the top is a 4 by 4 foot piece of high grade 3/4 inch
plywood (I had Home Depot cut a 4X8 sheet of plywood exactly in half before I
left the store). I cut the front corner of the plywood off to form the working
front edge and then routed the resulting three front edges with a "quarter round"
bit. Except for painting the plywood top, screwing the top to the "leg system"
and drilling a few holes for tubes and handpiece holders, that is about it.
I should note that this is a very versatile bench in that you can cut the plywood
in any shape necessary to fit your available space. I needed my bench to fit into
an available corner of my office so that is why I cut the plywood as I did.
You could just as easily design the bench to work off one of the sides of the
plywood if that shape would fit better.
Les Schowe
I am relatively new to engraving and this is my first real post to this forum.
I must say, that this is a great web site for a budding engraver. I have learned
quite a bit here and I really appreciate Sam making this websit available to the
engraving community.
Anyway, getting on to the the topic of this post:
I built this workbench after I came home from the Basic Engraving class which I
attended at GRS in June. The bench measures 33 inches high and has a working
surface of about 4X4 feet. It seems to work quite well and it is very sturdy.
The base is a "leg system" which I purchased from Grizzly Industrial
(Model: H5741) and the top is a 4 by 4 foot piece of high grade 3/4 inch
plywood (I had Home Depot cut a 4X8 sheet of plywood exactly in half before I
left the store). I cut the front corner of the plywood off to form the working
front edge and then routed the resulting three front edges with a "quarter round"
bit. Except for painting the plywood top, screwing the top to the "leg system"
and drilling a few holes for tubes and handpiece holders, that is about it.
I should note that this is a very versatile bench in that you can cut the plywood
in any shape necessary to fit your available space. I needed my bench to fit into
an available corner of my office so that is why I cut the plywood as I did.
You could just as easily design the bench to work off one of the sides of the
plywood if that shape would fit better.
Les Schowe
Attachments
-
 R_Bench_4.JPG120.4 KB · Views: 5,681
 -
 R_Office_1.jpg95.6 KB · Views: 5,423
pierre
Elite Cafe Member
here's my place
Attachments
-
 P1040504.JPG101.7 KB · Views: 2,466
 -
 P1040505.JPG97.2 KB · Views: 2,407
 -
 P1040506.JPG100.1 KB · Views: 2,360
JamesO
Member
Well I need a bigger bench, of course for a bigger MESS!
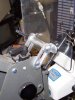
I posted this in another forum where they were discussing microscope lighting, to show my dental light and my vise stand.
The light is a pelton & crane w/ 3 intensity settings. I have no idea the watts or bulb type- never checked it. But there is virtually No glare or shadowing and its very flexible. Ask your dentist or find an office that is being remodeled- they throw this stuff out all the time. The vise base is the bottom of a dental chair w/ drill stand mount. Very smooth ball bearing screw mechanism w/ foot controls on both left and right , and both have up and down control. Also has swivel base and power outlets for more TOOLS !! I believe someone else here has a setup like this.
leschowe
Elite Cafe Member
Question for Rex
Hi Rex,
I noticed in your workbench picture that you have a board above your scope which
is apparently attached to the Acrobat Stand. Is this a device to hold a drawing
of your engraving? If so, I think that it is a really neat idea and was wondering
if you could tell us a little more about it? How it is constructed, and how it is
attached to the Acrobat Stand.
thanks,
Les Schowe
fegarex
~ Elite 1000 Member ~
Yes,
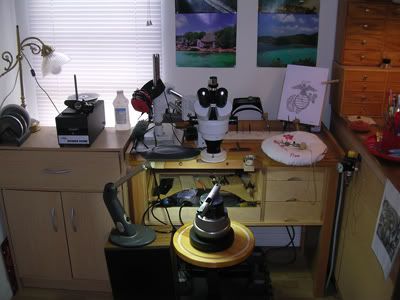
It's made to hold drawings or pictures. The nice thing is that I can put a 8X10 picture up there and just roll my eyes up from the scope to see the picture. I try to make the picture as large as I can and it gives me about what I see engraving in the scope. I'll try to take some pictures of it soon. I made the holder out of Lexan so when I don't have a picture on it the light will pass through. I fashioned a few aluminum brackets to make it adjustable. It might be a day or so but I'll try to post something.
It's made to hold drawings or pictures. The nice thing is that I can put a 8X10 picture up there and just roll my eyes up from the scope to see the picture. I try to make the picture as large as I can and it gives me about what I see engraving in the scope. I'll try to take some pictures of it soon. I made the holder out of Lexan so when I don't have a picture on it the light will pass through. I fashioned a few aluminum brackets to make it adjustable. It might be a day or so but I'll try to post something.
michaelp
Elite Cafe Member
Picture of my setup:

Jim Sackett
Elite Cafe Member
This is my engraving bench.
These pics were taken a couple years ago when I was first setting up. Since then I have added a drillpress and a plate cutter. I can't find the pic of my engraving machine. My whole engraving plant covers approxametly 64 square feet. It used to be an enterance way.
Jim Sackett
letterguy@jimsackettsengravingplus.com
 I'v added a tool box and a Dremel Rotery tool to this.
 This is my inside ring engraving machine.
These pics were taken a couple years ago when I was first setting up. Since then I have added a drillpress and a plate cutter. I can't find the pic of my engraving machine. My whole engraving plant covers approxametly 64 square feet. It used to be an enterance way.
Jim Sackett
letterguy@jimsackettsengravingplus.com
I'v added a tool box and a Dremel Rotery tool to this.
This is my inside ring engraving machine.Powderhorn
Elite Cafe Member
I had posted the pictures of a new bench, that I built quite a while back. Pictures are kinda in order, new no tools, just started using it, and now as a disaster area.
Attachments
-
 IMG_0030.JPG65.2 KB · Views: 2,340
 -
 IMG_0032.JPG73.7 KB · Views: 2,353
 -
 100_0050.jpg123.7 KB · Views: 2,449
fegarex
~ Elite 1000 Member ~
Here's some quick snap shots of my picture holder.
Attachments
-
 Picture-011a.jpg32.9 KB · Views: 2,313
 -
 Picture-013a.jpg33.1 KB · Views: 2,259
 -
 Picture-014a.jpg30.1 KB · Views: 2,265
Sponsors


