Critique Request Almost 1 year at it and here's where I'm at!

MICHAEL

Elite Cafe Member
Joined
Dec 14, 2009
Messages
339
Location
Harriman, Tn.
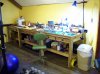
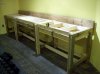
I took some time away from engraving and built me a new engraving bench and a bench to do gun disassembly / assembly / work. I got tired of cleaning my engraving bench every time I wanted to work on a gun (and sucking tools up with the shop vac). I keep all my tools off my engraving bench now and so far haven't sucked any tools up and clean up is quick and easy. I keep most all the chips on the table top. Chips on table top means Michael can stay in the house!:) 
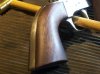
I also made my first set of one piece grips for a set of Uberti SS 45's. I left the grips slightly oversized for carving later.
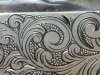
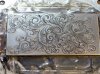
I've been cutting straight lines and circles for the past few months. I started to add scroll backbones and now I tried some leaves. I'm experimenting with my cuts to see if can make the design flow. This is a design from Nimschke that I modified slightly. I'm more concerned with critique on the cuts, depth, flow, punchdot, shading, and anything I may not know yet. :thumbs up: My biggest question is have I over-extended my abilities? Should I go back to lines and circles? :confused:
I'm still using an optivisor. :thumbs up:
 

Attachments

  • 100_0265.jpg
    100_0265.jpg
    49.9 KB · Views: 711
  • 100_0264.jpg
    100_0264.jpg
    61.1 KB · Views: 757
  • 100_0263.jpg
    100_0263.jpg
    51.4 KB · Views: 732
  • 100_0262.jpg
    100_0262.jpg
    95 KB · Views: 793
  • 100_0261.jpg
    100_0261.jpg
    111.6 KB · Views: 799
  • 100_0258.jpg
    100_0258.jpg
    48.4 KB · Views: 713

Cloudy

~ Elite 1000 Member ~
Joined
Oct 27, 2007
Messages
1,051
Location
Chatham Center, NY
Looks really nice, but I don't think the dots in the background are supposed to overlap...
Beats lines and circles- ya done good!
 

Andrew Biggs

Moderator
Joined
Nov 10, 2006
Messages
5,034
Location
Christchurch, New Zealand
Hi Michael

That's much better cutting and your practice is showing. It's still not perfect with an occasional bump, but that's OK, it's getting better and showing signs of improvement. Unfortunately I can still see a lot of impatience in the work.

Your shading lines are the same as the main cuts and this is an area you need to start looking at. Shading cuts are a lot finer than the main cuts. At the moment everything is fighting each other for your attention.

The mulesfoot cuts ) ) ) ) ) Pay a lot more attention to them. They are too big and need to be more delicate and more curved. Some of them are very flat. They also go from big to small. At the moment you have them roughly all the same size.

The design work. This is the area that is letting you down the most. You need to start paying far more attention to this side of things and start introducing more finesse even in the Nimschke style scrolls. This finesse will translate into better cutting. One thing leads to another.

Cheers
Andrew
 

MICHAEL

Elite Cafe Member
Joined
Dec 14, 2009
Messages
339
Location
Harriman, Tn.
Andrew, just the man I wanted to hear from.:) Yea, some things don't look so obvious until you take a close up picture and post it on the Internet!:shock: And most of the things you mentioned didn't even occur to me. I know you're right especially the emphasis on the design problem. My problem is I have no background in any of the area's I need a background in to be good at this (Guns, Art, metal prep, and a whole lot I'm not smart enough to know of at the moment). I really just woke up one morning (metaphorically speaking) and decided to become an engraver. If I really understood all it entailed I probably wouldn't have started. But since I started and have the rest of my life, I'll stick with it.:big grin: Design / drawing is something I work at each day. Thanks for the advice and helping me Andrew.
Cloudy, :), I know, I know. I really thought I was doing them well until I saw the pic on the computer screen. THe #3 punch is so much harder for me to not overlap the dots than the #2 punch. Any helpful hints would be much appreciated.:thumbs up:
Andros, thx for responding, I really like your carvings!:thumbs up:
 

Andrew Biggs

Moderator
Joined
Nov 10, 2006
Messages
5,034
Location
Christchurch, New Zealand
Hi Michael

I can relate to what you are saying. I was sitting at an auction bored out of my mind because what I was interested was one of the last items to go under the hammer. The auctioneer held up a book about hand engraving and out of sheer desperation I brought it so I could have something to read for a couple of hours. The book was the Art of Engraving by Meeks. When I opened the pages I was fascinated and thought.........I can do that. So I did. :)

Your cutting will take care of itself to a large extent.....unless you get lazy, complacent or form really bad habits. Just think about what you are doing and keep good reference material close by while your cutting.

The design..there seems to be an attraction towards Nimschke, which is perfectly fine. It's a traditional and attractive style.

So.........learn to draw one good Nimschke scroll....just one. Shading lines and all. Study it in every respect and see what makes it attractive. Study the shading, the cuts, the balance and all the rest of it. Get involved in every little detail

Once you can draw one............then move onto joining two together. Then join another to that and so on.

It is like reading a book.........You start at chapter one and the story builds up over each page till the final chapter. At the moment a lot of beginners try to start at the end of the book and never understand the plot because they neglected to read from the beginning.

Your drawing will help your cutting immensely because the pencil work gives you understanding of what it is you are doing.

I will add something else which is only a personal opinion (well, all of it is really) You may want to think about spreading yourself too thin. Engraving and wood carving are two very separate skills that require two totally different trains of thought, skill and technique.....perhaps drop one in favor of the other until you have become proficient at it. Otherwise you run the risk of dissipating your energies over too large an area. Just food for thought.

Cheers
Andrew
 

MICHAEL

Elite Cafe Member
Joined
Dec 14, 2009
Messages
339
Location
Harriman, Tn.
Hi Michael

I will add something else which is only a personal opinion (well, all of it is really) You may want to think about spreading yourself too thin. Engraving and wood carving are two very separate skills that require two totally different trains of thought, skill and technique.....perhaps drop one in favor of the other until you have become proficient at it. Otherwise you run the risk of dissipating your energies over too large an area. Just food for thought.

Cheers
Andrew

I am focusing on the Engraving Andrew.:) Sometimes It's nice to take a break and create something different or useful. Doing plates over and over covered with lines and circles and scroll backbones can take a toll.:( After I made my walnut grips and my benches I had a burning desire to get back to engraving. :big grin:Before I made them it seemed like I was cutting less and less, dreading the lines, circles, and backbones.:mad: It seems to me or at least I hope that by using my hands these skills will transfer some. So, the priority is engraving, everything else is just a break. P.S. I don't play an instrument.;)
 

Roger Bleile

~ Elite 1000 Member ~
Joined
Oct 4, 2007
Messages
2,988
Location
Northern Kentucky
Michael,

I agree with everything that Andrew has mentioned above and will only mention two more things so you are not overwhelmed with information.

1.) Regarding your cuts, the depth and smoothness are pretty good but as Andrew mentioned, it is important to vary the value of your cuts between the backbone, leaves, and shading cuts. You didn't use any crosshatching (that's OK) but if you do the hatches should be slightly heavier than the cross hatches. You will pick this all up by studing close up images of good engraving. The thing that will give your cuts life is to slightly flare your cuts in the appropriate places. I am not talking about "flare cut scroll." Take a good look at some of the pictures of Sam Alfano's scroll examples and you will notice how and where the various lines are flared. Flaring the cuts and appropriately varying the line values (width/depth) will give your work life and visual impact.

2.) This one is difficult to describe in writing. I have attached a mark-up of one of your images for example. With scrollwork, you often hear of "flow." I explain this by saying that every line in a scrollwork design is moving toward the same vanishing point. In other words, if you extended every line at the end of its path they would all continue curving until they reach the same undefined point in the design.

What often happens with beginners and low end occupational engravers is that a curving line will start out along the correct path and then straighten out at the end so that if you extended the end of the line it is no longer traveling toward the vanishing point but is heading off on a tangent. This is what I have tried to illustrate with the colored lines in the example.

As to your dots or beads overlapping a little hear and there, it is no great sin. It is preferable to have them all neatly side-by-side but if you look at the work of 19th century factory engravers there is plenty of overlapping but it is good enough to the naked eye to convey the desired effect.

I would like to say that I do not usually offer suggestion/evaluations here and certainly never unless asked for because I do not consider myself a teaching-master. Nevertheless at your level I think I can offer some simple advice that may be of use to others who are struggling with similar common issues.

CRB
 

Attachments

  • scroll flow.jpg
    scroll flow.jpg
    122.4 KB · Views: 574
Last edited:

MICHAEL

Elite Cafe Member
Joined
Dec 14, 2009
Messages
339
Location
Harriman, Tn.
I would like to say that I do not usually offer suggestion/evaluations here and certainly never unless asked for because I do not consider myself a teaching-master. Nevertheless at your level I think I can offer some simple advice that may be of use to others who are struggling with similar common issues.

CRB[/QUOTE]

Roger, you are exactly correct about how your advice is of help to others who are struggling. Every time a beginner asks a question, I have benefited from the help they recieved even though I did not ask the question. Your advice will always be greatly appreciated and valued.:tiphat:

Thanks especially for pointing out how the lines should flow. I knew it didn't look right but couldn't figure out how to fix it. Still doing lines and circles and will start concentrating on 1 good scroll with leaves. Thanks again.:thumbs up:
P.S. My shoe box is filling up!:big grin:
 

MICHAEL

Elite Cafe Member
Joined
Dec 14, 2009
Messages
339
Location
Harriman, Tn.
Andrew and Roger just about covered all the engraving comments that are needed so I'll just ask: You actually have time to clean????
Very impressive!
LOL!


p.s. Keep up the work....

Brian, if one chip gets in either my wife's foot, one of the dogs paws, or her expensive vacuum cleaner, I'll be in the basement.:( So yes, I clean at the end of every day. Notice the door sweep attached to the table. Keeps, the gaps filled and all the chips stay on top. At the end of the day i just suck all the chips up with my shop vac in less than a minute.:big grin:
Yep, that's an exercise ball. Great for my lower back and abs. Since I started sitting at the bench all day when I started engraving, I've gotten way out of shape. I'm starting to get engravers gut. Whenever I take a break, I try to do some exercise.:thumbs up:
 

vdrum4250

Elite Cafe Member
Joined
May 17, 2016
Messages
178
Location
Irvine, California
i know its an old post but...... how does one make those circle backgrounds, hammer and chisel? I have been told ngraver sells some nice bead tools, but they are 1/4. do you just ahmmer onthose or does someone sell a holder? been looking everywhere for this info
 

mitch

~ Elite 1000 Member ~
Joined
Jul 23, 2007
Messages
2,635

MICHAEL

Elite Cafe Member
Joined
Dec 14, 2009
Messages
339
Location
Harriman, Tn.
i know its an old post but...... how does one make those circle backgrounds, hammer and chisel? I have been told ngraver sells some nice bead tools, but they are 1/4. do you just ahmmer onthose or does someone sell a holder? been looking everywhere for this info
I use #2 punch dot tool from Ngraver. Have tried others but they don't hold up. I use them in the hand piece. Chuck it in your drill and use sandpaper to make it fit. It is better to be loose than tight. You don't want one stuck in your hand piece.
 

Karlspinks

Member
Joined
Nov 4, 2016
Messages
76
Location
London, England
Michael,

I agree with everything that Andrew has mentioned above and will only mention two more things so you are not overwhelmed with information.

1.) Regarding your cuts, the depth and smoothness are pretty good but as Andrew mentioned, it is important to vary the value of your cuts between the backbone, leaves, and shading cuts. You didn't use any crosshatching (that's OK) but if you do the hatches should be slightly heavier than the cross hatches. You will pick this all up by studing close up images of good engraving. The thing that will give your cuts life is to slightly flare your cuts in the appropriate places. I am not talking about "flare cut scroll." Take a good look at some of the pictures of Sam Alfano's scroll examples and you will notice how and where the various lines are flared. Flaring the cuts and appropriately varying the line values (width/depth) will give your work life and visual impact.

2.) This one is difficult to describe in writing. I have attached a mark-up of one of your images for example. With scrollwork, you often hear of "flow." I explain this by saying that every line in a scrollwork design is moving toward the same vanishing point. In other words, if you extended every line at the end of its path they would all continue curving until they reach the same undefined point in the design.

What often happens with beginners and low end occupational engravers is that a curving line will start out along the correct path and then straighten out at the end so that if you extended the end of the line it is no longer traveling toward the vanishing point but is heading off on a tangent. This is what I have tried to illustrate with the colored lines in the example.

As to your dots or beads overlapping a little hear and there, it is no great sin. It is preferable to have them all neatly side-by-side but if you look at the work of 19th century factory engravers there is plenty of overlapping but it is good enough to the naked eye to convey the desired effect.

I would like to say that I do not usually offer suggestion/evaluations here and certainly never unless asked for because I do not consider myself a teaching-master. Nevertheless at your level I think I can offer some simple advice that may be of use to others who are struggling with similar common issues.

CRB

This has been helpful to me also, particularly your diagram, its something i have seen described before "flow" but i did not really understand until now. (thanks)

Now i see this in all of my designs and cutting.....

This site is just a lovely wealth of knowledge. Gives us newbies a chance to improve!
 

Roger Bleile

~ Elite 1000 Member ~
Joined
Oct 4, 2007
Messages
2,988
Location
Northern Kentucky
"...What often happens with beginners and low end occupational engravers is that a curving line will start out along the correct path and then straighten out at the end so that if you extended the end of the line it is no longer traveling toward the vanishing point but is heading off on a tangent..."

In one of Sam Alfano's videos, Sam refers to the above issue as a "pointing error." I now use Sam's terminology to describe this problem.
 

Latest posts

Sponsors

Top