My first real attempt at engraving

Joined
Aug 26, 2010
Messages
69
Location
Frogner, Norway
Hello everyone!

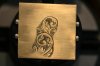
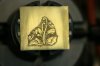
I have now finished engraving my very first "real" attempt at scroll engraving with the gravermax.

I have discovered the power of this machine, and have yet to claim control of the depth of the graver. Being my first engraving I have a positive feeling of accomplishment, even though this is nowhere near the quality of which I strive for.

The plate I used is a brass door sign blank sawed to a square shape. I only used two tools (as I have yet to grind my hand-push gravers to fit the QC tool-bits) which were the Glensteel 105 square graver, and the stipling tool both shipped with the GraverMax G8. (The glensteel graver is way too long for me as well..)

I hope you all can give me some tips if you have any in regards to this particular engraving. :)

Back to engraving another plate! :big grin::big grin:

PS. I totally get why you say that this is an all-consuming activity! :p
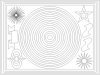
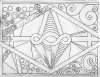
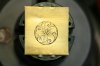
[EDIT]These are not my designs. Nr. 1 is of the shotgun someone recently posted, and the flower is from a ornamental book from 1855. The third is of my own design though! :)[/EDIT]
 

Attachments

  • engraving.jpg
    engraving.jpg
    40.3 KB · Views: 303
  • gravering 001.jpg
    gravering 001.jpg
    34.3 KB · Views: 256
  • gravering 002.jpg
    gravering 002.jpg
    34.9 KB · Views: 257
Last edited:

JT Kinney

Elite Cafe Member
Joined
Nov 24, 2006
Messages
132
Location
Wisconsin
Hi Steinar,

Your work shows promise, keep praticing, and you will improve everyday. There are wonderful engravers on this forum to help you along the way.

Cheers,
JT
 

Marrinan

~ Elite 1000 Member ~
Joined
Nov 11, 2006
Messages
2,917
Location
outside Albany in SW GA
Steinar, A good first effort. There are several issues that could be address in a critic.It will take some cutting to develop the tool control you will require for your work. It is my suggestion that you begin your practice plates with the cuts that make up engraving in all styles. Begin first with lots of lines. Work toward keeping the depths constant and the tool absolutely vertical creating what are referred to as hair lines. When you can cut these very narrow and shallow lines consistently. When you feel satisfied with the lines work at placing then consistently parallel to the one nest to it. The next step would be to increase the depth which will increase the with. Same routine. Cut them until you are consistent in line width and depth and spacing. Move on to alternating thick - thin and increase the length as if cutting borders. Intersecting lines should be practiced as well.

The nest step would be to add a tilt to the tool and experiment with cuts creating wide lines that are shallow-Same routine, both directions until your consistent.

Next it is the same drills but curves-Each of your exercises should vary in radius and follow the same routine both right and left.

You will also need to learn to change from right-hand curve to left hand curve in the same cuts.

Steinar, this is boring redundant drill and practice but it is required. When you have mastered these cuts and can do them constantly and smoothly then move to complete designs. You need to switch tool geometries and do the same drills.

At the early stage do your scrolls and designs with pen and paper-a lot of it but master the basic cuts before you make the complicated designs-Study scroll design and leaf structure-As Mad Eye Moody says "Constant Vigilance-You've Got to be Prepared" My opinion Fred
 

fegarex

~ Elite 1000 Member ~
Joined
Nov 8, 2006
Messages
2,061
Location
Ludington, MI
A very nice first attempt.
You mentioned you used a graver that came with the machine. Now.. as far as I know these are not really sharpened. The face is sharpened but no heel. If you don't know much about sharpening, you really need to search the archives here and learn how to get a heel on a tool. Pehaps yo uknow this already but I am surprised to learn how many people don't and find engraving much easier with the proper sharpened tools!
Rex
 

JJ Roberts

:::Pledge Member:::
::::Pledge Member::::
Joined
Nov 10, 2006
Messages
3,459
Location
Manassas, VA
Steinar,I would recommend Ron Smith's book Advanced Drawing of Scrolls,you'll find it very helpful.J.J.
 
Joined
Aug 26, 2010
Messages
69
Location
Frogner, Norway
Thank you for your kind replies. :)

I do know how to sharpen a tool, as I have been sharpening hand-push gravers for some time. By hand. I will not claim that I am even close to being intermediate at sharpening, but I know the basics. :p I know I should get a sharpening system, but that is too expensive for me right now. :) Will get one when I get money.

Roberts, thank you for your recommendation, I surely will look into it. Been looking for a good book on scrolls.. ^^,

Fred, I will try the approach you describe. I am thankful for your guidance :)
 

fegarex

~ Elite 1000 Member ~
Joined
Nov 8, 2006
Messages
2,061
Location
Ludington, MI
Steinar,
That's good. As long as you know how to sharpen hand gravers, it applies the same. The systems are faster but I sharpened many by hand for years myself. They are well worth it but knowing how to do it by hand is a good thing too.
 

Arnaud Van Tilburgh

~ Elite 1000 Member ~
Joined
Oct 3, 2008
Messages
4,221
Location
Belgium
That is a nice for a first try. I still have my first ones that looks less on a design than yours.
I putted mine out of my view for a couple of months, and I was very amazed to see the progress. I think we all have started with something we were proud of untill we did it better. At least I still do.

arnaud
 

Roger Bleile

~ Elite 1000 Member ~
Joined
Oct 4, 2007
Messages
2,988
Location
Northern Kentucky
Steinar,

You are doing all the right things to achieve your goal of becoming an engraver, however I must agree with Fred that you should first practice basic cuts before jumping into designs. Use your pencil to perfect your design skill while you use your graver to perfect your cutting skill.

I have attached two practice plate designs that you can transfer to your plates. One, I designed and the other was designed and posted by our friend Joseph. I suggest you start with mine but as long as you do both you will have your cutting skill well established.

Some tips: Try to keep the part you are cutting in the center of the vise. This is most important for the circles. When you start, do the outside straight lines first then the circles. Start with the smallest circle first. It is the easiest one. The biggest circle is the most difficult to cut perfectly. With the circles, try not to lean your graver to one side or the other. Also it is good practice to cut one circle clockwise and the next counterclockwise. If you are right handed it will be more natural to cut counterclockwise but you will find when doing scrolls that you will have to cut clockwise some of the time because of hand obstructions on the workpiece.

Like Fred indicated, this can be very boring work but if you work at it you will have really good tool control when you are done. Always keep your practice plate to remind you where you started.

Good luck,

Roger
 

Attachments

  • Practice plate-Bleile.jpg
    Practice plate-Bleile.jpg
    87.8 KB · Views: 129
  • Practice plate-Joseph.jpg
    Practice plate-Joseph.jpg
    132.7 KB · Views: 140
Last edited:

Hora

Elite Cafe Member
Joined
Dec 28, 2008
Messages
237
Location
Saudi Arabia
Tanks Roger for the practice plate designs. I hope you don't mind that I'll study them as well. :tiphat:
 

Roger Bleile

~ Elite 1000 Member ~
Joined
Oct 4, 2007
Messages
2,988
Location
Northern Kentucky
Hora,

Anything I post is for all who can use it. That is the beauty of this forum. You may answer one person's question but many can benefit from it.

Roger
 
Joined
Aug 26, 2010
Messages
69
Location
Frogner, Norway
Hora,

Anything I post is for all who can use it. That is the beauty of this forum. You may answer one person's question but many can benefit from it.

Roger

Thank you so much for the advices, and designs! I do not have any way to transfer this to metal yet, and I haven't really found any method that fits the equipment I currently have. I own a canon pixma mp610 printer...

Anyways, I have taken inspiration from the designs you provided me, and have made my own. I already see progress which is quite encouraging. :)
Just bought some white paint from winsor and newton, couldn't get the "china white" as described by meek, but got a different opaque white (Titanium white). Also bought a fixative spray, guess that will keep the lead from smearing everywhere. :p
 

Renee

Member
Joined
Jun 15, 2010
Messages
11
Location
CT
Roger,

I'd like to study and use your practice plate designs. As a beginner, I need all the help that I can get to become competent in the craft.

Renee
 

Roger Bleile

~ Elite 1000 Member ~
Joined
Oct 4, 2007
Messages
2,988
Location
Northern Kentucky
Renee,
Please feel free to use my practice design. The other is from Joseph who posted it some time back.

There is no particular science to either of these designs. They are made to build skill and muscle memory in the type of motions used when engraving scroll and borders. If any of you are unable to make a transfer of the designs you can make your own using a ruler, compass, and French curve

You should begin your straight lines cutting the shortest lines on the inside and progress to the longer outside lines. Then cut the smallest inside circle and progress to the outside circle. By the time you have done the outside lines and circles they should look like they were cut by a milling machine. If not make another practice plate and continue.

When you have eventually cut a perfect circle and long straight line you will feel a great sense of accomplishment and have the confidence in your manual dexterity to tackle anything you can draw.

Cheers,

Roger
 

Latest posts

Sponsors

Top