Thanks to Scott and John B

cwbyengraver

Member
Joined
Nov 12, 2006
Messages
75
Location
Ft Myers FL USA
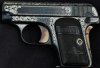
Last year at the engrave-in I asked Scott to critique a little colt pistol. He said it looked pretty good except the top. His exact words were I don't know what you got going on here but it don't match anything. When you get home file off what you got there and start over. I am glad I did because before I thought it looked good and so did everybody I showed it to. But now it definitely looks better. And thanks to John for all the tips on the french gray.
 

Attachments

  • IMG_0788.jpg
    IMG_0788.jpg
    72.8 KB · Views: 172
  • IMG_0808.jpg
    IMG_0808.jpg
    71.5 KB · Views: 137

John B.

Lifetime Pledge Member
::::Pledge Member::::
Joined
Nov 9, 2006
Messages
3,955
Location
Los Angeles area, California.
Looks really good, Cmbyengraver. You did a fine job.
The selective FG makes it really pop ( no pun intended.)
These little Colt .25's are pretty little guns.
Best.
 

eastslope

~ Elite 1000 Member ~
Joined
Jan 16, 2008
Messages
1,008
Location
Conrad, MT
That is sure some cool work and thanks for sharing. How and the heck did you do the selective frenchgray/bluing. Cool stuff, Seth
 

MICHAEL

Elite Cafe Member
Joined
Dec 14, 2009
Messages
339
Location
Harriman, Tn.
Wow, makes me wish I'd have bought a similiar gun from a friend when he was selling it. It's beautiful. Thanks for sharing!
 

cwbyengraver

Member
Joined
Nov 12, 2006
Messages
75
Location
Ft Myers FL USA
Thanks for the kind words y'all. It is fun to learn on small projects. eastslope the french gray was fun. What I did was paint over the engraving with nail polish. the trick I use is take a 8" piece of polished cloth polished very important. place your index finger on the edge of the cloth to the 1st knuckle. collect the rest of the cloth no top of your finger and twist very tight. wet your finger with remover and rub over engraving. move to a clean spot on the cloth twist up and rub again. The polished cloth don't have little hairs that will pull the nail polish out of the engraving and that is why you twist it so tight around your finger so your finger wont conform to the engraving and remove the nail polish. once the engraving is full of nail polish. I paint around the outside of the engraving with nail polish once it dries you can push it around with a toothpick if you have over runs or you get some on the engraving. the reason I paint around the outside the engraving is once you start to gray the area the fumes will remove the blue around the edge. The selective gray I do with a toothpick I use gun blue remover once the toothpick absorbs enough it will work like a little paintbrush. Like John B said don't worry about the inconsistent color. once you are done you use an eraser to go over the gray area to polish it. don't forget to seal it go to tips for that.
 

Latest posts

Sponsors

Top