Brian Hochstrat
Elite Cafe Member
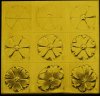
Bright cut scroll cutting sequence.
1. I have wriggled the backbone, I used a 37 flat 40 deg. face and no heel or a very low angled heel I use the low hand technique and over exaggerate the wrist roll to get this type of look. Keep the edge of the tool on the outside edge of my guide line. Also I have made the 1st cut of the 3 step sequence the "backhand cut". I use a 45 flat with the heel rolled from 20-5 deg. highly polished. The cut should be broke off squarely at the end.
2. This is the bright cut, to make the bullnose ending at the end of the cut, drop your hand and kick the graver up and to the northeast, if you are facing north. The rolled heel helps with a clean leave. Stop your cut short of the backbone to give room for the "cap cut".
3. This is the "cap cut". It lines the bright cut, It should be somewhat light, I have a bad habit of getting them to heavy, it should just accent and crispen the edge of your bright cut.
4. Here are all the cuts with leaf size tapering in size as you go, the last cut is a "combo cut" it has a backhand and bright cut but no cap cut.
5. Here are the "closer cuts", The first is just a variation, note the last closer next to the nob should cross the backhand cut. Also the crescent cut is added to accent the nob.
6. Here is the finishing sequence for the nob. Snap the cuts off squarely at the end.
7. Here is the start of lining, I use a 18-10 bent liner with face rounded for ease of cornering. I start with one tooth in the metal at the thin end of the leaf and roll it flat as the leaf thickens.
8. Here all the leaves are lined, keep in mind the lining should flow smoothly with the leaves. Keep only the teeth of graver cutting, you should see several fine peels coming out of the metal as you are cutting
9. Here is the cross hatching, to achieve this stand the tool at a high angle, with the corner in the metal and give your vise a turn as you roll the tool flat creating more lines as it turns, I use a 28-8 for this.
Attachments
-
 practplate.jpg107.2 KB · Views: 244
Last edited: