My first attempt in sculpturing a shotgun

Ray R Negron

Member
Joined
Feb 14, 2008
Messages
36
Location
Valrico Florida
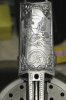
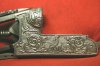
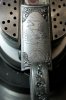
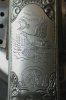
This is my first attempt on doing a shotgun sculpturing along with a bird scene please advice any comments would be appreciated. The shotgun is a uplander 28 gauge that I finally got around to engrave it after 7 month lying around the house.
 

Attachments

  • Stoeger Uplander 28 gage shotgun_1.jpg
    Stoeger Uplander 28 gage shotgun_1.jpg
    58 KB · Views: 385

Ray R Negron

Member
Joined
Feb 14, 2008
Messages
36
Location
Valrico Florida
Hi Andrew,

I posting 3 photos 2 side view 1 top hope these would be closer my camera does not have macro need to by a new lens that would allow me to get closer. I also did myfirst french grey I glass peen the surface and placed it in a acid solution rinsed clear water then I did clear flat coat Boeshield rust corrosion protection. I hope these will do any comments would be appreciated.

Thanks

Ray
 

Attachments

  • Uplander 28 gauge shotgun-2.jpg
    Uplander 28 gauge shotgun-2.jpg
    70.7 KB · Views: 237
  • Uplander 28 guage shotgun-4.jpg
    Uplander 28 guage shotgun-4.jpg
    61 KB · Views: 205
  • Uplander Stoeger shotgun-5.jpg
    Uplander Stoeger shotgun-5.jpg
    66.3 KB · Views: 221

D.Ellis

Member
Joined
Mar 29, 2007
Messages
97
Location
Fort Fraser BC Canada
Looks nice. I will leave the critique to the big boys with more experience.
I like engraving that will not wipe off with use......this looks good and durable.
Darcy:)
 

Andrew Biggs

Moderator
Joined
Nov 10, 2006
Messages
5,034
Location
Christchurch, New Zealand
Hi Ray

Good effort and well done for trying it out. It's a lot of metal to remove isn't it!!! :)

There are a few things about what you have done that could be a bit better. What I'm going to suggest is only one way of doing it. There are others as there is no definative way to do this kind of thing.

At the moment you have everything rounded off on the tops of the carvings..........this gives it a worn look like a jagged cliff face that been smoothed out over time.

What tends to happen when it's rounded it disperses the light and shadow too much and loses the 3D look. Because you can't go really deep into the metal like it was a slolid object you have to create an illusion of more depth than it really is. The light will do the rest of the job for you by creating shadows and highlights

Where both sides come up..........try and make the apex sharper like a razorback. This razorback will act almost like a highlight in the work. If you curve one side this will look softer in the light. If you make the other side almost vertical, that will create a shadow onto the background. Don't have the apex meet in the middle. Have it off to one side so the curved side angles over and then a sudden drop on the other side.

With your small flats that you cut it with...........think wood chisels!!! Make your graver with a long narrow taper down to the face.........have a really small face of only maybe 1mm high x 1mm wide (approx)and put a very tiny heel on the underside. By tiny I mean just there and no more. The small face stops you from damaging the surrounding work.

When you get to the finishing stages make up a small scraper and scrape the surfaces smooth.

If you want to matt the work then you can use small punches or even abrasive rubbers. You can even use the punches to move the work around a bit.

What I would suggest is take a step back and try a few smaller designs, like a simple scroll, on a metal plate first. Once you get the hang of it you'll be away laughing.

Cheers
Andrew
 
Last edited:

Marcus Hunt

~ Elite 1000 Member ~
Joined
Nov 9, 2006
Messages
1,799
Location
The Oxfordshire Cotswolds, England
Ditto Andrew's excellent comments, Ray.

Regarding the birds, try to get hold of as many photos as you can of your subject then, really observe it and note the anatomy. You know a bird has legs (we all know that) so you've given your bird legs but with no attention as to where they're placed. If it were a real bird it'd be unable to walk as it's leg is far too far forward on the body. This is fundamental stuff that firearms engravers must study. You may have been able to get away with this type of thing 50+ years ago but in this day and age the public is too savvy to let you get away with it. Everyone has more access to excellent photographs and video of the natural world than at any time in history, so people instinctively know whether or not something looks correct.

Some things that give a poor engraver away when it comes to birds are beaks (look at it and see whether or not the bird could use it), eye placement, and wing feather shape (believe it or not, not all feathers are the same shape on every bird!).

Overall though Ray, a good attempt and, if you follow the pointers you've been given, hopefully you'll see improvement as you gain more experience in the future.
 

Kevin P.

~ Elite 1000 Member ~
Joined
Feb 28, 2008
Messages
1,256
Location
Nambe, NM
Hi Ray, If I may offer a suggestion, draw your engraving design before you start cutting and post the design. There are very generous people on this forum and they can give you suggestions that might be helpful. It's easier than revising the design in the metal.

As Marcus has already pointed out you need to look more closely at wildlife.
The bird in the air is recognizable as a bird, but the viewer wants to know what bird. There is not enough detail and some of the anatomical features are off.
Kevin P.
 

Ray R Negron

Member
Joined
Feb 14, 2008
Messages
36
Location
Valrico Florida
Great Pointers, Andrew

I highly regard any comments from any engravers specially the senior engravers comments. I been working on practice plates I should have submitted them for pointers in the past on small flowers sculptures but it seems to me they just not quite the same like the real weapon metal face. The stoager up Lander shotgun is very inexpensive this shotgun I was going to bring it to a GRS shotgun engraving class about 6 months ago but I got sick and was not available to go then may be another time in the future. I will follow the pointers that you have recommended as my guide for upcoming engraving projects. I will take the advice and submit my future project layout to the forum for any suggestions before I start engraving since it makes a lot more sense. I am a certified scuba diver and I know strongly believe in lots of practice before you make the real ocean plunge no room for mistakes then. Andrew I have found that there is no substitute for the real item costly at times but at the end great results would be obtain at the end you just keep your self focus and good guidance great results will come from it.
Best regards
Ray
 

Andrew Biggs

Moderator
Joined
Nov 10, 2006
Messages
5,034
Location
Christchurch, New Zealand
Hi Ray

No worries. Glad to help out.

I agree with you.........it's good to get in there and get your feet wet (and it's a lot of fun as well) That's the way we learn to do something and nothing you do is a wasted exercise. Learning on cheap guns is an excellent way to hone your skills and well worth the effort...........as you've discovered, engraving is only just a part of it.

Eveything we do today is just preperation for tomorrow!!

Just keep at it and enjoy yourself :)

Cheers
Andrew
 
Last edited:

Latest posts

Sponsors

Top