Gold inlay attempt and scoll.

jetta77

Elite Cafe Member
Joined
Jul 19, 2008
Messages
621
Location
St. George Ut
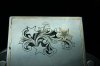
Hey all, here's another practice plate. This time I tried my hand at gold inlay, I love the color combination of the steel and gold. Also another scroll design. Can anyone give me their thoughts and takes on inlaying gold. I've read all the info I could find on the subject but would love more input. For this inlay I used my 90 graver to cut a line, then switched to a 37 flat, then undercut w a 4/0 onglette. Any comments and suggestions would be welcome.
Jeff
 

Attachments

  • engraving gold 1.jpg
    engraving gold 1.jpg
    50.4 KB · Views: 211
  • engraving gold star.jpg
    engraving gold star.jpg
    40.4 KB · Views: 187

fegarex

~ Elite 1000 Member ~
Joined
Nov 8, 2006
Messages
2,061
Location
Ludington, MI
Jeff,
I think you are on the right track for inlay. It's hard to tell from the photos if you have cut a fine line along the inlay or if it is just a gap. From what I can see you need to stone/sand the gold better to make it flush. There are many ways to do inlays and perhaps others will give advice but I use about the same method as you are using. Just make sure you have enough gold to fill the line but not so much that you are wasting a great deal. Also I can see you might had issues with the punch you were using denting the metal. I like to use brass but others just use a steel punch carefully.
 
Last edited:

Sam

Chief Administrator & Benevolent Dictator
Staff member
Joined
Nov 6, 2006
Messages
10,491
Location
Covington, Louisiana
Yes, you have to be extremely careful when driving in the gold wire. A misplaced punch followed by a dent can add a LOT of unnecessary repair time to a job.

For basic wire borders, the depth of the channel you cut should be about half the diameter of the gold you're inlaying. Your wire should fit tightly side-to-side with about 50% above the surface of the metal. If your undercuts and channel aren't too deep, this will give you plenty to drive in and stone off, resulting in a nice, smooth border.

When you end up with bad spots (and it happens to ALL of us), you must remove the gold from that area and inlay a new piece. Remember that when joining two pieces of gold, they must be driven down together. If you hammer one side all the way in and then join it with another piece, you have a relatively good chance of ending up with bad spot. Bringing them down together will result in an invisible joint as the two pieces cold-weld together. / ~Sam

p.s. be sure to texture the surface of your punch. I tap mine on a fine file several times. A textured punch will drive the gold downward into the channel. A smooth faced punch tends to spread the gold out on the surface more than into the channel. If you're using a brass punch, check it often to be sure the face is not getting burnished and smooth.
 

FANCYGUN

~ Elite 1000 Member ~
Joined
Nov 10, 2006
Messages
1,842
Location
West Grove, PA
Jeff
I normally don't cut my line with a 90. I prefer a onglette as it cuts deeper in proportion to the width for my inlay line. Depending on if it is a straight or curved line I may dress it out with a flat graver and tooth the bottom or undercut with punches using the onglette cut line.
 

fegarex

~ Elite 1000 Member ~
Joined
Nov 8, 2006
Messages
2,061
Location
Ludington, MI
To add to what Sam said about texturing punches, it really works well. You can actually "walk" the wire if needed. You can push the wire forward while inlaying and fill in any minor gaps as you go.
You didn't mention if you are doing this by hand or with air assist. I now use my punches in my Gravermach instead of by hand. It really works great and much faster. A hammer works fine however.
 

John B.

Lifetime Pledge Member
::::Pledge Member::::
Joined
Nov 9, 2006
Messages
3,956
Location
Los Angeles area, California.
Like Marty, I use an onglette for a first light cut.
Then slightly round off the heel of this graver and make a second pass.
Much easier to maintain an even width of line than using a V graver.
And I notice you have some issues with line width.
All this said, very nice early effort. We're a bunch of nit pickers.
Try some other tool choices and find out what works best for you.

Regards and thank you for posting your fine effort.
John B.
 

jetta77

Elite Cafe Member
Joined
Jul 19, 2008
Messages
621
Location
St. George Ut
Excellent recomendations guys. I do need to texture my punch face, and also one mistake I made was to hammer one end of the wire down completely and then start a new one which doesn't work all that great, the gold just won't fuse. I'll give it another go and hopefully this time I'll get gold in all around.
Thanks guys.
Jeff
 

Latest posts

Sponsors

Top